Creating a PowerShell module allows you to group related functionality into a distributable package. The most common items included in a PowerShell module are functions, variables, and cmdlets but you can also include PowerShell drives or aliases among others. This article will walk through the steps involved in creating a custom module and exposing it’s functionality inside a JAMS Workflow.
First, you need to create a directory for our module in a location where PowerShell will recognize it. For this example create it in the %UserProfile%\Documents\WindowsPowerShell\Modules\ directory.
 |
PowerShell checks the paths specified within the $env:PSModulePath environment variable to determine available modules. If you create your module in another location you will need to add the path to this environment variable. |
Within this directory create a new folder called “CustomJAMSModule” and note that the name of the folder must be the same as the module you are creating. Next, add the items to this directory that will make up the module. Start a new PowerShell ISE session where you will create a Script Module file that will contain the functions that the module will expose.
Copy the following three functions into your PowerShell ISE session:
| Script Module File |
Copy Code
|
|---|---|
<# .SYNOPSIS Gets Jobs in the schedule that were submitted by the specified user. A Job name mask can also be specified. #> Function Get-JobsBySubmitter([string] $userName = "*", [string] $jobName= "*"){ Get-JAMSEntry -Name $jobName | ?{$_.SubmittedBy -Like "$userName"} } <# .SYNOPSIS Gets Jobs in the schedule that are running in the specified batch queue. A Job name mask can also be specified. #> Function Get-JobsByQueue([string] $queueName = "*", [string] $jobName= "*"){ Get-JAMSEntry -Name $jobName | ?{$_.BatchQueueName -Like "$queueName"} } <# .SYNOPSIS Gets Jobs in the schedule that are running in the specified Agent node. A Job name mask can also be specified. #> Function Get-JobsByAgent([string] $agentName = "*", [string] $jobName= "*"){ Get-JAMSEntry -Name $jobName | ?{$_.NodeName -Like "$agentName"} } |
|
Next, save this script within your module directory with the name: CustomJAMSModule.psm1. Note that the filename must match the name of the module directory and must have a .psm1 extension. At this point you now have a simple module which can be imported into a PowerShell session and be utilized inside a JAMS workflow Job. It is a good idea to import this module inside a PowerShell profile so that it will be available in JAMS Jobs and interactive PowerShell sessions. For details on importing a PowerShell module see Microsoft’s article on the Import-Module cmdlet.
|
You can also create a manifest file for your module via the New-ModuleManifest cmdlet . A manifest file contains author information as well as details about the contents of the module. |
Exposing a PowerShell Module Inside a Workflow Job
This section details the steps involved in exposing the functionality of an existing PowerShell module inside a JAMS workflow Job. The following steps will reference the module created in the previous section, however JAMS’ extensible architecture allows for any module to be supported.
First, navigate to your JAMS Client directory which is located in your JAMS installation folder: “X:\Program Files\MVPSI\JAMS\Client\”. JAMS loads workflow toolbox items by checking the Client directory for files that match the name WFToolbox*.config. Create a new text file called “WFToolBoxCustom.config” and open the file with notepad. Next, paste the following xml into the file:
| WFToolBoxCustom.config |
Copy Code
|
|---|---|
<?xml version="1.0" encoding="utf-8" ?> <WFToolboxConfig xmlns:xsi="http://www.w3.org/2001/XMLSchema-instance" xmlns:xsd="http://www.w3.org/2001/XMLSchema" xmlns="http://jams.mvpsi.com/v1"> <Categories> <!-- Define a Toolbox Category that specifies a PowerShell module --> <ToolboxCategoryConfig Name="PS Module Activities" PSModuleName="CustomJAMSModule"> </ToolboxCategoryConfig> </Categories> </WFToolboxConfig> |
|
This xml tells JAMS to add a toolbox category called “PS Module Activities” that will populate its activities based on the functions and commands defined within a module named “CustomJAMSModule”. Lastly, save the changes to this file while being sure that it has a .config extension.
|
You should always create a custom config file for the workflow activities that you create since the default config file “WFToolbox.config” is overwritten during JAMS upgrades. |
Start the JAMS Client and open a Workflow Job definition. You will notice that the Toolbox contains the new category along with an activity for each of the functions within the module.
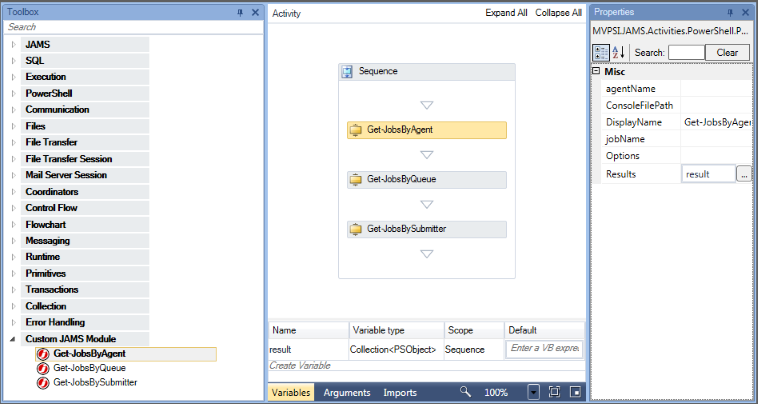
You can treat these items like any other workflow activity by dragging them onto the designer. The property editor will automatically populate any parameters that the function expects. Furthermore, you can capture the output from these activities through the “results” property.
|
The PowerShell module must exist on the machine where the Workflow Job will run. Additionally, the module must be imported either in the user’s profile that runs the Job or by another means. |
In summary, any PowerShell module can be utilized within a JAMS workflow Job to create drag-and-drop functionality. This feature makes it simple to take advantage of PowerShell’s capabilities without the need to write raw PowerShell source in your workflows.