Banner in JAMS
Introduction
JAMS offers two robust and user-friendly integrations with Ellucian Banner. The V2 Banner Procedure option comes with updates to the Execution Method to support direct integration with the Banner Oracle database, while the V1 Banner option may still be configured if desired.
Both Banner integrations allows JAMS users to take advantage of Banner’s core functionality such as registration, grade distribution, human resource information, financial aid processing, and other financial information.
When the adapter runs, it initiates communication with the Banner application server and instructs executing Banner Jobs as configured in JAMS. The process can then be monitored, canceled, and restarted in either Banner or JAMS.
Advanced Queues
JAMS now supports Advanced Queues in Banner. No configuration is needed within JAMS for Advanced Queues because it is self-contained within the Banner Package. If Advanced Queuing is detected and enabled, JAMS uses Advanced Queues. If Advanced Queuing is not enabled, dbms pipes are used.
Setting up the V2 Banner Procedure Integration
Load the Banner Integration Pack
You can load the Banner Integration Pack by using the JAMS installer.
- Run the JAMS installer.
- Follow the prompts until you see the Integration Packs page.
- Select the Banner Integration Pack.
- Click Next.
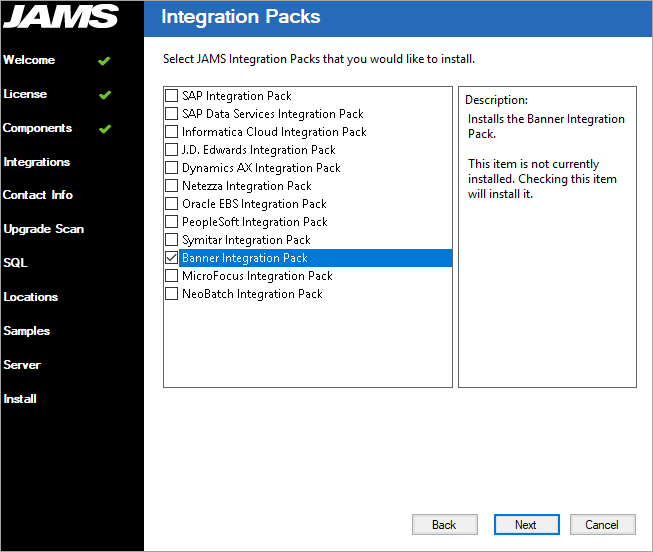
- Follow the remaining prompts in the installer to complete the installation.
If needed, you can run the LOAD/ASSEMBLY=JAMSBannerIntegration command in JAMSDBA to reset the Execution Methods back to their default states, if you selected the Banner Integration Pack during install.
-
Go to <JAMS Install Folder>\MVPSI\JAMS\Scheduler.
-
Right-click JAMSDBA.exe and select Run as administrator.
-
At the JAMSDBA prompt, run the LOAD/ASSEMBLY=JAMSBannerIntegration command.
Install the JAMS Oracle Integration the JAMS Server
After the Banner Integration Pack is installed, install the JAMS Oracle Integration.
It is recommended that you create a maintenance window if you are doing this during normal business hours due to restarting the JAMS Scheduler and JAMS Server services.
- In the JAMSDBA, run the LOAD/ASSEMBLY=JAMSOracleIntegration command.

- Verify the following screen is displayed after the assembly loads.

- On the JAMS Scheduler, open the Windows Services application.
-
Click the JAMS Scheduler service and click Restart.
-
Click the JAMS Server service and click Restart.
Install the Oracle Stored Procedure on the Banner Database
- Log in to the Banner Oracle database as "baninst1".
- Compile the custom package Z_HS_JAMS_JOBUTIL. The package is located on the JAMS Scheduler in the <JAMS Install Folder>\MVPSI\JAMS\Integrations\Banner directory.
NOTE: The package contains functions and procedures for running Ellucian Banner Jobs through the JAMS Scheduler. Refer to the package definitions for additional details.
- Create a public synonym for the package by running the command below.
CREATE PUBLIC SYNONYM Z_HS_JAMS_JOBUTIL FOR BANINST1.Z_HS_JAMS_JOBUTIL;
- Create a custom role to be assigned to the database user that will be used by JAMS by running the command below.
CREATE ROLE HS_JAMS_ROLE;
- Add the required grants to the role by running the commands below.
GRANT EXECUTE ON Z_HS_JAMS_JOBUTIL TO HS_JAMS_ROLE;
GRANT SELECT,INSERT,UPDATE ON GJBPRUN TO HS_JAMS_ROLE; - Create a database user that will be used by JAMS by running the commands below. Replace <password> with a valid password for the database user.
CREATE USER JAMSADMIN IDENTIFIED BY <password>;
GRANT CREATE SESSION TO JAMSADMIN;
GRANT HS_JAMS_ROLE TO JAMSADMIN;
Creating a JAMS Connection to the Banner Oracle Database
This option is available only if the Oracle Integration has been installed. See Connections for Integrations for more information.
Creating a Banner Procedure Job in JAMS
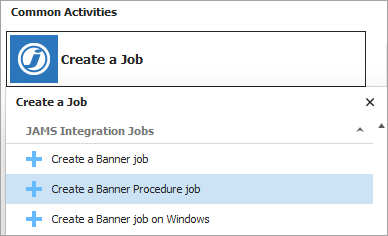
- On the Home screen, click Create a Job.
- Select JAMS Integration Jobs.
- Select Create a Banner Procedure job. If you do not see the Jobs as shown below, close JAMS, install the Integration Pack again, and reopen JAMS.
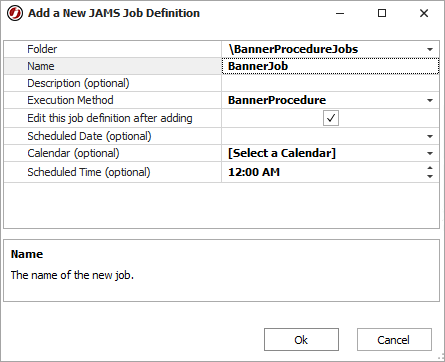
- On the Add a New JAMS Job Definition dialog, do the following:
- In the Folder field, select the Folder where the Job will be saved.
- In the Name field, enter a name for the Banner Job.
- Click OK. The Banner Job is created. The Source tab is displayed.
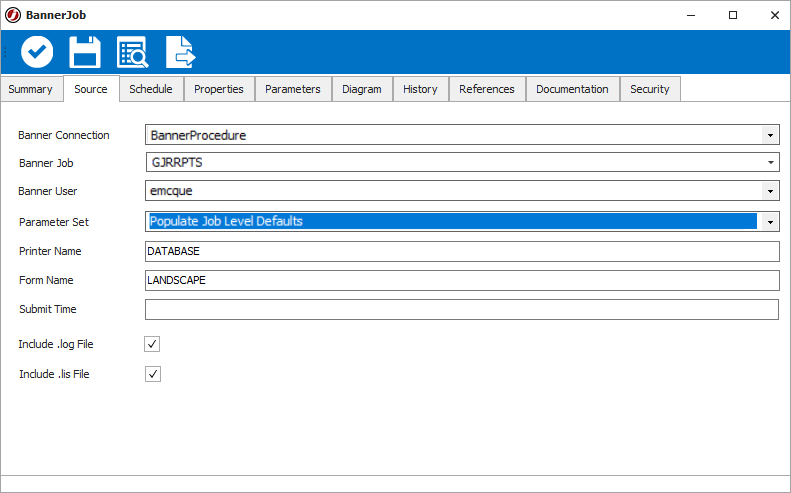
- On the Source tab of the Job, do the following:
- In the Banner Connection field, select your Banner Connection that was created in the Connection Store.
- In the Banner Job field, view the list of the available Jobs in Banner.
- In the Banner User field, select a JAMS Credential for the Banner user.
- In the Parameter Set field, select the Parameter Set that will be used when executing the Job. The Parameter Set will populate the Parameter tab within the JAMS Job.
- Review the Include .log File and Include .lis File check boxes. If there is sensitive information within the .log and .lis files and you do not want them in the JAMS Job log file, clear the check boxes for these two options.NOTE: If multiple .log and .lis files are used in a Banner Job, they can be displayed in the JAMS Entry Log. If you do not see this information in the JAMS Log, increase the Log File Polling Interval value on the Properties tab to a value that slightly exceeds the expected run time of the Job. The default value is 30 seconds.NOTE: If Banner Credentials have not yet been saved in JAMS, save them by clicking the Credentials Shortcut within the JAMS Shortcut menu in the JAMS Client. When adding the Banner Credential in JAMS, ensure the Display Name and Logon Name are the actual Banner user name. If a proxy user is used to submit Banner Jobs, the Logon Name should use the ‘[]’ format, such as [banproxy], to match the format used by the GURJOBS process.
- Click the Properties tab.
-
BannerProcedure Jobs need to run on the JAMS Scheduler server. This can be configured in the Properties tab by leaving the Agent field blank. If the default Agent inherited from the Folder is different than the JAMS Scheduler, select the JAMS Scheduler Server from the dropdown menu in the Agent field.
- Click the Save and Close button.
Banner Properties
There are additional properties that you can modify. Properties can be inherited from the Job Properties tab for the Banner Procedure Execution Method or set within the Banner Procedure Sequence Task or Job Definition. (In the Banner Procedure Job, you can hover your cursor over a property to view a tooltip that indicates if the property is inherited.)
The following properties are available in a Banner Procedure Sequence Task and Job Definition:
| Property | Description |
|---|---|
| Banner Connection | Sets the Connection Store for connecting to Banner. |
| Banner User | Sets the JAMS Credential for the Banner user. This Credential is used to run Jobs. |
| Printer Name | Sets the name of the printer to use. |
| Form Name | Sets the name of the Banner form. |
| Submit Time | Sets the submit time for the Banner Job. |
| Include .log file | Includes the contents of the .log file into the JAMS Entry Log. Multiple .log files can be included in the JAMS Log. |
| Include .lis file | Includes the contents of the .lis file into the JAMS Entry Log. Multiple .lis files can be included in the JAMS Log. |
| Log File Polling Interval | Sets the polling time for the Banner .log and .lis files. The default is 30 seconds. It is recommended that this value be set to a value that slightly exceeds the expected run time of the Job. |
| MIME Type | Sets the type of file used to format reports/output files. Select PDF or Plain Text. |
| Special Print | Sets the field that may be used to pass information to 3rd-party applications. |
| PDF Font | Sets the type of font to use for PDF reports. |
| PDF Font Size | Sets the size of the font to use for PDF reports. |
| Environment Type | Sets the type of environment for the Banner instance to either Unix or Windows. By default, this option is set to Unix. If the Oracle database instance is running on Windows rather than Unix, set this option to Windows. |
Submitting a Banner Procedure Job
- In the Shortcuts menu, click Definitions.
- Expand the folder containing the Banner Procedure Job.
- Right-click the Banner Procedure Job and select Submit.The Submit dialog is displayed. Any required parameters are also
marked and need to be updated before the Job will run.
NOTE: If the required parameters are not marked, reload the parameter sets/parameter from within Banner.
- Click Submit Run Request.
NOTE: If you cancel a Banner Job that is currently running, only the corresponding JAMS Job is canceled. The Job log file in JAMS displays a message indicating the Banner Job on the host may still be running. As a best practice, check the Job in Banner.
Setting up the V1 Banner Integration
- Install AgentX on the Banner application server. This Agent can be automatically deployed or manually installed, specifically where the gjajobs.shl is stored.
Use the links at the end of this topic to learn more about deploying JAMS Agents.
NOTE: If the Banner server is running Windows, you may deploy a JAMS Windows Agent to the Banner server. - From the JAMS Client, create a JAMS user that has permission to access the Banner application server and can also connect to the remote Linux server. This can also be the same user that was used to deploy the Agent.
- From the JAMS Client, select the Execution Methods Shortcut to access the list of available Execution Method options.
- Double-click the Banner Execution Method to open its properties.
- Select the Template tab.
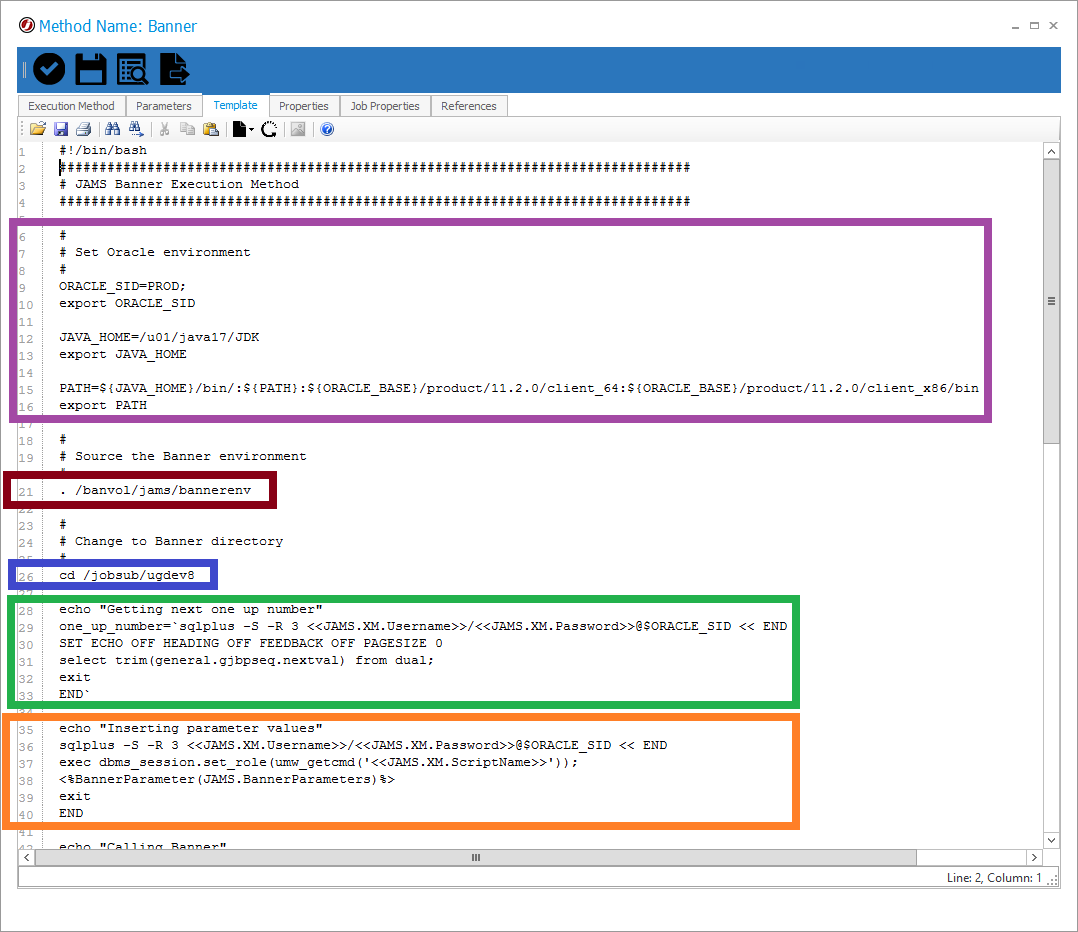
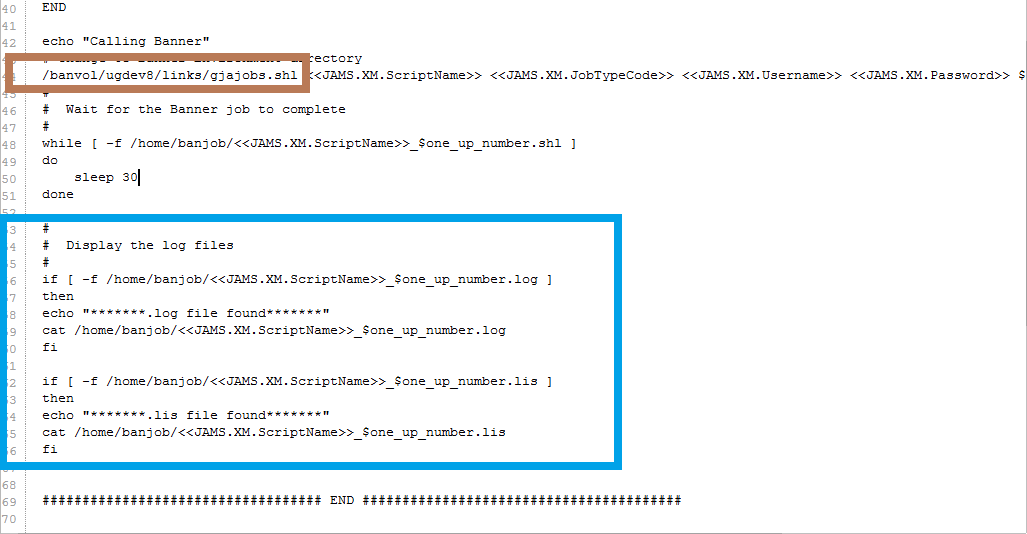
- Customize the template settings in the areas shown in the following screenshots.
Line 6 through 16- Set the source options for Oracle and Java.
Line 21 - Source the Banner environment.
Line 26 - Change the value to the Banner directory.
Line 28 through 33 - This section is used to increment the Banner One-Up-Number. This section should not need to be changed.
Line 35 through 40 -This section ensures the Parameters on the JAMS Job are passed to the Banner server. This section should not need to be changed.
Line 44 - Ensure gjajobs.shl is referenced properly. You may need to SSH into the Banner server and manually confirm this information.
Line 53 through 66 - This section pulls the .lis and .log files from Banner. This section should not need to be changed.
 NOTE: The Banner Environment may also be set using a bash profile (source ~/.bash_profile) if the Banner environment variables have been set on the default bash profile.NOTE: The Banner directory and the directory containing the gjajobs.shl need to be configured.NOTE: If sensitive data would be included in the Banner .log and .lis files, you may want to create a copy of the Banner Execution Method, and then remove the logging options from the copy's template. This new Banner Execution Method could be used in situations where Banner writes sensitive data to the Banner output files.
 - Make sure that any folder containing a JAMS Banner Job (including sub-folders) includes a path to the Banner Macro. This path must be populated in the Folders Properties (Properties -> Source Options -> Template Library).
By default, this path is C:\Program Files\MVPSI\JAMS\Scheduler\BannerMacros.xml
- With the configuration complete, create a new JAMS Job and select the Banner Execution Method in the Job Definition dialog.
- On the Job Definition Source page, set the Banner User, select a Job Type from the list, and then enter the Job Name.
NOTE: The Job name should not include the folder path or the .shl extension. The Job name in JAMS must be in the same case as what is stored on the Banner server.
- Double-click the newly completed JAMS Job to access its properties.
- Click the Properties tab and go to the Submit Options section.
- Edit the Job by selecting the Execute As and Agent properties. The Execute As should be a UNIX account with access to JAMS AgentX.
Banner Parameters
Banner parameters always have an associated number, as seen in the left side of the example below.

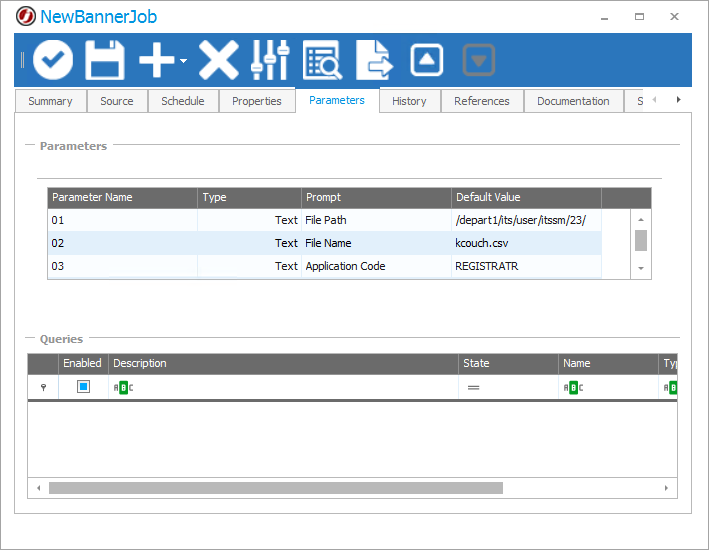
To pass parameters from JAMS to Banner, create JAMS Parameters with names that match the Banner parameter numbers on the given Job. Set the default value of the JAMS Parameter to what the value would be in Banner. Finally, you may set the Parameter Prompt in JAMS to match the Banner parameter name.
The example below shows how the above Banner Parameters would look when set on a JAMS Job:
You may also specify multiple values for a single parameter by separating the values with pipe characters "|".
For example, if parameter 01 had a value of
|Val1|Val2|Val3|JAMS would send the following to Banner:
01 = Val1
01 = Val2
01 = Val3
V2 Banner Parameter 88
The Parameter 88 setup was updated with the V2 Banner Integration to resemble other Banner parameters.
For example, a value of |One,Federal|Two,Grant is passed to Banner as the following:
88 = |One,Federal|Two,Grant|
You can define the parameter as 88 and then the value will contain a | delimited name,value pair.
V1 Banner Parameter 88
Parameter 88 is special as it can include a "label" before each value. JAMS removes the value and then inserts it into the 88 parameter. A value of “This,That” is passed to Banner as "88This = That".
For example, a value of |One,Federal|Two,Grant is passed to Banner as the following:
88One = Federal
88Two = Grant
You can also define the parameter as "88This" and then the value only needs to contain "That".