JAMS Installation Guide
The JAMS environment incorporates several key components that work together to create a unique and powerful scheduling system.
JAMS Desktop Client
The JAMS Desktop Client provides the primary user controls for JAMS and includes:
- Windows-based GUI (JAMS Client)
- PowerShell Cmdlets
- JAMS PowerShell provider
- .NET-based Class Library
- JAMS.exe command line tool
JAMS Scheduler for Windows
This is essentially the heart of the JAMS system. The scheduler provides background services that maintain, schedule and execute JAMS Jobs.
JAMS Scheduler Services Installation
JAMS Scheduler installation also contains other important JAMS components, including:
- JAMS Scheduler Services
- JAMS Server Services
- JAMS Executor Services
JAMS Agents
There are many different Agents available for JAMS, each designed and configured for a specific platform and purpose. See Agents in JAMS for more information.
JAMS Web Client / REST API
Optional. Installing the JAMS Web Client allows you to run and manage the automation environment from any web-connected device. If you do not install the JAMS Web Client during the initial install of JAMS, you can install the Web Client at a later time. See Installing the JAMS Web Client for more information.
JAMS Desktop Client Installation Components
The JAMS Desktop Client installation includes the following items:
- A Start Menu shortcut to JAMSWin.exe
- The JAMSShr.dll Class Library
- The JAMS PowerShell Modules (PowerShell must be installed before you install JAMS)
- The JAMS.exe command line tool
- JAMS Help files
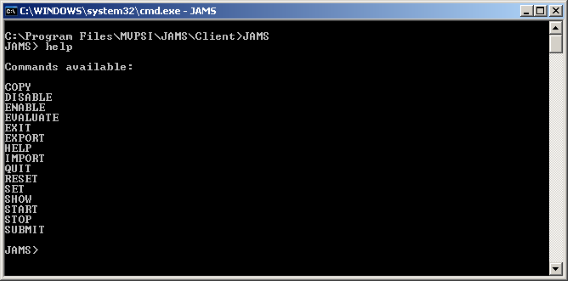
JAMS Command Line Environment
In addition to the JAMS Client, the JAMS PowerShell Modules, and the .NET Controls, JAMS offers a command line interpreter to manage your scheduling environment. When the JAMS Desktop Client is installed, it also includes a command line tool (JAMS.EXE).
- Start JAMS.EXE from the command line to see the JAMS> prompt. This establishes the connection to the JAMS Server.
- Type HELP to view all the supporting commands.
- Type HELP COMMAND to get additional assistance for a command, such as HELP EXPORT JOB.
System Requirements
| JAMS Scheduler | JAMS Agent | JAMS Client | |
|---|---|---|---|
| Software Prerequisites |
|
|
|
| Hardware Server (minimum) |
|
|
|
| Hardware Server (50,000 to 100,000 Jobs per Day) |
|
|
|
| Hardware Server (>100,000 jobs per day) |
|
|
|
Permissions
To install JAMS, ensure that the user performing the installation is logged in as an account with administrator privileges to the server where JAMS will be installed. In addition, the account performing the install must have the ability to create a database on the database server. JAMS creates the database locally by default.
Prerequisites
Before installing JAMS, review the prerequisite software and minimum hardware requirements. The JAMS installer checks for and installs all prerequisites.
.NET Framework
The JAMS Client, JAMS Scheduler, and JAMS Windows Agent require .NET Framework 4.8. If it is not installed, the installer displays a message and attempts to install the correct version.
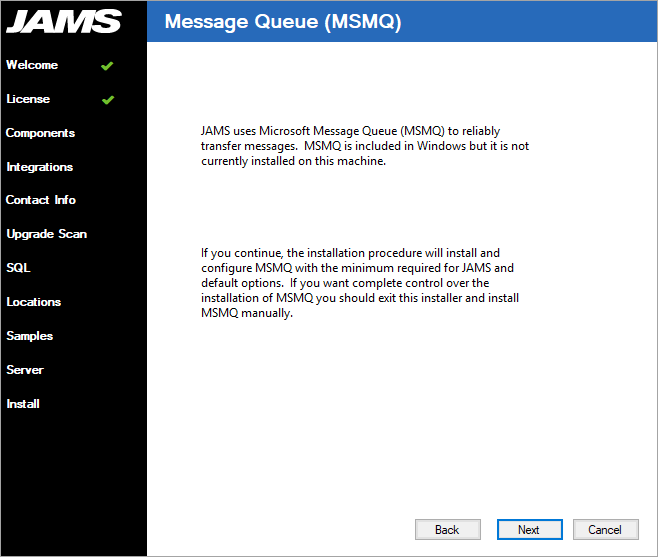
Microsoft Message Queue (MSMQ)
The JAMS Scheduler requires the Microsoft Message Queue (MSMQ). When installing the JAMS Scheduler, the installer checks for the MSMQ and, if it's not installed, will prompt you to install it. For more information, see the MSMQ section in this topic.
Microsoft SQL Server
The JAMS Scheduler requires Microsoft SQL Server 2019, 2017, 2016, or 2014. The SQL Server does not need to be installed on the same machine as the JAMS Scheduler. The database is fully supported in a clustered configuration.
If you or your DBA choose to install the JAMS Scheduler component, the installer first checks for a connection to an SQL Server. If SQL Server is it not installed locally, the installer prompts you to install the SQL Server 2019 Express Edition.
You also have the option of using SQL Server on a different machine. When the installer checks for the SQL Server, it only looks for the default instance names of MSSQLSERVER and SQLEXPRESS. If you have a different instance preference, decline the SQL Express installation (clear the check box) and specify your preferred instance in the SQL Server\Instance field.
To run SSISDirect Execution Method Jobs, the Client Tools Backwards Compatibility and Client Tools SDK Shared Features are required. If you see an error message indicating an Invalid Class Exception while editing an SSISDirect Job, ensure the latest SQL Server Management Studio is installed.
PowerShell 3.0 or newer
The JAMS Client component includes a JAMS PowerShell Module that contains JAMS cmdlets and a JAMS Provider. PowerShell is not required, but you must install PowerShell before installing JAMS to use the JAMS PowerShell Module. If you install PowerShell after installing the JAMS Desktop Client, reinstall the JAMS Desktop Client to access the JAMS PowerShell Module.
Hardware Server Specifications for the JAMS Scheduler
- Processor: ~2.5 GHZ (x86 or x64)
- Memory: 8 GB
- Disk Space: 10 GB, in addition to the disk space required by the OS.
These are the minimum system requirements that can support running thousands of jobs per day. Heavy loads, for example, over 100,000 jobs per day, require more resources.
For database planning, the JAMS test lab runs approximately 1,000 jobs per day using one instance of JAMS. Retaining 30 days of information generates a database approximately 110 Mb in size.
For Sites Running Over 100,000 Jobs per Day
Based on customer implementations where more than 100,000 jobs are executed each day, the JAMS installation should include:
- Two Windows servers, each with Dual Quad 2.0 GHz CPUs and 32 GB of RAM (or more).
- Specifically, one of the above servers hosting the JAMS Scheduler and the second server reserved for the SQL Server with multiple high-speed SCSI drives.
Hardware Server Specs for JAMS Agents
- Processor: 1 GHZ (x86 or x64)
- Memory: 1 GB
- Disk Space: 75 MB
Hardware Server Specs for the JAMS Client
- Processor: 1 GHZ (x86 or x64)
- Memory: 1 GB
- Disk Space: 300 MB
Supporting JAMS in a Virtual Environment
HelpSystems supports customers running JAMS on any supported operating system in a virtualized environment, such as VMware and HyperV.
Installing JAMS
Follow the steps below to install JAMS on a Windows computer.
- Log on to Windows using an account with administrator privileges and the ability to create the JAMS Database in SQL Server. (Typically, using an account with dbcreator or sysadmin rights in SQL Server provides the necessary permissions.)
NOTE: Users must also be able to create a database on the database server. The default database server is the local machine.
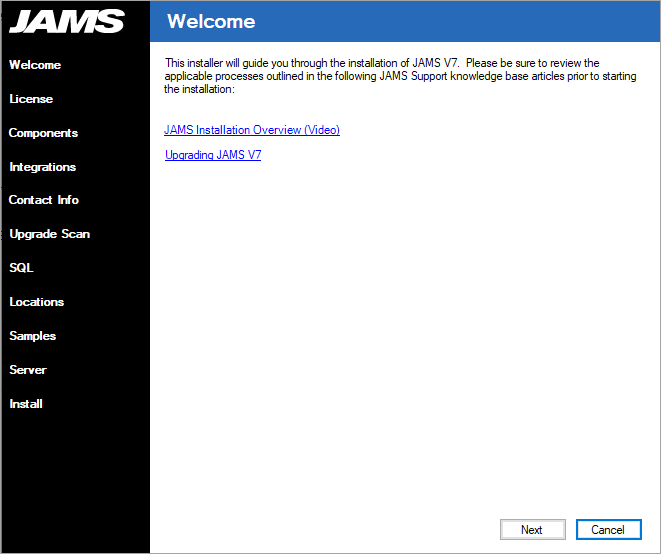
- Right-click the SetupJAMS executable and select Run as Administrator to start the JAMS installer.
- On the Welcome page, verify this installation is the proper edition and version.
- Click Next.
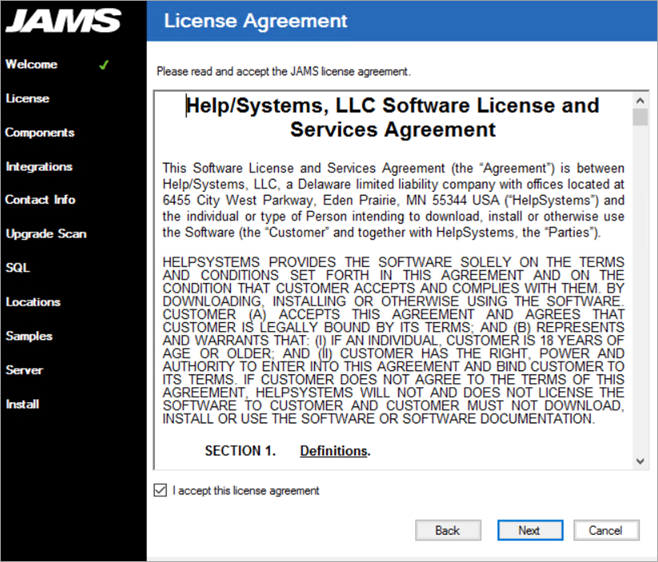
- On the License Agreement page, review the JAMS license agreement.
- Select the checkbox next to I accept this license agreement.
- Click Next.
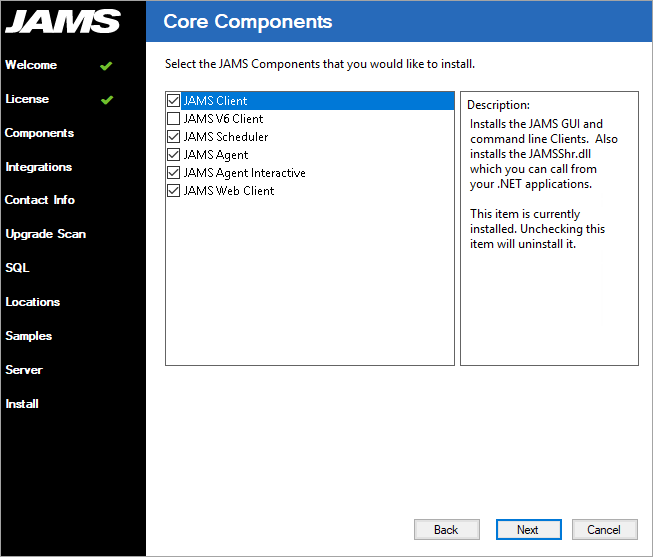
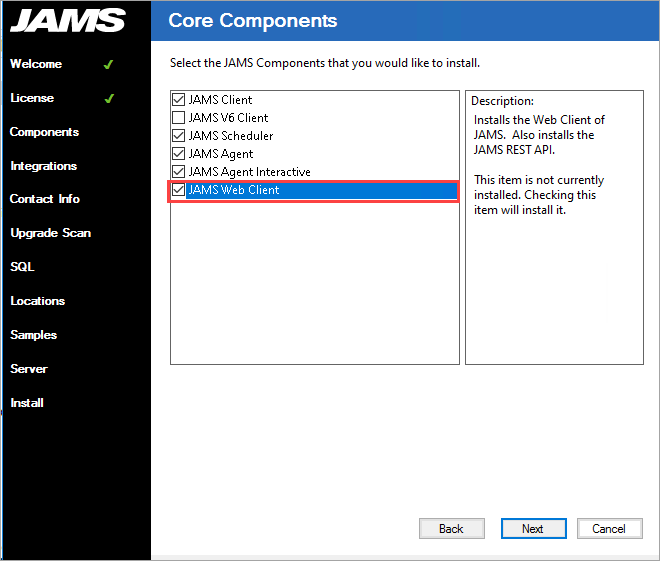
- On the Core Components page, select the JAMS Components to install. If this is a new installation where no JAMS Scheduler exists, the JAMS Client and JAMS Scheduler should be installed.
- Click Next.
- On the Message Queue (MSMQ) page, view the message regarding installing MSMQ.
- Click Next.
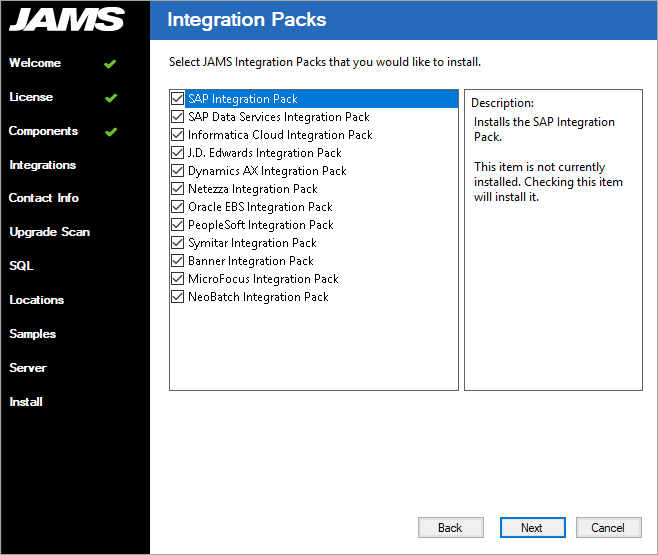
- On the Integration Packs page, select the packs to install, if needed. Note that Integration Packs are not required to install JAMS.
- Click Next.
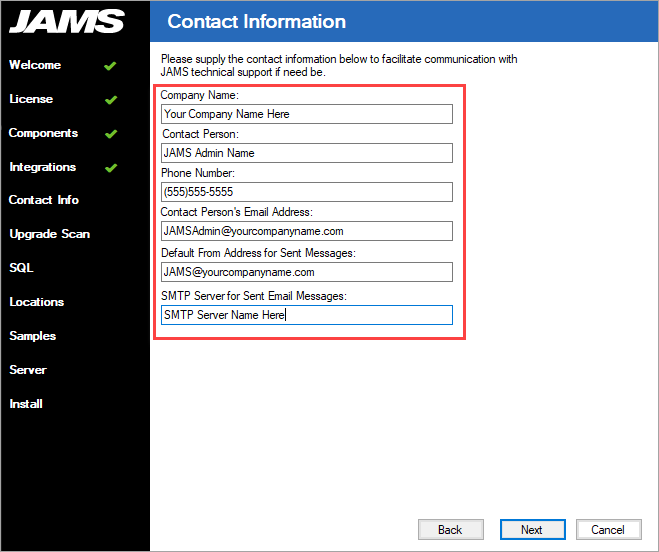
- On the Contact Information step, enter the information that will be used when working with Technical Support.
Completing this page is optional but entering accurate information can help Technical Support improve its support capabilities. If you are unsure about the information, leave it blank and enter it at a later date. - Click Next.
NOTE: The installer includes an Upgrade Scan page to review the installation prior to upgrading from a previous version of JAMS. For a new installation of JAMS, the installer skips this step and displays the SQL page.
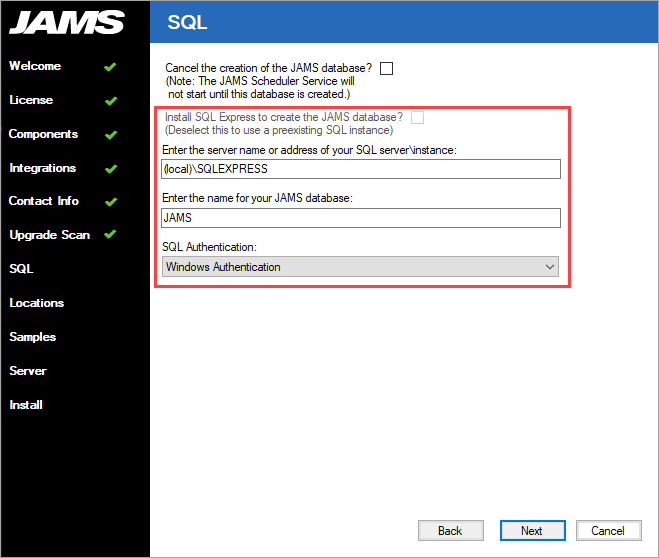
- On the SQL page, select or clear the check box to install SQL Express locally to create the JAMS Database. If another SQL Instance will be used, do not select the check box. (The check box is disabled if SQL Express is already installed.)
NOTE: The JAMS Installer will create the database, unless specified otherwise. The Database should always be created by JAMS. If the Database was not created during the initial installation, you can manually start the JAMS Database Creation Wizard. See Creating the JAMS Database for more information.
- Enter the information to create the JAMS Database as well as the authentication method used to connect to it.
NOTE: Windows Authentication uses the Machine Account to connect to SQL Server after the initial install. The user performing the install needs to also have dbcreator rights for the JAMS Database to be created. The rights can be removed after the install is completed and the database is created.
If you select SQL Server Authentication, JAMS connects to SQL with these credentials. The credentials are saved in the Common.config file located at C:\Program Files\MVPSI\JAMS\Scheduler.
NOTE: (The credentials will be visible to anyone that has access to this file.) - Click Next.
 NOTE: The JAMS Scheduler Service will not start until the JAMS Database is created.NOTE: Users should NEVER attempt to manually create the JAMS Database.
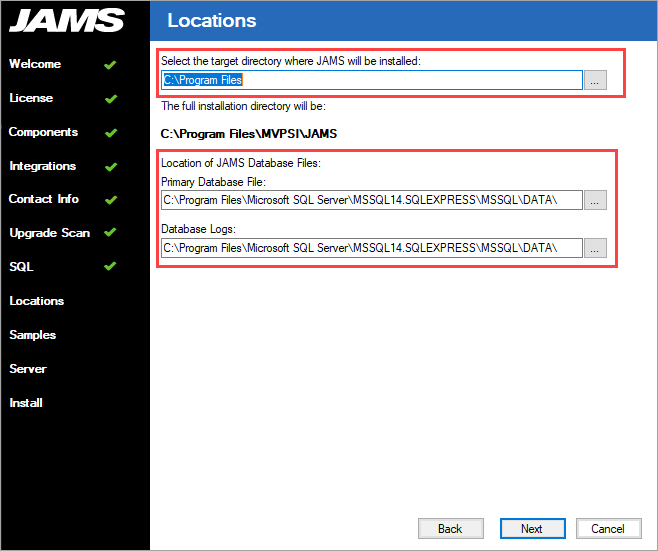
 - On the Locations page, accept or change the target directory where JAMS will be installed. The location for the JAMS Database files is a location on the SQL Server. If you change the location, verify the new location exists.
- Click Next.
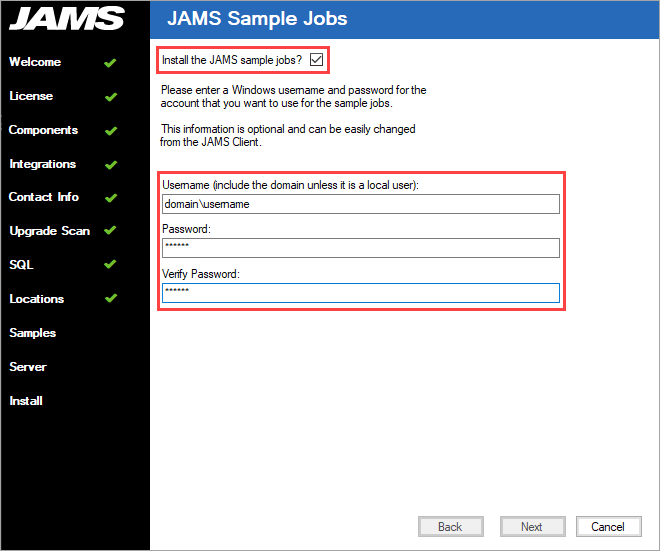
- On the JAMS Sample Jobs page, select or clear the check box to install sample jobs.
- If you select to install the sample jobs, define a JAMS user to run the sample jobs.
NOTE: To run jobs in JAMS, an Execute As user must be specified.
- Click Next.
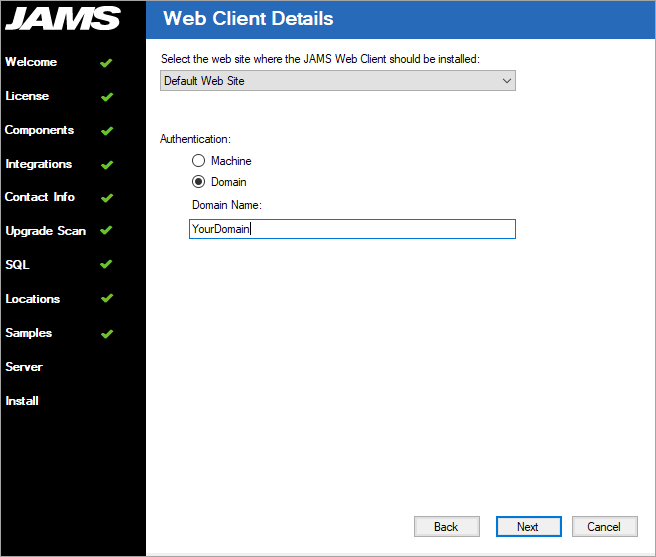
- On the Web Client Details page, select where the JAMS Web Client should be installed. (This page is displayed only if the JAMS Web Client was selected on the Core Components page.)
- Click Next. The installation begins.
- View the progress of the installation. You may also see a progress bar displaying the SQL Express installation, if you selected to install it in a previous step.
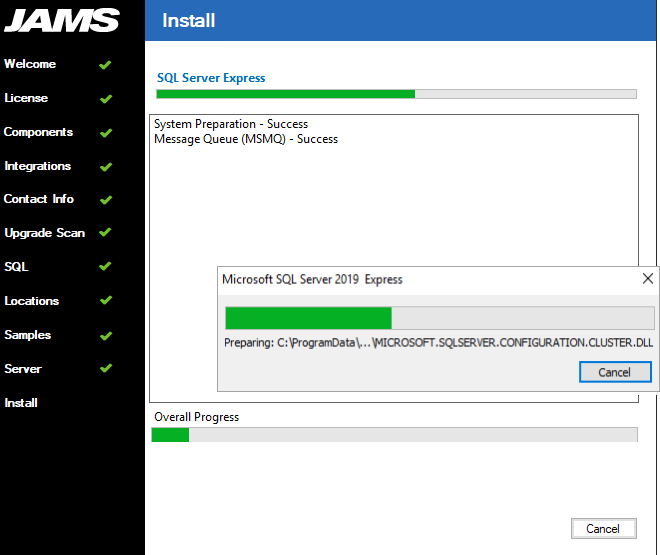
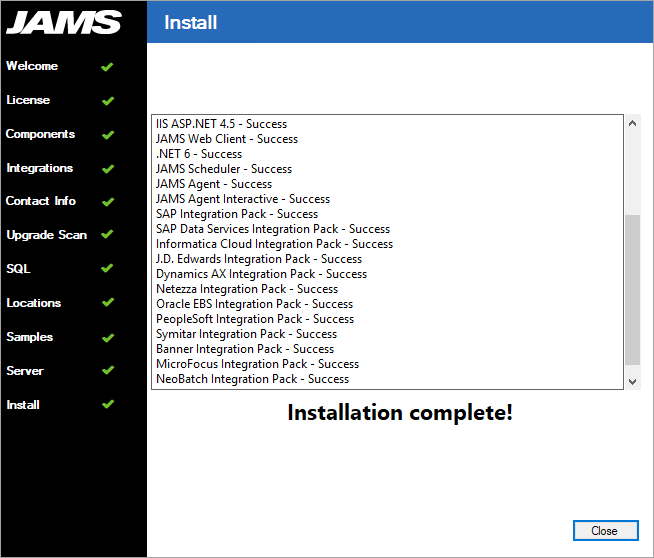
- On the Install page, click Close after the installation is completed.
Applying the JAMS License
JAMS licenses are sent out as XML files. To apply a JAMS license, copy the license key file(s) into the C:\Program Files\MVPSI\JAMS\Scheduler directory. No other actions should be necessary.
If a license is properly placed in the C:\Program Files\MVPSI\JAMS\Scheduler> directory and it is not recognized, the license file may be blocked by the File Blocking feature in Windows. To check the status and unblock files:
- Right-click the license file and select Properties.
- In the Properties dialog, ensure the General tab is selected.
- Check the lower right corner to see if an Unblock button is displayed. If it is displayed, the file is blocked. Otherwise, the file is not blocked.
- Click Unblock.
- Click OK or Apply to save the changes.
If the license file is not recognized and is not blocked, restart the JAMS Scheduler Service:
- Close the JAMS Client.
- Open Windows Services on the JAMS Server.
- Restart the JAMS Scheduler Service.
- Open the JAMS Client. The license should be recognized. If problems persist, contact Technical Support.
For more information about the JAMS license, see Licenses in JAMS.
Creating the JAMS Database (If Not Selected During Install)
The JAMS Installer will create the JAMS Database, unless you specify otherwise. The Database should always be created by JAMS. If it was not created during the initial installation, you can manually start the JAMS Database Creation Wizard to create the JAMS Database.
Starting the JAMS Database Creation Wizard
To install the JAMS Database after JAMS has been installed, do the following:
- Go to the JAMS Scheduler default directory (C:\Program Files\MVPSI\JAMS\Scheduler).
- Right-click JAMSDBA.exe and select Run as administrator.
- If the Common.config file exists in C:\Program Files\MVPSI\JAMS\Scheduler, delete it.
- In the JAMSDBA> prompt, enter Install and press Enter.
- Follow the prompts in the wizard to create the database.
Installing the JAMS Web Client/REST API (If Not Selected During Install)
If the JAMS Web Client was not installed during the initial installation of JAMS, you can install it by following the steps below. By default, it will be installed on the JAMS Server, but the JAMS Web Client can be installed on any Windows IIS Server.
Prerequisites
- JAMS V7.0 or higher
- Microsoft Windows Server 2022, 2019, 2016, or 2012R2
- .NET Framework 4.8
- IIS 8 or higher
- Edge, Chrome, or Firefox for the best experience
- If the REST API is installed on a separate server from the Scheduler, the following ports are required to be open on the Scheduler and Web Server:
- 4773 - Used to communicate from the Web Server to the Scheduler.
- 1801 - Used by the Web Server to communicate with the jamsrequests and jamsrequestssubmitcancel MSMQ queues on the Scheduler.
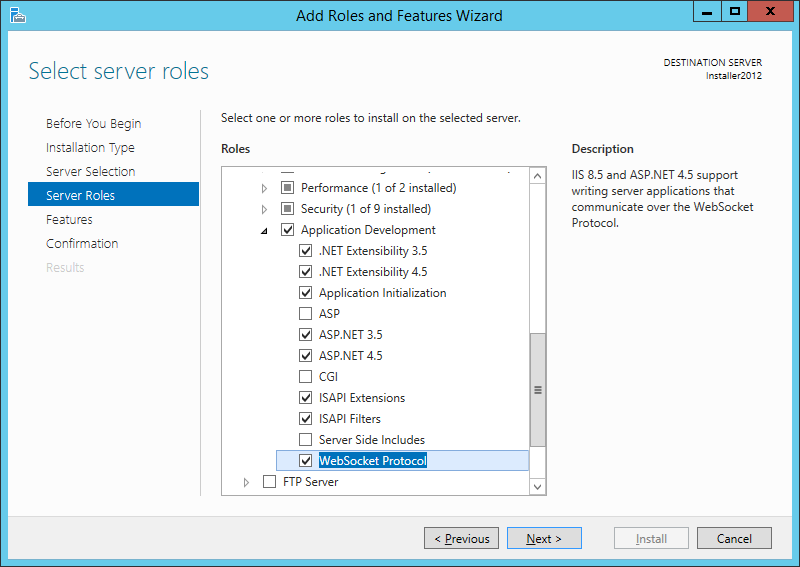
Installing IIS
The installer attempt to enable the roles and features shown below within JAMS if the user performing the install has administrator rights. When installing roles and features, it may be necessary to supply a path to the Windows Source files (SxS). If this is true, manually install the roles and features shown below before installing the JAMS Web Client.
- Enable the Web Server IIS Role.
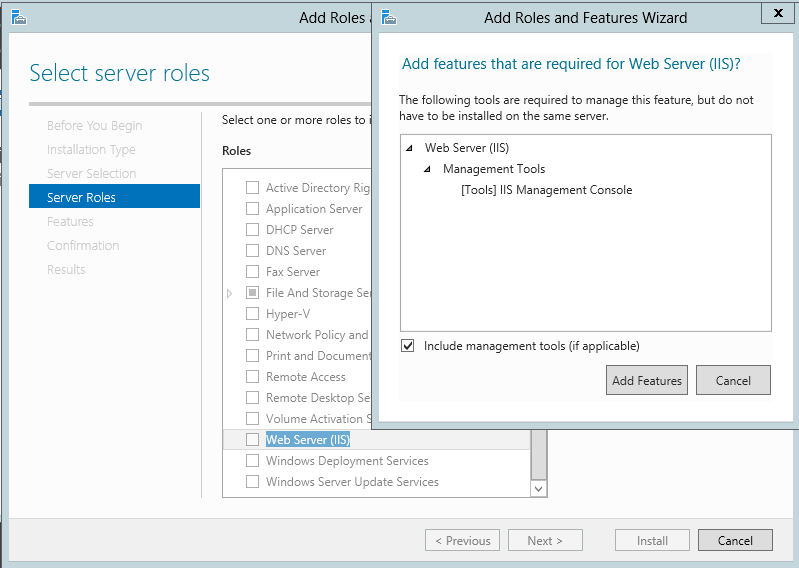
- Ensure the components listed below are enabled.
Installing the JAMS Web Client
- Run the JAMS installer.
- Follow the prompts until you see the Core Components page.
- On the Core Components page, ensure the JAMS Web Client component is selected.
IMPORTANT: If you install the JAMS Web Client on a server where the JAMS Scheduler has already been installed, do not clear any Components that are already selected. This will uninstall those Components. If you install the JAMS Web Client on a server where the JAMS Scheduler is not installed, select only the JAMS Web Client Component.
- Click Next.
- Follow the prompts until you see the Web Client Details page.
- On the Web Client Details page, select the web site where the JAMS Web Client should be installed. Default Web Site is the default.
- Click Next.
- Follow the remaining prompts to complete the installation.
After JAMS is installed, open the Common.config file for the JAMS Web Client from C:\Program Files\MVPSI\JAMS\WebClient\.
Edit the Common.config file as necessary for the environment.
- Verify the connection string value matches the desired server.
- If the JAMS Site is installed within a domain, set the ContextType value to Domain and ContextName value to the domain itself. (In the image below, the domain is "JAMS".)
- If the JAMS Site is not installed within a domain, set the ContextType value to Machine and ContextName value to the name of the machine.
- If the JAMS REST API/Web Client is installed on a different server than the JAMS Scheduler Server, set the SchedulerName value and SchedulerPort value accordingly.
If the Scheduler is not on another server, setting values for SchedulerName and SchedulerPort will cause issues.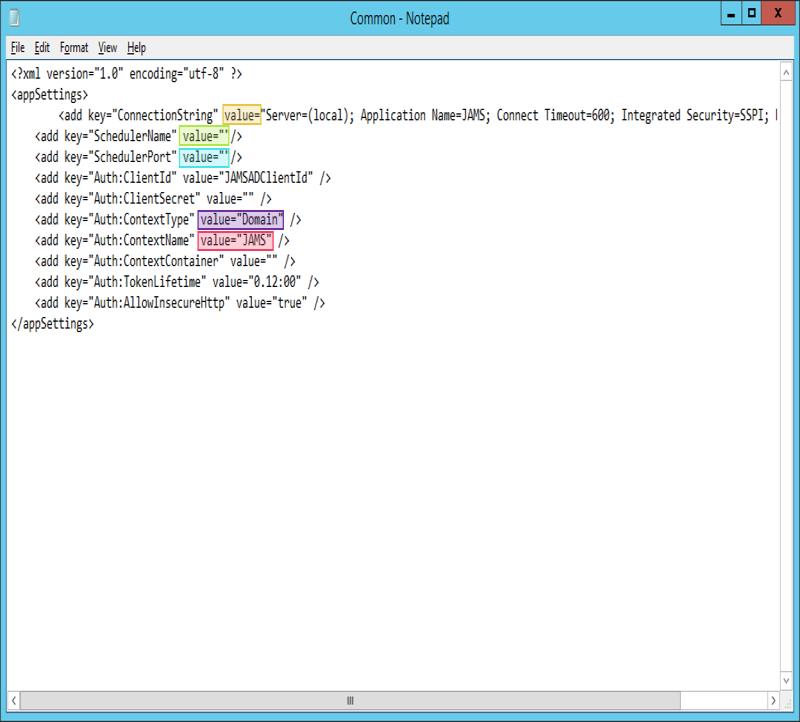
- If the JAMS REST API/Web Client is installed on a different server than the JAMS Scheduler Server AND a failover is not configured, add the key below to the Common.config file (C:\Program Files\MVPSI\JAMS\Scheduler\Common.config) on the JAMS Server. This opens port 4773, allowing the JAMS Web Client to communicate with the Scheduler. In an environment with a Failover configured, port 4773 will already be open. After configuring the JAMS Server Common.config file, restart the JAMS Server service.
<add key="EnableRemoteAccess" value="true" />
- If the JAMS REST API/Web Client is installed on a different server than the JAMS Scheduler Server, the JAMS fat client must be installed on the web server. The client can be downloaded here. The Web Server and Scheduler Server must be running the same version of the fat client.
- If the JAMS REST API/Web Client is installed on a different server than the JAMS Scheduler Server, users must grant the Web Server full permissions to the jamsrequests and jamsrequestssubmitcancel queue on the Scheduler Server. For more information on granting access to the MSMQ using the naming format MyWebServer$, see Granting Permissions to the MSMQ Service from a Secondary JAMS Scheduler.
- If the JAMS Web Client is configured for HTTPS (the default is HTTP), the following additional key must be added to the Common.config file, where JAMSServerName is the actual name of the JAMS Scheduler.
<add key="Auth:TokenUrl" value="https://JAMSServerName/JAMS/">
App Pool Settings
The user running the AppPool will be the user running the JAMS Services, which by default is LocalSystems.
If your JAMS Services are running as a domain account, it is also recommended to run the JAMSSiteAppPool as that same domain account.
Restart IIS services.
Documentation
The REST API includes built-in documentation displaying the endpoints and corresponding Headers that can be passed. There are two variants of Documentation that can be accessed based upon your preference:
After Installing JAMS
Here are some additional details you may need to know to continue using or evaluating JAMS.
Access Control
By default, NT AUTHORITY\Authenticated Users have full access to JAMS Objects in new installations. It is recommended to set up JAMS Security as described in JAMS Security: Setting Access Control Lists. However, to work with all JAMS functions, you must be part of the administrators group because administrators, by default, have full access into JAMS.
The Server ACL controls who may connect to a specific server. The administrators group retains full access while authenticated users have limited access. When you open the JAMS Client, you will not be in the administrators group. To open the JAMS Client with administrator rights, right-click the JAMS Client icon in the Windows Start menu and select Run as administrator. This gives you permissions to adjust the ACLs for other users.
Setting an Execute As User
For security purposes, JAMS will not run Jobs without an Execute As user defined. An Execute As user may be defined at the Job or Folder level. To allow all Jobs in the environment to run, users may set an Execute As user on the root folder.
To add the Execute As user:
- Go to the Properties tab of the Job or Folder definition.
- Click Add Property.
- Select Execute As from the property list.
- Click OK.
With the Execute As property added, users are able to select a JAMS Credential from the drop-down list. To create a Credential in JAMS, see JAMS Security: Working with User Credential Definitions for more information.
Adding a Server Definition
If you are running the JAMS Client on the same machine as the JAMS Scheduler, the JAMS Client can automatically locate the Scheduler. However, if the Scheduler is running on a different machine, you must include a server definition to tell the JAMS Client where to find the Scheduler.
To add a Server definition, click on Client Settings in the upper right corner of the JAMS Client and select Servers to open the JAMS Servers dialog.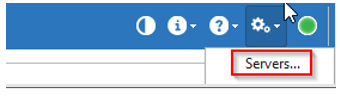
Installing JAMS Integration Packs
JAMS natively supports automation using many leading business applications. “Integration Packs” for these preferred applications are selected using a check box during the JAMS installation process. Once an Integration Pack for a product is enabled, you can create, manage, deploy and monitor almost any kind of JAMS Job using the following products:
- SAP Integration Pack
- SAP Data Services Integration Pack
- Informatica Cloud Integration Pack
- J.D. Edwards Integration Pack
- Dynamics AX Integration Pack
- Netezza Integration Pack
- Oracle EBS Integration Pack
- PeopleSoft Integration Pack
- Symitar Integration Pack
- Banner Integration Pack
- MicroFocus Integration Pack
- NeoBatch Integration Pack
The JAMSDBA Utility
The JAMSDBA.exe utility is used to manage the JAMS Database and to perform other installation and management tasks. JAMSDBA is a command line utility located in the Scheduler installation directory (C:\Program Files\MVPSI\JAMS\Scheduler by default).
When starting the JAMSDBA, you will see a JAMSDBA> prompt. You can enter the command you want to execute or enter HELP to access online help. You can also start JAMSDBA with a command appending the command you want to execute; for example:
JAMSDBA INSTALL/DBLOG
Microsoft Messaging Queueing (MSMQ)
JAMS uses Microsoft Message Queue (MSMQ) to reliably pass messages between the JAMS Services. It does this by creating private queues named jamsrequests and jamsrequestssubmitcancel. MSMQ is included with Windows, but it is not installed by default. If MSMQ is not installed before installing JAMS, the JAMS installer will install MSMQ using the default minimum settings.
To change the way that MSMQ is installed after installing JAMS:
- Stop the JAMS Services.
- Reinstall MSMQ.
- Restart the JAMS Services.
Configuration Settings
JAMS contains a number of configuration settings that are listed below. You can change these settings using the Configuration shortcut on the JAMS Menu.
Contact
| Contact | Description |
|---|---|
| Company Name | The company name to include in error reports. |
| Contact Name | The person in your organization responsible for JAMS deployment. |
| Contact Phone | The responsible person’s phone number. |
| Contact Email | The responsible person’s email address. |
| Automatically Report Exceptions | When set to true, failures of the JAMSServices will be automatically sent to JAMS technical support. |
| Description | |
| Default Notify Email Address | A comma separated list of e-mail addresses that will receive all notifications. You can remove inherited addresses by prefixing the address with a minus (-) sign. You can remove all inherited addresses by entering -*. |
| From Address | The from email address used when sending the e-mail from JAMS. |
| Maximum Log Size | Log files that are larger than this value will not be attached to notification e-mails. |
| SMTPServer | The name of the SMTP server used for JAMS. This must be configured to send error reports to JAMS Support. |
| SMTP Retry Count | The retry count used to resend SMTP emails if an attempt to send one is unsuccessful. |
| SMTP Retry Delay | The time to wait to resend SMTP emails if an attempt to send one is unsuccessful. |
System
| ACL Security Bypass | Description |
|---|---|
| Grant Administrators Bypass | Option to allow individuals in the Administrator group to bypass ACL security. |
| Grant Bypass Group | Individuals listed in a specified group to bypass ACL security. |
| ACL Import/Export | Description |
| Restrict ACL on Export | Select the check box to prevent ACL information from being included in the XML when exporting any object, such as a Job or an Agent, from JAMS. To restrict the ACL for a specific object, use the Export-JAMSXML PowerShell cmdlet with -IgnoreACL. When selected, the Restrict ACL On Export option overrides the cmdlet. NOTE: Ensure the JAMS Client and JAMS Scheduler have been updated to the same version to use this option. |
| Restrict ACL on Import | Select the check box to prevent ACL information from being included in the XML when importing any object, such as a Job or an Agent, into JAMS. Inherited ACL information from within JAMS will still be applied. To restrict the ACL for a specific object, use the Import-JAMSXML PowerShell cmdlet with -IgnoreACL. When selected, the Restrict ACL On Import option overrides the cmdlet. |
| Options | Description |
| Schedule Examples | Examples of natural language date specifications displayed in date editors. |
| Base URL | The base URL for this JAMS Scheduler web site. |
| Encoding | Description |
| Default input Encoding | The default input encoding for routine jobs. |
| Default Output Encoding | The default output encoding for routine jobs. |
| File Locations | Description |
| Default Log Location* | The default location for Job log files. |
| Common Log Location | Used in a failover configuration to define a location that is common to both servers. |
| Temporary File Location | The location for temporary files. |
| History | Description |
| History Lookback Period | The number of days in the past to query history inside a detail dialog. |
| History Query Limit | Maximum number of history records to return in a single query? (zero means unlimited) |
| History Query Time Limit | The maximum time to wait (in seconds) for a response to a history query. |
| Projected Schedule | Description |
| Projected Schedule Limit | The maximum number of jobs to return in a projected schedule. |
| Projected Schedule Time Limit | The maximum time to wait (in seconds) for a response to a projected schedule. |
| Monitor | Description |
| Keep Completed | Keep completed Jobs in the Monitor for a specified period of time. |
| Workdays | Description |
| Work Monday | Is Monday usually a workday? |
| Work Tuesday | Is Tuesday usually a workday? |
| Work Wednesday | Is Wednesday usually a workday? |
| Work Thursday | Is Thursday usually a workday? |
| Work Friday | Is Friday usually a workday? |
| Work Saturday | Is Saturday usually a workday? |
| Work _Sunday | Is Sunday usually a workday? |
Presentation
| Theme | Description |
|---|---|
| Light Theme | The theme shown to end-users when they select Light Theme. |
| Dark Theme | The theme shown to end-users when they select the Dark Theme. |
| Documentation | Description |
| Header | This HTML fragment is placed before all documentation content configured within this server. |
| Footer | This HTML fragment is placed after all documentation content configured within this server. |
| Description | |
| E-Mail Header | This HTML fragment is placed before all e-mail content configured within this server. |
| E-Mail Footer | This HTML fragment is placed after all e-mail content configured within this server. |
Integrations
| Integrations Paladin | Description |
|---|---|
| Certificate | The name of the x.509 certificate used to authenticate with Paladin. |
| Paladin User | The Paladin User |
| Ask Job | A Job that is submitted when we need to ask Paladin for a response. |
| Severity | Only log files that are smaller than this maximum will be uploaded to Paladin. |
| Paladin URL | The URL for the Paladin service |
*The DefaultLogLocation is a .NET format string used to construct the full file specification for a Job's log file. The data values passed in the formatting operation are:
0. Directory specification
1. Filename
2. File Extension
3. Folder Name
4. Job or Sequence Name
5. Run occurrence number
6. JAMS Entry Number
7. Timestamp date & time
8. Timestamp year
9. Timestamp month
10. Timestamp day
11. Timestamp hour
12, Timestamp minute
13. Timestamp second
14. Timestamp millisecond
Working with JAMS Services
JAMS Scheduler installation includes four Windows Services:
- JAMS Scheduler Services
- JAMS Server Service
- JAMS Executor Service
- JAMS Agent Service
JAMS Scheduler Service
The JAMS Scheduler Service is responsible for automatically scheduling jobs, firing triggers, and checking dependencies. The JAMS Scheduler must include access to the JAMS Database or the service will fail. However, JAMS is designed to be resilient. Job execution is handled by the JAMS Executor service, so if the JAMS Scheduler service fails, no job execution information is lost.
JAMS Server Service
The JAMS Server provides middle-tier services to all JAMS Client components (GUI, PowerShell, .NET Class Library, and Web services). While the JAMS Server service is not involved in the execution of Jobs, many jobs can use the JAMS PowerShell client, which does utilize this service.
JAMS Executor and Agent Services
The JAMS Executor is responsible for executing and monitoring Jobs. This service does not access the JAMS Database.
The JAMS Agent service is an extension of the JAMS Executor service. When the JAMS Executor needs to execute a Job on a different machine, it does so using the JAMS Agent running on that machine.
Troubleshooting JAMS Services
Each JAMS Service generates a ServiceName.log, such as JAMSScheduler.log, in the installation directory. These logs are reset every Sunday with the previous weeks log files renamed to ServiceNameArchive.log, such as JAMSSchedulerArchive.log. The default location is C:\Program Files\MVPSI\JAMS\Scheduler.
If you suspect there are problems with JAMS, shutting down one of the three services may resolve your issues. The list below provides some guidelines from the least to most disruptive option.
Restart the JAMS Scheduler
While the JAMS Scheduler Service does the most work, restarting it is the least disruptive. Restarting the JAMS Scheduler Service does not cause any Jobs failures and all job completion information remains intact. While the JAMS Scheduler service is stopped, no new Jobs can enter into the Schedule.
Stop the JAMS Server Service
The JAMS Server service may be stopped without losing any job execution information. The JAMS Client will not function while the JAMS Server service is shut down.
Shut down the JAMS Executor Service
Stopping the JAMS Executor service should be a last resort, as it will not typically resolve JAMS issues. This service executes and monitors Jobs. When this service is halted, completion information for any executing Jobs will be lost and some executing Jobs may fail. The JAMS Executor service does not access the JAMS database, so stopping this service won’t be necessary during SQL service maintenance.
Service Accounts
By default, JAMS Services are set to run under the LocalSystem account, but this can be modified to run on a Windows Domain based account. See Change the Account Running JAMS for more information.
In general, it is recommended that you leave the JAMS Executor and JAMS Agent services running under LocalSystem. These services require access to the database or network and require the privileges associated with the LocalSystem account.
Use the Service Control application to change the account for the JAMS Scheduler and JAMS Server services in order to control network and database access.
When modifying the account, you may need to adjust the security settings on:
- C:\Program Files\MVPSI\JAMS\Scheduler folder
- C:\Program Files\MVPSI\JAMS\Scheduler\JAMSScheduler.log
- MSMQ jamsrequests and jamsrequestssubmitcancel private queues
- JAMS Database
You need to modify the security on the MSMQ private queues to grant the domain account full access to the queue. This may require you to take ownership of the MSMQ queue.
The following local security policies should also be granted for the domain-based account:
- Log on as a Batch job
- Log on as a Service
- Adjust memory quotas for a process
- Bypass traverse checking
- Replace a process level token
If the domain-based user account is not in the administrators group, create an Active Directory Group, add the user to the group, and make the following changes in the Common.config file located at:
Program Files\MVPSI\JAMS\Scheduler<directory>
<add key=AuthorizedGroup " value="domain\YourGroup"/>
Managing the JAMS Database
The JAMS Database provides critical features to the JAMS Scheduler and stores JAMS definitions. The following section contains information on managing the JAMS SQL database back end.
Manually Creating the JAMS Database
Typically, the JAMS Database is created with the JAMS Scheduler during the installation process. However, in some cases, when installing the JAMS Scheduler you may prefer not to create the JAMS Database. See Creating the JAMS Database for more information.
Security
JAMS supports either Windows Integrated Authentication or SQL Server Authentication. This can be modified after installation by changing the connection string found in the Common.config file. The default installation requires the JAMS Services to be running under the LocalSystem account. To facilitate this, the installation executes the following SQL commands:
exec sp_grantlogin @loginame='BUILTIN\Administrators' exec sp_grantdbaccess
@loginame='BUILTIN\Administrators', @name_in_db='JAMSService' exec
sp_addrolemember @rolename='JAMSApp', @membername='JAMSService'
The effect of using Windows Integrated authentication is that anyone in the administrators group can map the JAMSService Database user and become a part of the JAMSApp Database role.
Backing up the JAMS Database
It is critical to back up the JAMS Database. Since the JAMS Database is a standard SQL Server database, simply add it to your existing SQL Server backup procedures. You can also use the JAMS Job named JAMSBackup, located in the JAMS folder, to back up the JAMS Database.
Choosing the Recovery Model
Before implementing a backup plan, select the recovery model to use with the JAMS database. The default installation uses the Simple Recovery Model. The other option is the Full Recovery Model. The main difference between the two is in the amount of journaling performed by the database.
Simple Recovery Model
The Simple Recovery Model is the easiest to use. You periodically backup the JAMS database only, not the journal file. The downside to this model is a lack of recovery options. If the JAMS Database becomes corrupted, you can recover it from a backup but all database changes since the last backup will be lost. This includes job execution history, so Job dependencies may not work as expected.
Full Recovery Model
This model contains more robust recovery features. However, the disadvantage of this model is that you must manage the journal file for the JAMS Database. Each time a change is made to the JAMS Database it is also written to the journal file.
For example, if a hardware failure occurs or you have otherwise corrupted the JAMS Database, you can restore a backup and then recover it using the journal files up to a specific point in time.
Restoring the JAMS Database from a Backup
Restoring a JAMS Database from a backup requires a standard SQL Server restore operation, but there are some details to consider before attempting the restoration process.
The JAMS Database includes the current schedule. Often, you may not want the current schedule to be restored. For example, if the database was backed up on Monday and you restore it on Friday, you probably don’t want to start running Monday’s Jobs along with the rest of the week’s processing.
You can use JAMSDBA.exe to reset the Schedule.
CD C:\Program Files\MVPSI\JAMS\Scheduler " JAMSDBA RESET SCHEDULE

CD C:\Program Files\MVPSI\JAMS\Scheduler" JAMSDBA UPDATE/LOG
Moving or Restoring the JAMS SQL Database
The process for moving the SQL database used by JAMS does not require reinstalling JAMS.
- Ensure there are no Jobs currently running or are scheduled to run in the near future. You can manually put all Jobs on hold by using the Monitor view or by using a Maintenance Resource as described in the Creating a Maintenance Window article. When restoring the Database and activating the JAMS Server, you may not want jobs to run at that time.
- Use the JAMSBackup Job in the JAMS folder to back up the SQL database and restore to the target server.
- Edit the connection string property of the Common.config file located at C:\Program Files\MVPSI\JAMS\Scheduler\ by default.
- Update the server location and the database name, if the name of the database is being changed.
- Update the permissions to the JAMS Scheduler Server to connect to the restored JAMS Database.
- Replace YourDomain\YourMachineName with your own name in both lines of the query:
exec_sp_grantlogin @loginame='YourDomain\YourMachineName$'
exec_spgrantdbaccess @loginame='YourDomain\YourMachineName$', @name_in_db='JAMSMachine2'
exec_sp_addrolemember @rolename='JAMSApp', @membername='JAMSMachine2'
NOTE: If you have a failover server, change the JAMSMachine2 to JAMSMachine1 in the query and run the query again. You need to truncate the Failover table of the JAMS Database regardless of the failover configuration. - Restart the JAMS Scheduler Service from the Windows Control Panel.
- If you are running JAMS V6.4X or older, run JAMS_DB_ERRORs.sql, located in the JAMS Scheduler directory, on the master database within the same SQL instance where the JAMS Database resides.
The Common.config file contains the connection string used by JAMS services to link to the SQL database. Below are two examples of connection strings: one for Windows Authentication and another for SQL Authentication.
Windows Authentication
<?xml version="1.0" encoding="utf-8" ?>
<appSettings>
<add key="ConnectionString" value="Server=SQLA\INST1; Failover Partner=SQLB\INST1; Database=JAMS; Application
Name=JAMS; Connect Timeout=600; Integrated Security=SSPI"/>
</appSettings>
SQL Account Authentication
<?xml version="1.0" encoding="utf-8" ?>
<appSettings>
<add key="ConnectionString" value="Server=SQLA\INST1; Failover Partner=SQLB\INST1; Database=JAMS; Application
Name=JAMS; Connect Timeout=600;Trusted_Connection=False;uid=YOURSQLACCOUNT;pwd=YOURPASSWORD" />
</appSettings>
SettingsPath for the JAMS Client
JAMS can override all saved client settings at any installed locations. This can be useful when you want multiple JAMS Clients to default to the same shortcuts and themes. It also simplifies how new layouts and shortcuts changes can be standardized across-the-network with only one location needed as a template.
Configure the SettingsPath for each JAMS Client by modifying the user.config file as described below:
- Open the configuration file that is by default located at: C:\Program Files\MVPSI\JAMS\Client\User.config
- Add a new entry within the <appSettings> tags called “CommonSettingsPath” with a value of the location where you want to save the client settings. For example:
<appSettings file="User.config" >
<add key="ClientSettingsProvider.ServiceUri" value="" />
<add key="CommonSettingsPath" value="\\AppServer\ClientSettings\" />
</appSettings>
- Optionally, if you want the JAMS Client to save changes back to this common location simply add an entry for WriteToCommonSettings
with a value of “true”. By default, any new changes will be saved to the user-specific location.
add key="WriteToCommonSettings" value="true" />
- Copy the desired client settings into the new common location. By default, JAMS stores the client settings by version number for each user and stores it in the .XML files found in:
%HOMEPATH%\Local Settings\Application Data\MVP Systems, Inc\JAMS\X.X.X.
You can replicate settings from one client to the next by copying these flat files.
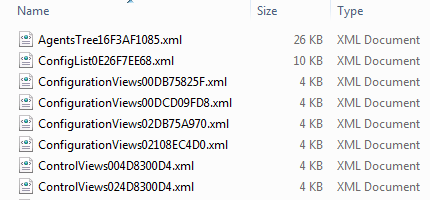
- Two critical files in this group include: Servers.xml and JAMSPage.xml. The former stores the JAMS Server definitions and the latter defines shortcut settings on the JAMS page. In most cases, these are the only files that are required, with other files controlling more user specific setting such as columns and column widths.
- Or you can copy the entire folder to the new location. These files contain the current client settings, but make sure you select the folder that corresponds to the current installed version of JAMS.
- JAMS will attempt to load files from the common location that it does not find in the user-specific location. To force an existing JAMS Client to load from the common location, you need to delete the user- specific settings.
These user settings can be helpful if you want to have varying client layouts for different user groups such as administrators, developers, and users. For example, you could set up three directories that contain the appropriate settings for each group. After configuring the Client config file for the members of these groups, you could then manage the settings independently.
- If the WriteToCommonSettings option is “true” for multiple JAMS Clients, they can overwrite the common settings.
- JAMS will only load from the common location if it doesn’t find the files in the user-specific location.
- You can prevent users from making changes to the server definitions by adding:
<add Key="LockServer" value="true" />
- Prevent users from changing shortcuts by adding:
<add Key="LockShortcutbar" value="true" />
- When Configuration files exist in the Common location and the user's local settings, ensure the Client loads Configuration files from the Common location by adding:
<add Key=" PrioritizeCommonSettings" value="true" />
The following is a sample of a Configuration file using PrioritizeCommonSettings:
<?xml version="1.0" encoding="utf-8" ?>
<appSettings>
    <add key="PrioritizeCommonSettings"
         value="True" />
    <add key="CommonSettingsPath"
         value="\\az-win019-test\share\ClientSettings" />
    <add key="LockShortcutBar"
         value="False" />
    <add key="LockServer"
         value="False" />
    <add key="LockQuery"
         value="False" />
    <add key="LockUsername"
         value="False" />
    <add key="PromptForSearchKeys"
         value="False" />
    <add key="DefaultServer"
         value="" />
    <add key="DefaultPort"
         value="773" />
</appSettings>
Managing Encryption Keys
JAMS encrypts password and private key information when it is stored in the database. The standard JAMS installation uses a predefined encryption key, which is adequate for many sites. For additional protection you can generate a unique encryption key but must ensure that it is properly backed up and secured.
When generating a unique encryption key, JAMS uses Advanced Encryption Standard (AES) to re-encrypt all password and private key information within the database. The generated key is then encrypted and stored using the Windows Data Protection API (DPAPI). The protected key is then linked to user account associated with the JAMS Server and Scheduler services.
To manage encryption keys, use the JAMSDBA Utility as described below:
- Go to C:\Program Files\MVPSI\JAMS\Scheduler.
- Right-click JAMSDBA and select Run as administrator.
- Run the following commands:
GENERATE KEY - Generates a new 256-bit encryption key, decrypts the password with the old key then encrypts it with the new key. The new encryption key is then stored using DPAPI.
EXPORT KEY - Pulls the encryption key from DPAPI and writes it to a text file.
IMPORT KEY – This is similar to the GENERATE KEY. In this case the new key is pulled from a text file instead of being generated. If recovering from backup or configuring the secondary server in a failover configuration, you should use the /NOENCRYPT qualifier to skip the decryption and re-encryption of the current data.
For additional information on protecting/restoring a JAMS Server as well as working in failover environments, go to the complete topic: JAMS Security: Managing Encryption Keys.
Protecting a Standalone JAMS Server
To protect a standalone JAMS Server, follow the steps below:
- Log on to the server as a user with Execute access to the JAMS configuration settings. (Users in the JAMS Administrator Group bypass security in JAMS and have all of the needed permissions.)
- Go to your default directory to the JAMS Scheduler installation directory. The default is: C:\Program Files\MVPSI\JAMS\Scheduler.
- Right-click JAMSDBA.EXE and select Run as administrator to open a JAMSDBA> prompt.
- Enter GENERATE KEY and press Enter.
- Enter EXPORT KEYYourFileName.txt and press Enter.
- Enter EXIT and press Enter.
- Then move the exported text file to a safe location.
Restoring a Standalone JAMS Server
When restoring a backup of the JAMS Database to different server, the encrypted passwords cannot be decrypted because of the encryption key DPAPI protection associated with the original machine/user. To restore the encryption key from a backup, follow these steps:
- Log on to the server as a user with Execute access to JAMS configuration settings. (Users in the JAMS Administrator Group bypass security in JAMS and have all of the needed permissions.)
- Go to the default directory to the JAMS Scheduler installation directory. The default is: C:\Program Files\MVPSI\JAMS\Scheduler
- Copy the exported text file (YourFileName.txt) from your safe location to the current directory.
- Right-click JAMSDBA.EXE and select Run as administrator to open a JAMSDBA> prompt.
- Enter IMPORT KEY/NOENCRYPT and press Enter.
- Enter EXIT and press Enter.
Failover Environments
To protect the servers in a failover environment, follow the steps below:
- Ensure your primary JAMS Server is running.
- Log on to the primary server as a user with Execute access to the JAMS configuration settings. (Users in the JAMS Administrator Group bypass security in JAMS and have all of the needed permissions.)
- Go to the default directory to the JAMS Scheduler installation directory. The default is: C:\Program Files\MVPSI\JAMS\Scheduler.
- Right-click JAMSDBA.EXE and select Run as administrator to open a JAMSDBA> prompt.
- Enter GENERATE KEY and press Return.
- Enter EXPORT KEY YourFileName.txt and press Enter.
- Enter EXIT and press Return.
- Move the exported text file to a safe location.
- Log on to the secondary server as a user with Execute access to the JAMS configuration settings. (Users in the JAMS Administrator Group bypass security in JAMS and have all of the needed permissions.)
- Go to the default directory to the JAMS Scheduler installation directory. The default is: C:\Program Files\MVPSI\JAMS\Scheduler.
- Copy the exported text file (YourFileName.txt) from your safe location to the current directory.
- Right-click JAMSDBA.EXE and select Run as administrator to open a JAMSDBA> prompt.
- Enter IMPORT KEY/NOENCRYPT and press Enter.
- Enter EXIT and press Enter.
High Availability
The Benefits of a JAMS Failover Scheduler
Often, it is beneficial to ensure a secondary Failover environment has been configured for the JAMS installation. The Failover ensures that there is a completely redundant instance of JAMS residing on a secondary server, often off site, relying on a heartbeat connection between the two.
By default, this heartbeat is set to a 60 second interval. If the Failover does not get a response from the Primary within 3 consecutive beats, the Failover will take over as the Primary Scheduler, ensuring that the schedule continues unharmed.
JAMS Failover Architecture
The JAMS Failover Architecture should consist of at least three servers:
- JAMS Primary Scheduler Server
- JAMS Failover Scheduler Server
- JAMS Agent Server(s), where Jobs are run
If a failure occurs, the Failover Scheduler takes over for the Primary Scheduler, ensuring the schedule of Jobs remains intact. If Jobs are executing locally on the Primary Scheduler Server, a failure would cause all Jobs executing on the Scheduler server to fail. Running Jobs on JAMS Agent Servers insulates those Jobs from Primary Scheduler Server failure.
Installing and Configuring the JAMS Failover
- Install the JAMS Primary Engine.
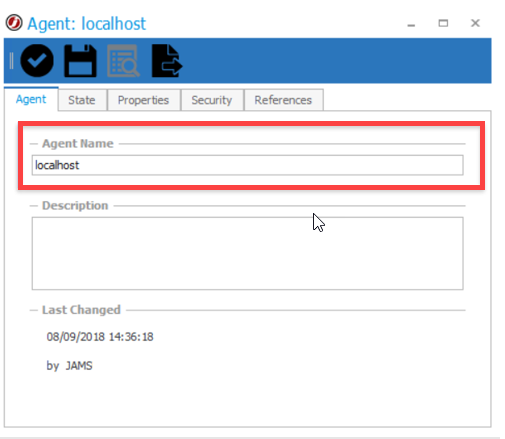
- The Local Agent Name defaults to the name of the Primary Scheduler. Update the name of the Secondary Scheduler to localhost.
- For redundancy of the JAMS Database, you can configure AlwaysOn Availability after you complete these steps. AlwaysOn Availability is a Microsoft project that replaced Database Mirroring in SQL Server 2012.
- Stop the JAMS Scheduler service on the JAMS Scheduler Server.
If the primary and secondary JAMS Schedulers are to share a database, add a user to the JAMS database to allow the secondary JAMS Scheduler to connect. This can be done by running the SQL statements below on the JAMS database. Replace the login name with the machine name.
exec sp_grantlogin @loginame='YourDomain\YourMachineName$'
exec sp_grantdbaccess @loginame='YourDomain\YourMachineName$', @name_in_db='JAMSMachine2'
exec sp_addrolemember @rolename='JAMSApp', @membername='JAMSMachine2'
Install the JAMS Scheduler on the secondary server.
- When prompted for the database server, enter the same SQL Server, Instance, and Database Name as the primary JAMS Scheduler server.
- Click Next. On the dialog stating "Database already exists", select Use Database.
Stop the JAMS Scheduler service on the secondary server.
Create and edit a Failover.config file in the C:\Program Files\MVPSI\JAMS\Scheduler\directory on the primary and secondary servers. A sample Failover file is shown below.
Start the JAMS Scheduler on both the primary and secondary servers.
Grant permissions to the MSMQ Service from the secondary JAMS Scheduler as described in How to Grant Permissions to the MSMQ Service from a Secondary JAMS Scheduler.
A Sample Failover config
<FailoverConfig>
<Primary>Server1</Primary>
<Secondary>Server2</Secondary>
<Port>4773</Port>
<Interval>60</Interval>
</FailoverConfig>
- The primary and secondary server names are the hostnames of the respective machines.
- The port is the port used by the primary and secondary scheduler to communicate the heartbeat connection.
- The interval value is the length of time that must elapse before a heartbeat is missed. If 3 heartbeats are missed, then the failover process will start.
- The interval value can be modified to suit the users needs. It is recommended to not have this value lower than 15 seconds to ensure that the schedulers are not constantly trying to take control of the database during intermittent network issues.
Common Log Output Location
To have a common log output location on network share for both Primary and Secondary schedulers, see Setting a common log output location for JAMS in a Failover Environment for more information.
Disaster Recovery Configuration
Recommended DR Model
The JAMS Server and Agents should have DR equivalents, named differently than the production servers. This will ensure the boxes are not seen on the network with the same name as their production equivalents.
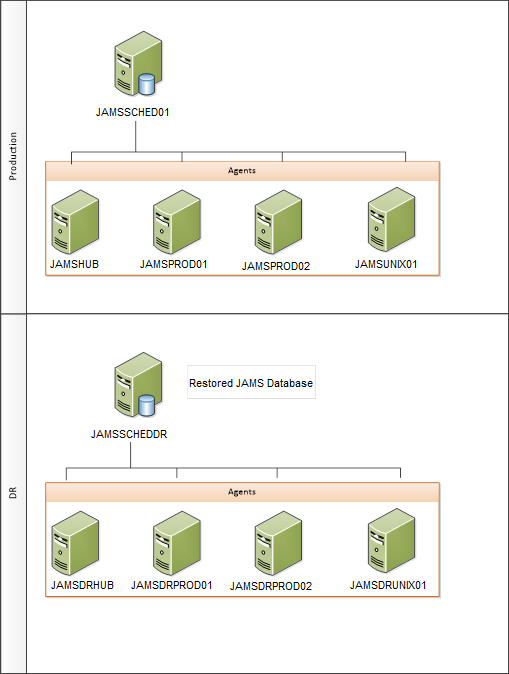
With the JAMS DR architecture set up as outlined above, the DR Process includes:
- Restoring the Production JAMS database to the DR Server and running any necessary database SQL scripts
- Replacing references to the JAMS Production nodes with DR equivalents
Disaster Recovery Process
Before Beginning the DR Process
On the DR Server, ensure the following are true:
- The JAMS Services are disabled (Includes the JAMS Executor, JAMS Scheduler, and JAMS Server)
- Host files on the JAMS Server and Agent Nodes are pointing to the DR Servers
- Common.config is pointing to the local SQL Server (located at C:\Program Files\MVPSI\JAMS\Scheduler\Common.config by default)
Restore the SQL Database
Create a backup of the JAMS Production Database and then restore the JAMS Production Database in DR.
Truncate the Failover Table
Truncate the failover table on the DR Server.
Back up the Current Monitor View state
On the JAMS DR Server:
- Start the JAMS Server Service.
- Within the JAMS DR Client, go to the Monitor View and take screenshots of the current Jobs within the Monitor View.
- Stop the JAMS Server service.
Update the JAMS Server Agents/Nodes to Point to the DR Servers
The JAMS Nodes must be updated to point to the DR Servers instead of Production Servers. In this example, all Sequences and Jobs within JAMS refer to a JAMS Queue, rather than point to an Agent Node directly. With this Queue configuration, re-directing the Nodes will be a simple case of updating the Production Queues to point to the DR Nodes.
JAMS will not allow existing nodes to be deleted if any running or pending Jobs that point to those Queues/Nodes are within the Schedule/Monitor view. Therefore, in order to allow the nodes to be updated, all Jobs will need to be cleared from the Monitor View using the Reset Schedule process detailed below.
Reset the JAMS Schedule
On the JAMS DR Server
- Ensure the JAMS Scheduler Service is stopped. The JAMS Scheduler service should be stopped so the Reset Schedule command (explained later) does not re-schedule Jobs before the queue nodes have been updated.
- Run the JAMSDBA executable as an administrator.
- Enter RESET SCHEDULE and press Enter.
When JAMS starts up against a restored database, it checks to see if the Schedule is more than 48 hours old. If it is, it automatically rebuilds the schedule from the current time. Otherwise, it will continue with the current schedule as-is. As the JAMS Database will likely be less than 48 hours old on DR, the 'Reset Schedule" process will have to be manually run using the JAMSDBA utility.
Once the Scheduler Service starts, the Schedule will be built based on the current time. To rebuild the Schedule against a different time, the /Restart switch can be specified.
Enable Access to the JAMS Client
Start the JAMS Server Service on the DR Server. To successfully connect to the Server from a JAMS Client, the JAMS Server service needs to be enabled and started. View the status of the JAMS Server at the bottom left corner of the JAMS client.
Update the JAMS Server Nodes
- Ensure the JAMS Client is opening against the DR Server and that all Jobs have been cleared from the Monitor View.
- Run the Update Queues PowerShell script to update the JAMS Queues to point to DR Nodes.
NOTE: Because the JAMS Scheduler is still disabled, run the Update Queues script outside JAMS.
- Ensure the Queues have been successfully re-pointed in the front end by viewing the Agents and Queue Nodes.
Start the JAMS Services
On the DR Server, manually start the JAMS Scheduler Service and the JAMS Executor Service. Starting the JAMS Scheduler results in the Schedule being rebuilt within the Monitor view, as defined by the JAMSDBA utility.
Run Test Processes
On the DR Server, run a test process in JAMS to validate that the Scheduler is working as expected.
Licensing DR
The JAMS DR Server requires a unique JAMS License.
Agents will be consumed as follows:
The JAMS License is on the JAMS Server and it will detail the number of available Agent licenses. When the JAMS Server is restarted, the number of allocated Agent licenses is set to zero. As Jobs consume Agents, the allocated License count is incremented.
JAMS TCP/IP Ports
JAMS uses the following TCP/IP Ports for both outgoing and incoming connections.
JAMSAgent.exe: The JAMS Agent listens on port 77 for requests to execute Jobs from other machines running JAMS.
JAMSServer.exe: The JAMS Server listens on port 773 for connection requests from JAMS Clients.
JAMSScheduler.exe: The JAMS Scheduler listens on port 2773 for connections from the JAMS Server and JAMS Debugger.This is usually confined to the local machine.
JAMSExecutor.exe: The JAMS Executor listens on port 3773 for connections from the JAMS Scheduler and JAMS Debugger.This is usually confined to the local machine.
JAMSScheduler.exe: The JAMS Scheduler listens on port 4773 for connections from the Failover JAMS Scheduler. This is configured in the Failover.config file.
Common Configuration: If no port is specified in the Common.config file in C:\Program Files\MVPSI\JAMS\Scheduler (default location), the default SQL port of 1433 is used.
Web Interface HTTP: The JAMS Web Interface uses port 80 by default for HTTP.
Web Interface HTTPS: The JAMS Web Interface uses port 443 by default for HTTPS.