Upgrading JAMS Using a Primary-Failover Environment
Before You Begin
- Review the Upgrading from JAMS 7.x to 7.x for notes and additional requirements.
- Note the Log On As account that your JAMS Scheduler and JAMS Server services are running under, if they are not using LocalSystem. The upgrade sets the user for these services to LocalSystem.
- Create a maintenance window and allow currently running Jobs to complete. The maintenance window prevents future Jobs from executing during the upgrade. See Creating a Maintenance Window in JAMS.
-
Create backups or snapshots of the following:
- The JAMS Database.
- The JAMS Scheduler Server, if it is running on a VM.
- JAMS config files, such as JAMSHost.exe.config or JAMSScheduler.exe.config, that have been customized in C:\Program Files\MVPSI\JAMS\Scheduler. These changes will need to be reapplied after the upgrade.
NOTE: When upgrading from JAMS V7.x to a version after V7.3.338, review your Message Queue permissions as described in this article.
Stop the JAMS Services on the Primary and Secondary Schedulers
- On the Primary Scheduler, open the Windows Services application.
-
Complete the steps below for the three JAMS Services.
- Click the JAMS Executor service and select Stop. This will also stop the JAMS Scheduler service.
- Verify the service has stopped.
- Repeat these steps for the JAMS Server service and JAMS Scheduler service.
- Repeat these steps on the Secondary Scheduler.
Upgrade the Primary Scheduler
- Right-click the JAMS installer and select Run As Administrator.
-
Follow the prompts in the installer until the upgrade is complete. NOTE: If you clear any of the checkboxes in the JAMS installer, those components will be removed. It is recommended to not clear any checkboxes for the JAMS components.
- Stop the three JAMS Services on the primary JAMS Scheduler.
- Update the Log On As account that your JAMS Scheduler and JAMS Server services are running under, if they are not using LocalSystem.
- On the primary JAMS Scheduler, go to \Program Files\MVPSI\JAMS\Scheduler.
- Right-click JAMSRegister.exe and select Run as administrator. A command prompt window opens.
- Run the command shown below to export the certificate. You need to copy this to the Secondary JAMS Scheduler.
Export root ca /filename="C:\root.pfx" /prompt - Enter a password to store the private key, which is referred to as the root key password and will be used in another step.
- Enter the password again when prompted to verify it.
- Copy the root.pfx file to the Secondary JAMS Scheduler to C:\.
Upgrade the Secondary Scheduler
- Right-click the JAMS installer and select Run As Administrator.
- Follow the prompts in the installer until the upgrade is complete. NOTE: If you clear any of the checkboxes in the JAMS installer, those components will be removed. It is recommended to not clear any checkboxes for the JAMS components.
- Stop the three JAMS Services on the secondary JAMS Scheduler.
- Update the Log On As account that your JAMS Scheduler and JAMS Server services are running under, if they are not using LocalSystem.
- On the secondary JAMS Scheduler, go to \Program Files\MVPSI\JAMS\Scheduler.
- Right-click JAMSRegister.exe and select Run as administrator. A command prompt window opens.
- Run the command shown below to import the certificate. Ensure you update the /filename command to specify the location where the file is saved.
Import root ca /filename=root.pfx /prompt /storekey - Enter the root key password.
- Run the command shown below:
Add scheduler listener /newcert
Restart the JAMS Services and Upgrade the Agents and Clients
- Apply any JAMS config files, such as JAMSHost.exe.config or JAMSScheduler.exe.config, that have been customized. The files are located in C:\Program Files\MVPSI\JAMS\Scheduler.
- Start the JAMS Services on the primary JAMS Scheduler to allow it to become the active JAMS Scheduler.
- Start the three JAMS Services on the secondary JAMS Scheduler.
-
Verify the primary JAMS Scheduler is now active and the secondary JAMS Scheduler is now passive by doing the following:
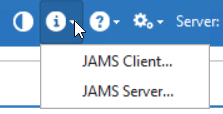
- From the JAMS Client, click the About icon and select JAMS Servers.

- Click the Status tab.
- Ensure the server is listed in the correct mode (Running or Backup Mode). You may need to scroll down to see all of the information.
- From the JAMS Client, click the About icon and select JAMS Servers.
- Run the installer on any remote Agents or Desktop Client to upgrade them.
- Disable the maintenance window to resume normal operation. See Creating a Maintenance Window in JAMS.