New/Edit On-Demand Report pane
How to get there
In the Reports page, choose Add > Add On-Demand Report.
What it does
These settings allow you to define the criteria to be used for creating On-Demand scanning reports.
Options
Save • Cancel
Click Save to save the report settings. Click Cancel to dismiss the pane without making changes.
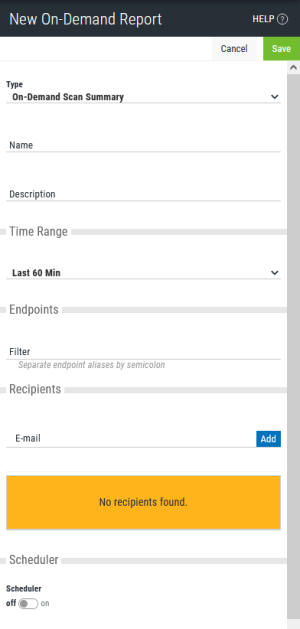
Type; On-Demand Scan Summary • On-Demand Scan Daily Summary • On-Demand Scan History
From this drop-down list, choose On-Demand Scan Summary if you would like to define a report that includes an aggregation of all scans for a given period of time. Choose On-Demand Scan Daily Summary if you would like to define a report that includes a daily aggregation of scans for a given period of days. Choose On-Demand Scan History to define a report that includes a detailed history for On-Demand Scans with additional sorting options.
Name • Description
A name and description for the report you are defining.
Time Range; Last 60 Min...Custom
From this drop-down list, choose the time period to include. Scans within this time range will be included in the report. Choose Custom to specify a start and end time.
Endpoints
Use this filter field to specify the endpoints you would like to include in the report. For example enter "xyz" to select all endpoints that contain "xyz" in their alias. You can use multiple filters, separated by a semicolon. Leave the filter blank to gather data for all servers.
Recipients; Email • Add
Enter an email address and click Add to include the email in the list of recipients. When email is properly configured in the Email Settings page, upon report generation, the included recipients will receive an email with a PDF attachment of the report.
Scheduler; Off • On
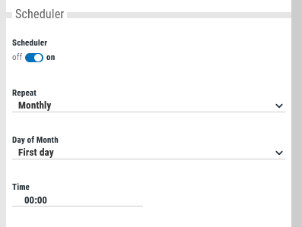
This setting allows you to run the report instance on a schedule automatically. Toggle to Off to disable, or On to enable, the automatic generation and distribution of reports. When set to On, the following fields appear, which allow you to define the frequency and timing of automatic report generation.

Repeat; Monthly • Daily • Day of Week
From this list, choose how often you would like to repeat the process of report generation and distribution.
-
Monthly; Day of Month; First Day • Last Day • Custom
From this list, choose the day of the month the report should be generated and distributed, first or last. To specify a different day, or list of days, choose Custom. With custom selected, specify one or more days of the month. For multiple days, separate each day with a semicolon.
-
Daily
Choose this option to run the report each day, at the specified time.
-
Day of Week; list of days
Select the days the report should run.
Time
Click this field to specify the hour (0-24) and minute (00-60) of the day the reports should be generated and distributed. Use the arrows adjacent to the hour field to increment by hour. Use the arrows adjacent to the minute field to increment by five minute intervals.
Sorting; Sort by: Endpoint • Scan Started Timestamp • Status
From this list, choose how the report details should be sorted. Choose Endpoint to sort alphabetically by endpoint alias. Choose Scan Started Timestamp to sort chronologically, from earliest to latest based on the timestamp of each scan. Choose Status to sort based on each scan's reported status.
