Workflow Designer Ribbon
Overview
The Workflow Designer encompasses a ribbon design which houses the command buttons and icons as a set of tabs, each grouping relevant commands. The ribbon-styled panel arrangement is designed to make WFD more discoverable and accessible with fewer mouse clicks. The ribbon is categorized into contextual tabs, each composed of groups which are a labeled set of closely related commands. In addition, the left portion of the title bar that sits directly above the ribbon contains a Quick Access Toolbar; a small customizable strip where users can access their most frequently used commands. A short description regarding each command can be easily determined by hovering the mouse directly above the desired command.
Related Topics
 Tabs
& commands
Tabs
& commands
The Workflow Designer Ribbon is categorized into three contextual tabs, File, Home, and Options. Each represents an activity area grouped together with related commands, controls or buttons that represents the operation to perform. To view a description of each command and associated hot-keys (if any), hover the mouse cursor directly above the desired command. The following tables describe the available commands contained within each tab.
Home tab
The Home tab (shown below) consists of commands that perform general workflow actions and operations such as Run, Stop, Pause, Update and Close. This tab also contains clipboard related commands to provide developers a convenient way to copy/paste objects to a workflow and as well as a command that allows you to select the default flow control arrow.

Home tab commands
The following table describes the Home tab's available command groups, associated buttons and other graphical control elements along with relevant hot-keys (if any).
| Group | Icon | Command | Description | Hot key |
|---|---|---|---|---|
| App |

|
Update All and Close | Updates any changes made to all open workflows and closes Workflow Designer. | --- |
| Workflow |

|
Update | Updates any changes made to the current workflow (without closing Workflow Designer). | CTRL + S |

|
Close | Closes the current workflow. If changes were made, a dialog will appear prompting whether or not to save them. | --- | |

|
Save Image | Saves
the current workflow diagram displayed in the Main
workspace of Workflow Designer as an image. Pressing this
button opens a dialog allowing specification of the drive,
directory and name of the file in which to save the image.
The following formats are supported:
|
--- | |

|
Prints the current workflow diagram that appears in the Main workspace of Workflow Designer. | CTRL + P | ||

|
Run | Executes
the current workflow. This is an ideal way to test all or
part of a workflow during its design and construction. Developers
can examine the course of a running workflow in real-time
by viewing the workflow diagram in the main workspace. They
can also view output data and examine the Shared
Variables, Shared
Datasets or Shared
Arrays tab of the Output/Shared
Objects panel. NOTE:
If the beginning of the workflow contains any triggering events
or conditions, they are ignored during manual execution. However,
other non-triggering conditions contained in the middle of
a workflow (that is, conditions used as wait objects or conditional
statements) will operate as normal. To test workflow triggering
functionality, avoid running it manually. Instead, allow the
monitored triggering event/condition to transpire. |
CTRL + F5 | |

|
Pause | Pauses execution of a running workflow. | --- | |

|
Step | Enables
step by step execution of each object in a workflow after
a Breakpoint
is reached. NOTE:
This option only appears when a Breakpoint is encountered
and a workflow object is selected. |
--- | |

|
Stop | Stops execution of a running workflow. | --- | |
| Clipboard |

|
Paste | Pastes another instance of the
clipboard objects onto the current workflow. IMPORTANT: The Paste option generally
creates another instance
of the original objects. However, it does not add an independent
copy to the Repository. This means that you risk adversely
affecting other workflows that use the object. The Paste
option generally creates a new icon and not an entirely new
independent Repository object. Therefore, any changes made
to a "pasted" object will impact the original Repository
item as well as all workflows that this item resides in. In order to paste an independent copy of an object, use the Paste New Item option instead. This option creates a new Repository object which can be edited without impacting the original object. |
CTR + V |

|
Paste New Item | Pastes a copy of the clipboard objects onto the selected workflow and creates a new copy in the repository which can be modified without compromising the original objects and any workflows that currently use them. This option is ideal in situations where a copy of the original object requires only minor changes to its properties because it eliminates the time consuming and repetitive task of creating a new object and setting its properties from the beginning. | --- | |

|
Copy | Copies
the selected objects to the clipboard. To select multiple
objects, hold down CTRL during selection. This option is used
to create a copy of an existing workflow object. Use the Paste option to paste an
instance of the original item onto a workflow. NOTE: Use the PasteNew Item option to paste
an independent copy of the item and add a new unique repository
object of that item. |
CTRL + C | |

|
Select all | Selects (highlights) all objects in the current workflow. | CTRL + A | |
|
|
Paste New Item | Pastes a copy of the clipboard objects onto the selected workflow and creates a new copy in the repository which can be modified without compromising the original objects and any workflows that currently use them. This option is ideal in situations where a copy of the original object requires only minor changes to its properties because it eliminates the time consuming and repetitive task of creating a new object and setting its properties from the beginning. | --- | |
| Arrow Style |

|
Elbow | If selected, indicates that the default style of flow control arrows to be used will be the elbow design. | CTRL + F |

|
Straight | If selected, indicates that the default flow control arrows will be straight. | --- | |
| Default Arror Type |
|
Success | Sets the Success Arrow as the default flow control arrow linked to newly added workflow objects (default). | --- |
|
|
Failure | Sets the Failure Arrow as the default flow control arrow linked to newly added workflow objects. | --- | |
|
|
Result | Sets the Result Arrow as the default flow control arrow linked to newly added workflow objects. | --- | |
| Help |

|
Help | Displays
help contents (F1) or the 'About Automate 10' window.
During Automate evaluation period, the 'About' page displays
the total evaluation days and number evaluation days left.
It also displays the current version of the software. NOTE:
To view the help topic for a specific section of SMC or WFD,
left mouse click anywhere in that section and press F1 key. |
F1 |
Selection tab
The Selection tab (shown below) is normally hidden from view. It only appears when a workflow object is added to or selected from the main workspace. Commands that appear on this tab varies depending on the type of workflow object added/selected. The following table describes the available Selection tab groups and commands as well as their associated hot keys (if any).

Selection tab commands
The following table describes the Selection tab's available command groups, associated buttons and other graphical control elements along with relevant hot-keys (if any).
| Group | Icon | Command | Description | Hot-Key |
|---|---|---|---|---|
| Item |

|
Edit | Edits the selected workflow object and opens the editor for that object. | --- |

|
Delete | Deletes the selected objects. To select multiple objects, hold down CTRL during selection. | --- | |

|
Rename | Renames the selected object. | --- | |

|
Enabled | Use as a toggle to enable/disable selected workflow objects. Disabled objects appear dimmed in the main workspace. | --- | |

|
Repository Properties | Displays the properties of the selected object that are saved to the repository. | --- | |

|
Workflow Properties | Displays the properties of the selected object as it relates to the workflow. |
--- |
|
| Execution |

|
Run from here | Runs the workflow from the currently selected object. Execution options are only available upon selection of an object that contains a breakpoint. For more details, see Debugging Workflows. | CRTL + SHIFT + F5 |

|
Resume | Resumes execution. Execution options are only available upon selection of an object that contains a breakpoint. For more details, see Debugging Workflows. | --- | |
|
|
Step | Steps through each object of the workflow sequentially. Execution options are only available upon selection of an object that contains a breakpoint. For more details, see Debugging Workflows. | F10 | |

|
Stop | Halts execution and logs status as success. Execution options are only available upon selection of an object that contains a breakpoint. For more details, see Debugging Workflows. | --- | |
| Clipboard |
|
Paste | Pastes
another instance of the clipboard objects onto the current
workflow. IMPORTANT:
This option generally creates a new icon representing the
original object and not an entirely new independent Repository
object. Therefore, any modifications made to a "pasted"
object will impact the original Repository object as well
as all workflows that this object resides in. In order to
paste an independent copy of an object, use Paste
New Item instead. This option creates a new Repository
object which can be edited without impacting the original
object. |
CTRL + V |

|
Cut | Cuts the selected objects. To cut multiple objects, hold down CTRL during selection. | CTRL + T | |
|
|
Copy | Copies the selected objects to the clipboard. To select multiple objects, hold down CTRL during selection. Use the Paste option to paste an instance of the original item onto the workflow. Use PasteNew Item to paste an independent copy of the item and add a new unique Repository object for that item. | CTRL + C | |
|
|
Select all | Selects all objects in the workflow. | CTRL + A | |
|
|
Paste New Item | Pastes a copy of the clipboard objects onto the selected workflow and additionally saves a new copy to the Repository. This option creates a new and unique Repository object, which you can edit without compromising the original object as well as other workflows that currently use it. This is ideal in situations where minor changes need to be performed to an existing object because it eliminates the tedious procedure of having to create a new object and setting its properties. | --- | |
| Association |

|
Associate Existing | Associates the selected workflow item with an existing repository object. This eliminates redundancy and provides a quick and convenient way to reuse pre-existing objects. | --- |

|
Disassociate | Removes the association with the selected objects. | --- | |
| Agent |

|
Select Agent | Displays the list of available agents, agent groups, process agents and system agents that the object can be assigned to. | --- |
| Breakpoint |

|
Breakpoint | Adds a breakpoint to the selected item. Breakpoints provide a means of pausing execution at a specified point in order to examine certain aspects of the workflow. Breakpoints take effect only when a workflow is run from the Workflow Designer and are ignored when the workflow is triggered or executed outside of the Workflow Designer. For more details, see Debugging Workflows. | F9 |
| Label |

|
Use Label | Uses the object's label instead of its
repository name. A label replaces the name of an object for
the current workflow. It can be used to simply convey details
about an object. More significantly, it is useful when a single
object is shared between two or more workflows because it
provides a way to determine which workflow the object belongs
to. It can also be used to distinguish a specific instance
of an object that may be used more than once in a single workflow. NOTE: This option creates an alias for the particular object as
it relates to the specific workflow. Label names appear italicized
making them easy to recognize. |
--- |

|
Edit Label | Edits the current label used for the selected object instead of the Repository name. This option can also be used to label an object that is currently not labeled. |
--- |
Options tab
The Options tab (shown below) contains commands that modify the "look and feel" of the Workflow Designer.

Options tab commands
The following table describes the Option tab's available command groups, associated buttons and other graphical control elements.
| Group | Command | Description |
|---|---|---|
| Grid | Show Grid | Displays a grid or graph layout in the WFD's workspace. The grid serves as a visual framework on which a developer can organize workflow objects in an organized, easy to view manner (disabled by default). |
| Snap to Grid | Causes the objects in the workflow to attach itself to the grid when selected. | |
| Vertical Spacing | Increases or decreases the space between the vertical grid points. | |
| Horizontal Spacing | Increases or decreases the space between the horizontal grid points. | |
| Behavior | Allow Unbuilt Items | If enabled, allows unbuilt objects to a
workflow without automatically opening the object's properties
editor. If disabled, launches the properties editor dialog
for any unbuilt objects added to a workflow (enabled by default). NOTE: Objects with empty properties are considered "unbuilt." |
| Arrow Text | Show Success Arrow Text | If enabled, shows the text associated with the Success Arrow. If disabled, the arrow appears in the workflow without a text display (enabled by default). |
| Show Failure Arrow Text | If enabled, shows the text associated with the Failure Arrow. If disabled, the arrow appears in the workflow without a text display (enabled by default). | |
| Show Result Arrow Text | If enabled shows the display text of the Result Arrow. If disabled, the arrow appears in the workflow without a text display (enabled by default). |
File
menu
The File menu is located in the upper-left corner of the ribbon and presents a menu of commands and operations that do not directly relate to the editing of the workflow at hand. They include items that normally reside in the File menu of legacy systems, such as Update, Close, and Print. The table below describes the available file menu commands.
| Icon | Command | Description |
|---|---|---|
|
|
Update | Updates any changes made to the current workflow (without closing Workflow Designer). |
|
|
Close | Closes the current workflow. If changes were made, a dialog will appear prompting whether or not to save them. |
|
|
Prints the current workflow. | |
|
|
Update All and Close | Updates any changes made to all open workflows and closes Workflow Designer. |
| --- | Exit | Exits Workflow Designer. If changes were made, a dialog will appear prompting whether or not to save them. |
Quick
access toolbar
The Quick Access Toolbar (shown below) is a row of buttons that provides users an easy way to select commonly used WFD features and commands. This toolbar is situated, by default, directly above the Ribbons panel, on the top left corner of the WFD interface. There's also an option to fit the toolbar directly below the Ribbons panel.

To move the toolbar below the ribbon
Right click an empty space on the Ribbon and select Show Quick Access Toolbar below Ribbon.
To add items to the toolbar
Right-click the desired item from the Ribbon and select Add to Quick Access Toolbar.
To remove items from the toolbar
Right-click the desired item that exists in the toolbar and select Remove from Quick Access Toolbar.
Access keys
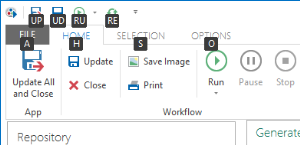
The Ribbon provides a feature that allows you access any Quick Access Toolbar or Ribbon command with a few keystrokes instead of using the mouse. These shortcut keys (shown below) are called as Access keys.
To use access keys
-
Press and release the ALT key. The KeyTips are displayed over each feature that is available in the current view (as shown below).
-
Press the letter/number shown in the KeyTip over the feature that you want to use. Depending on which letter/number you pressed, you may be shown additional KeyTips.
-
Continue pressing letters/numbers until you press the letter of the specific command or option that you want to use.

Copyright © Fortra, LLC and its group of companies.
All trademarks and registered trademarks are the property of their respective owners.
24.2.0 | 202408121109 | August 2024