Remote Backup & Restore
Overview
The fact is, most of us do not take data backup seriously and only think about it once we face a catastrophic situation. And as computers continue to become the standard way in which many businesses conduct important transactions and deliver core services, this type of idea is becoming increasingly risky. The Backup and Restore functions in Automate Desktop are capable of saving remote backup copies of managed tasks, triggers, and system data onto an Automate Desktop archive (.AMA) file. This file may later be used to restore lost data in the case of a catastrophic event, accidental deletion or corruption of data.
To manually backup remote Automate Desktop data
-
From the Task Administrator, connect to the desired remote Automate Desktop client by way of the Connection Panel. For more details, see Establishing a Remote Connection.
-
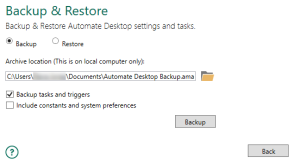
Once the connection is established, select Options > System Settings > Backup & Restore. To ensure you are viewing Backup & Restore properties of the remote client instead of locally, the title bar should display the remote computer's name or IP address (illustrated below, circled in red).
-
Toggle the Backup option.
-
In the parameter labeled Archive Location, use the default archive location (C:\Users\{username}\Documents\Automate Desktop2024 Backup.ama) or enter a desired path and file name.
-
There are two options to select from when backing up Automate Desktop:
-
Backup tasks and triggers – If selected, all managed tasks that are located in your Default Managed Tasks Location (specified in Options > System Settings > Task Service Preferences) will be included in the backup (this option is enabled by default).
-
Include constants and system preferences - When selected, all created constants and global system preferences which are specified in Options > System Settings will be included in the backup (this option is disabled by default, although it is recommended that it is enabled as well in order to perform a complete backup of imperative data).
-
-
After entering your preferences, click the Backup button. Automate Desktop will then attempt to backup the specified settings into a compressed file with a .AMA extension. The default name for the archive is Automate Desktop2024 Backup.ama.

To automatically backup remote Automate Desktop data
- Create a new task on your local Task Administrator.
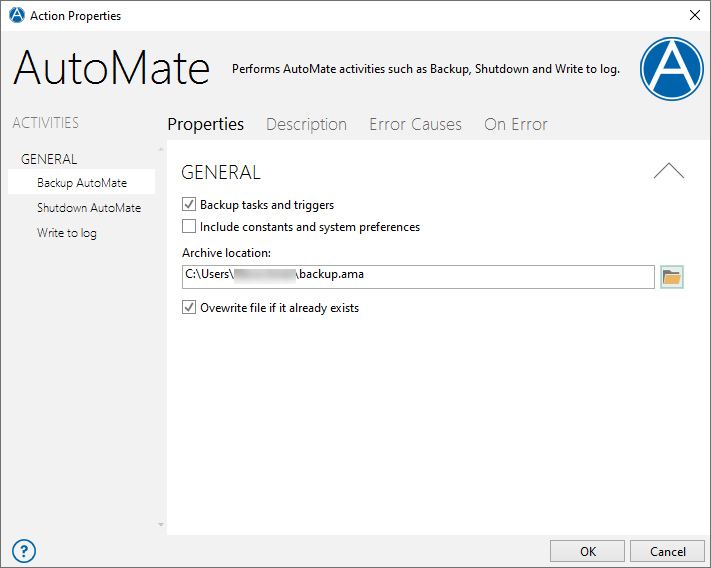
- From the Task Builder's Actions panel, expand the Automate action and drag the Backup Automate activity to the Steps panel. This should open the properties dialog.
- From the Task Builder's Actions panel, expand the Automate action and drag the Backup Automate activity to the Steps panel. This should open the properties dialog.
-
On the General properties, (illustrated below), do the following:
-
Select the desired checkboxes to specify the type of backup. The available options are:
-
Backup tasks and triggers - If enabled, all managed tasks that are located in your Default Managed Tasks Location (as specified under Options > System Settings > Task Service Preferences) and any triggers currently attached to those tasks will be included in the backup. This option is enabled by default.
-
Include constants and system preferences - If enabled, all global system preferences and existing constants (specified under Options > System Settings > Constants) will be included in the backup. This option is disabled by default. In order to perform a complete backup of imperative data, make certain to enable this option.

-
-
-
In the Archive location field, enter the path and file name in which to save the archive file. Press the Folder icon to navigate to the desired location. Note that when editing remote preferences that specify a drive location (such as the Archive location field, the Explorer window that comes into view reflects the local computer's drive. If entering a network location, make certain to specify the path by way of UNC (Universal Naming Convention) format as opposed to a mapped drive. For example, X:\foldername\filename.ama should be \\servername\foldername\filename.ama.
This is because mapped drives are created or connected when the user is logged on but are not accessible when the computer is in a logged off state. If the task executes in the background while the computer is logged off, it will fail to recognize the mapped drive. However, locations specified in UNC format are accessible even when the computer is logged off. Also, since the Task Builder is local, you are entering information relative to you local computer, therefore, make sure to enter the location relative to the remote computer in which to deploy this task.
- To overwrite any backup file that currently exists in the destination, make sure to enable the option Overwrite file if it already exists.
- After entering all preferences, click OK to save and close the properties dialog.
- Add the appropriate trigger to allow the task to run automatically.
- Deploy the task to the remote computer of your choice. See Deploying Tasks for more details.
To restore a remote backup
-
From Task Administrator, connect to the desired remote Runtime.
-
Select Options > System Settings > Backup & Restore.
-
Toggle Restore option.
-
In the Archive Location parameter, point to the archive you wish to restore.
-
Select or clear the following checkboxes:
-
Restore tasks and triggers - If selected, all managed tasks that were previously backed up will be restored to its original location (specified in Options > System Settings > Task Service Preferences under Default managed task location).
-
Restore constants and system preferences - If selected, all constants and global system preferences previously backed up will be restored.
-
-
After entering your preferences, click the Restore button. Automate Desktop will then attempt to restore previously backed up data.