Using the Calendar
Overview
The Task Execution Calendar can be used to view results of previously executed tasks. It also displays tasks that are scheduled to execute in the future (with the use of a Schedule trigger). It can be accessed from Task Administrator by selecting Calendar from the Navigation bar. The Task Execution Calendar is designed to allow you to quickly select a day, week, or month to view in the main viewing area and easily navigate to any date with either the keyboard or the mouse. The side panel contains a date navigator that allows you to modify what should be viewed in the main panel. You can also control what to view by selecting from one of the default views (for example, day, week, work week, etc.).
 Using the Date Navigator
The Date Navigator is a small calendar view that appears on the side panel which allows for point and click selection of specific dates to be displayed in the main viewing area. When you click a number in the Date Navigator, that date is displayed in the main panel. The Date Navigator can also help orient you as to which days of the month you're viewing, the current day, and which days currently contain task events. Dates that appear in the main viewing area are highlighted in the Date Navigator. You can choose which dates to view by dragging across a range of dates in the Date Navigator (up to a maximum of six weeks). That date range will be displayed in the main viewing area in a format similar to Month view. Dates that are boldfaced in the Date Navigator indicate that they contain at least one task event. The current day is always enclosed in a red box.
By manipulating the Date Navigator, you can control what appears in the main viewing area. The following is a list of common Date Navigator operations:
| Action | Instructions |
|---|---|
| Display previous month | Click on the left arrow next to the month/year view. |
| Display next month | Click on the right arrow next to the month/year view. |
| Change year to view | Click the current year that appears on the date navigator to open a pop-up dialog displaying the last 4 years and next four years. Select the desired year from the list. |
| Change month to view | Click the current month that appears on the date navigator to open a pop-up dialog displaying the last 4 months and next four months. Select the desired month from the list. |
| View consecutive weeks | Drag across a range of dates in the date navigator (up to a maximum of six weeks). The selected date range will be displayed in a format similar to month view. |
| View specific days | Hold down the CTRL key and select the desired days from the date navigator. The selected days will be displayed in a format similar to the week view. |
| View task events for a specific day. | Double-click a specific day on the date navigator. The selected day will be displayed in a format similar to a day view. |
| Show more than the default two month view | Rest the mouse pointer on the split bar to the right of the Date Navigator. The pointer will become a double arrow. Drag the double arrow cursor to the right until additional months are displayed. |
Modifying views
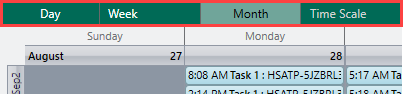
Views give you different ways to look at the same information in the calendar by putting it in different date and time-based arrangements and formats. To change the number of days that are displayed in the main viewing area, simply select the corresponding button (shown below). Selecting the Week view allows you to choose whether to display a 5 day work week or full 7 day week.
Available views
The following table describes the available calendar views:
| View | Description |
|---|---|
| Day | The main viewing area shows one day at a time. Use the date navigator to move to a new date by clicking a date on the calendar. |
| Week | The
main viewing area displays the following week view:
|
| Month | The main viewing area displays the current calendar month (default calendar view). |
| Time Scale | The
main viewing area displays a specific time grid (between 5
minutes and 1 hour). This preference is active only if the
view is set to Day, Week
or Work Week.
The available time scales are:
|
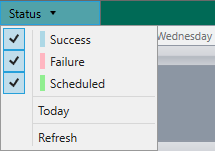
Filter by status
Status (shown below) allows you to filter which task events are to be displayed in the main viewing area based on execution status. Each status is color coded allowing for easy distinction of each event's status. In addition, you can select Today to view the status of events for the current day or select Refresh to update the current view.
Status options
The following table describes the available options included in the status drop-down:
| View | Description |
|---|---|
| Success | Previous task events that completed successfully will be included in the view. All events marked as a success are color coded blue. |
| Failure | Previous task events that failed will be included in the view. All events marked as a failure are color coded pink. |
| Scheduled | Task events that are scheduled to run in the future will be included in the view. All events marked as scheduled are color coded green. |
| Today | The main viewing area displays previously executed and scheduled tasks for the current day. |
| Refresh | Updates the calendar with information about any recent events that may have taken place. |
Filter by tasks
The task filter section (shown below) enables you to filter which tasks to include in the main display area. This parameter provides a drop-down list of available tasks to select from. The default value is set to All Tasks, however, you have the option to select a single task or a group of tasks contained in a folder.

To display the status for an individual task
-
Click the drop-down arrow to display available tasks.
-
Expand the necessary folder (if applicable).
-
Select the desired task.
To display a group of tasks
-
Click the drop-down arrow to display available tasks.
-
Select the desired folder/subfolder that contains a group of tasks. All tasks that reside in the immediate folder as well as any subfolders will be displayed.
To display all tasks
-
Click the drop-down arrow to display available tasks.
-
Select All Tasks.
Viewing Calendar Event details
Hovering your mouse cursor over an event displays general information, including last runtime/next runtime, task name and the name of the computer in which it resides. To drill down to further details, double-click the desired event. Doing so will display a dialog titled Calendar Event containing details about the given event (as shown below).
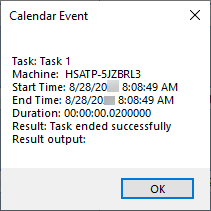
Available Calendar Event details
The information that's displayed by the Calendar Event dialog may differ depending on the event status (whether success, failure or scheduled). The following table describes the list of details that appear:
| Event Detail | Description |
|---|---|
| Task | The name of the task that generated the event or is scheduled to execute in the future. |
| Machine | The name of the computer that ran the task or is scheduled to run the task. |
| Start Time | The date/time the specified event started or is scheduled to start. |
| End Time | The date/time the specified event ended. If a scheduled task is selected, this event detail will return N/A. |
| Duration | The total duration of task execution, from start to finish. If a scheduled task is selected, this event detail will return N/A. |
| Result | The execution results (Success, Failure or Scheduled). |
| Result Output | A description of the result. For example, if result was Failure, this parameter displays the error message. If a scheduled task is selected, this event detail will return N/A. |
Copyright © Fortra, LLC and its group of companies.
All trademarks and registered trademarks are the property of their respective owners.
24.2.0 | 202409100515 | September 2024