 Automate Schedule - Create session
Declaration
<AMSKYBOT SESSION="text" IP="number" PORT="number" USERNAME="text" PASSWORD="text (encrypted)" HTTPS="YES/NO" PROXYTYPE="text (options)" PROXYSERVER="text" PROXYPORT="number" PROXYUSERNAME="text" PROXYPASSWORD="text (encrypted)" />
Description
Creates a unique session which can be used to associate subsequent Automate Schedule steps. This provides a single task the ability to execute numerous Automate Schedule operations simultaneously.
Practical usage
Ideally used to create a session to correlate subsequent Automate Schedule-related activities. Numerous sessions can exist in a single task. These sessions can run parallel with one another without interference. To end a session, use the Automate Schedule - End session activity.
Parameters
Session
| Property | Type | Required | Default | Markup | Description |
|---|---|---|---|---|---|
| Server | Number/Text | Yes | (Empty) | IP="xxx.xxx.xxx.xxx" | The Domain Name System (DNS) name (for example, www.domain.com) or IP address (for example, xxx.xxx.xxx.xxx ) of the Automate Schedule Server of where to establish communication. |
| Port | Number | Yes | (Empty) | PORT="0880" | The TCP/IP port assigned to enable communication with the Automate Schedule server. |
| User name | Text | No | (Empty) | USERNAME="jdoe" | A
valid username of a user configured to access the Automate Schedule
Server. NOTE: Certain Automate Schedule activities
may or may not be permitted depending on the permissions set for
the user. |
| Password | Text | No | (Empty) | PASSWORD="text (encrypted)" | The correct password for the user entered above. |
| Session | Text | Yes | (Empty) | SESSION="SkySession" | The name of the session to use to link to other Automate Schedule activities. |
| Use Https | Yes/No | No | No | HTTPS="YES" | If selected, specifies that the server protocol type is HTTPS (secure HTTP). If disabled, the server protocol type is HTTP. This parameter is disabled by default. |
Proxy
| Property | Type | Required | Default | Markup | Description |
|---|---|---|---|---|---|
| Proxy type | Text (options) | No | Default |
|
The
type of proxy required for Automate Schedule connections that pass through
a proxy server. The available options are:
|
| Use authentication | --- | --- | --- | --- | If
enabled, indicates that proxy authentication is implemented. This parameter is active only if the Proxy
type parameter is set to HTTP. NOTE: This parameter does not contain markup and is only displayed in visual mode for task construction and configuration purposes. |
| Proxy server | Text | No | (Empty) | PROXYSERVER="proxy.host.com" | The hostname (server.domain.com) or IP address (xxx.xxx.xxx.xxx) of the proxy server. This parameter is available only if the Proxy type parameter is set to HTTP. |
| Proxy username | Text | No | (Empty) | PROXYUSERNAME="ProxyUser" | The proxy username to use to authenticate and establish the connection. This parameter is available only if the Use authentication parameter is enabled. |
| Proxy password | Text | No | (Empty) | PROXYPASSWORD="encrypted" | The proxy password to use to authenticate and establish the connection. This parameter is available only if the Use authentication parameter is enabled. |
| Proxy port | Number | No | 8008 | PROXYPORT="8008" | The port to use to connect to the proxy server. This parameter is available only if the Proxy type parameter is set to HTTP. The default value is 8008. |
Additional notes
Enabling Automate Schedule Web Service
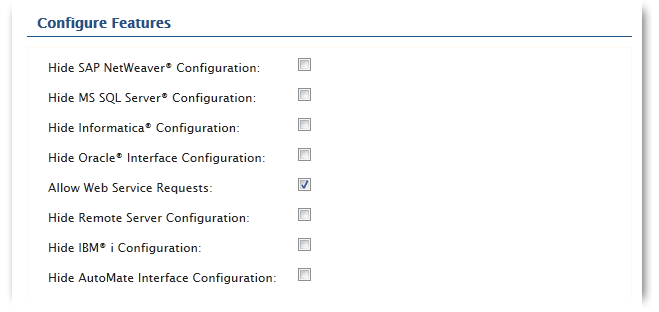
By default, Automate Schedule has the web services option disabled. This will prevent Automate Schedule actions from running. To enable the Automate Schedule Web Service, log into Automate Schedule's UI and select from the main menu Admin > System Settings. Scroll down to the Configure Features section and select EDIT. Select Allow Web Service Requests (as shown below) and save the settings.
Example
- Copy and paste the sample AML code below directly into the Task Builder Steps Panel.
- To successfully run the sample code, update parameters containing user credentials, files, file paths, or other information specific to the task to match your environment.
Description
This sample task demonstrates use of sessions and loop operations as well as the List agents and Hold agent queue activities:
- A Create session activity creates and starts a session.
- A List agents activity retrieves all agents and places their names in a dataset.
- During each iteration, a Hold agent queue activity performs a hold on the next agent queue on the list
- During each iteration, a Hold agent queue performs a hold on the next agent on the list.
- An End loop activity ends the loop operation.
- An End session activity ends the current session.
<AMSKYBOT SESSION="Skybot_1" IP="10.0.1.69" PORT="8008" USERNAME="admin" PASSWORD="AM4xbZm+mwQN5MGOCNMiHvJ5srNQYnFndV8aME" />
<AMSKYBOT ACTIVITY="list_agent" SESSION="Skybot_1" RESULTDATASET="theAgent" />
<AMLOOP ACTIVITY="dataset" DATASET="theAgent"><AMSKYBOT ACTIVITY="hold_agent_queue" SESSION="Skybot_1" AGENTNAME="%theAgent.AgentName%" /></AMLOOP>
<AMSKYBOT ACTIVITY="hold_agent_queue" SESSION="Skybot_1" AGENTNAME="%theAgent.AgentName%" />
<AMLOOP ACTIVITY="end" />
<AMSKYBOT ACTIVITY="close_skybot" SESSION="Skybot_1" />