Tickets
A vulnerability may be assigned a ticket. Unlike vulnerabilities, tickets are actionable items. Tickets allow all system users to track the course of action taken to eliminate a vulnerability. Users can update the status of a ticket, change a ticket’s due date, add comments, and more through the tickets area.
Viewing Tickets
To view tickets:
- Click More > Tickets.
- Click Summary.
By default, the Ticket Summary page displays information for all organizations. To display the tickets for a specific organization, select an organization from the drop-down list at the top of the page.
The results show the following information for each organization:
| Field | Description |
|---|---|
| Location | The organization, scan, or host. |
| Total | The total number of tickets. |
| Open | The number of open tickets. |
| Close | The number of closed tickets. |
| Resolved | The number of resolved tickets. |
| Ignored | The number of ignored tickets. |
| Overdue | The number of overdue tickets. |
| Highest Priority | The priority level of the highest-priority ticket. |
| Report | Contains icons for downloading a summary report in HTML, PDF, XML, or XLS format. |
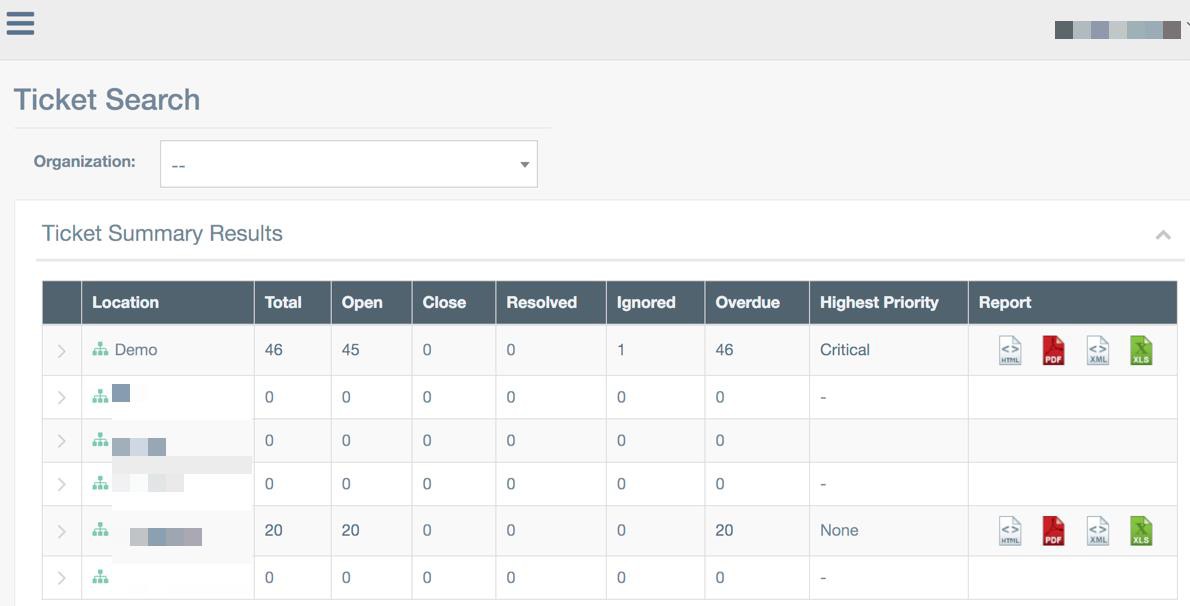
The Ticket Summary page.
Click on the value in a cell to see all related tickets. In the image above, for example, clicking on the number 45 would bring up a list of 45 open tickets for the Demo location.
Searching Tickets
To search tickets:
- Click More > Tickets.
-
Click Search.
By default, the Ticket List page displays all of the tickets for an organization. The basic search allows you to search by Vulnerability Name by entering text in the search box at the top right. To access the advanced search, click the arrow at the end of the search box. A search window with additional options will appear.
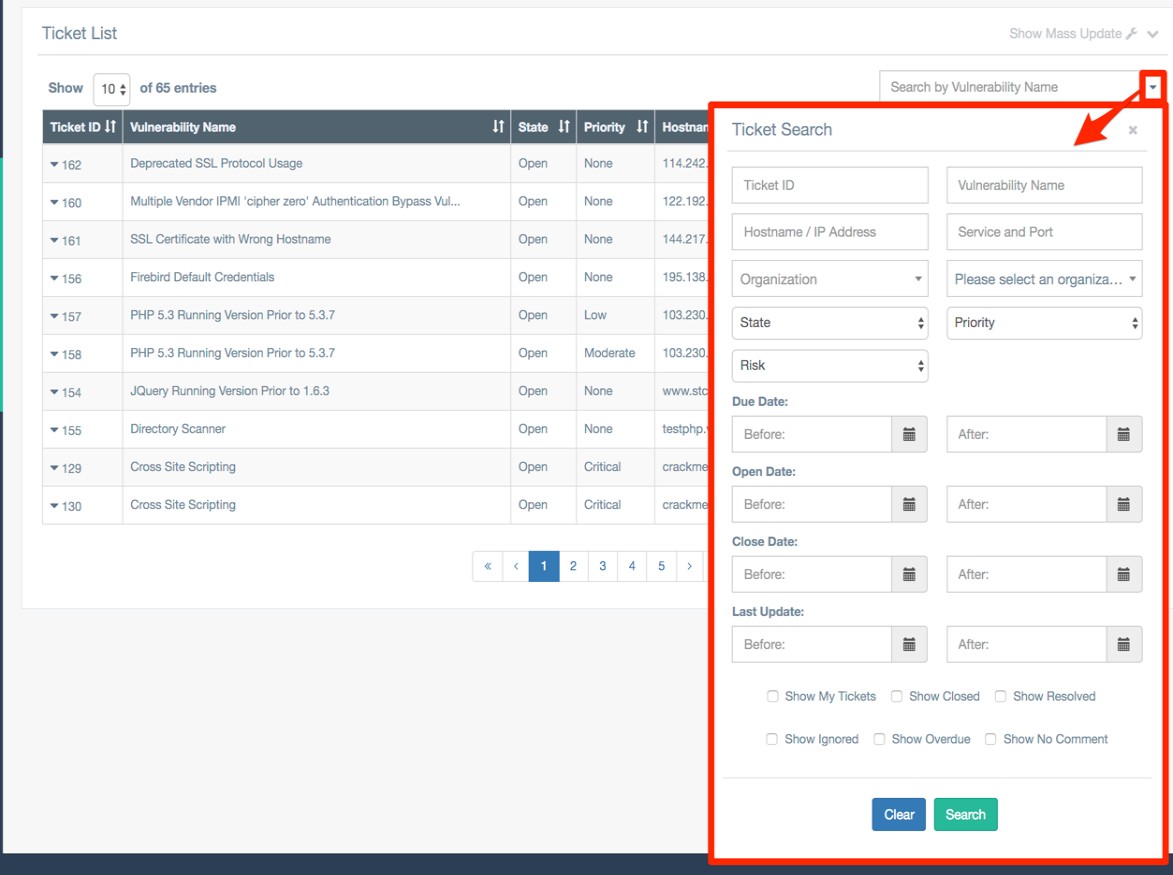
The Ticket List page, with the advanced search expanded.
The advanced search screen provides the following options:
Field Description Ticket ID The ID for the ticket. Vulnerability Name A descriptive name for the vulnerability. Hostname/IP Address The host name or IP address for the host associated with the ticket. Service and Port The service and port affected by the vulnerability. Separate the values with commas. For example, entering 80, 443 will return the results for port 80 and port 443. Organization The organization associated with the ticket. State The status of the ticket (open, ignore, resolved, or closed). For more information, see the Tickets section of this document. Priority How urgent the ticket is. Values are None, Low, Moderate, Important, and Critical. Risk The level of risk associated with the vulnerability in the ticket. Values are High, Medium, Low, and None. Due Date The date the ticket is due. Enter before and after dates to return tickets due within a specific time range. Open Date The date the ticket was opened. Enter before and after dates to return tickets due within a specific time range. Close Date The date the ticket was closed. Enter before and after dates to return tickets due within a specific time range. Last Updated The date the ticket was last updated. Enter before and after dates to return tickets due within a specific time range. Show My Tickets Includes tickets assigned to the current user. Show Closed Includes tickets that have been closed. Show Resolved Includes tickets that have been resolved. Show Ignored Includes tickets that have been marked Ignore. Show Overdue Includes tickets that are overdue. Show No Comment Shows tickets that don't have comments describing the action taken. - If using the advanced search, enter your search criteria and click the Search button.
-
Use the Next and Previous links at the bottom of the page to navigate through your results.
Click on a ticket to view the Ticket Details page.
Viewing Ticket Details
The Ticket Details page displays the following information about a ticket:
| Field | Description |
|---|---|
| Ticket ID | The ID for the ticket. |
| State | The status of the ticket (open, ignore, resolved, or closed). For more information, see the Tickets section of this document. |
| Priority | How urgent the ticket is. Values are None, Low, Moderate, Important, and Critical. |
| Due Date | The date the ticket is due. Enter before and after dates toreturn tickets due within a specific time range. |
| Host | The host name or IP address, port, and protocol for the host associated with the ticket. |
| Organization | The organization associated with the ticket. |
| Scan | The scan associated with the ticket. Note: An organization must be selected first. |
| Risk | The level of risk associated with the vulnerability in the ticket. Values are High, Medium, Low, and None. |
| Open Date | The date the ticket was opened. Enter before and after dates to return tickets due within a specific time range. |
| Close Date | The date the ticket was closed. Enter before and after dates to return tickets due within a specific time range. |
| Last Updated | The date the ticket was last updated. Enter before and after dates to return tickets due within a specific time range. |
| Assigned To | The email address for the user the ticket is as signed to. |
| Comment | A field for optional comments. |
The Ticket Details page.
To return to the ticket list, click Ticket List at the top of the screen.
Creating Tickets
Tickets are created through the Vulnerabilities List page, rather than the tickets area. One ticket can be created from each vulnerability. A user who can view the vulnerability information will also be able to view the ticket.
To create a ticket:
- Follow the steps listed in the Searching Vulnerabilities section of this guide
- Select a vulnerability from the results list.
- Click Create Ticket.
- Choose a ticket owner from the drop-down list, and then click Create Ticket.
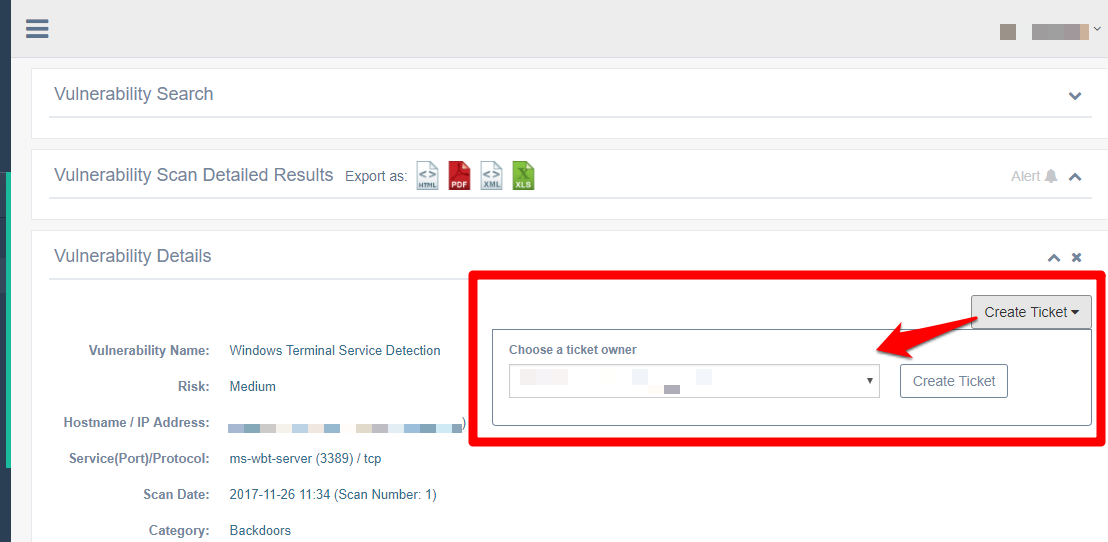
Creating a new ticket from a vulnerability.
Ticket State
A Ticket may have one of the following states: Open, Closed, Resolved, Ignored, or Overdue. The state Closed can only be assigned to tickets whose vulnerabilities are no longer present. Tickets marked Ignored are not displayed in the system.
To Set a Ticket to the Ignore State
-
Select the desired ticket from the Ticket List to display its details.
-
Click the Edit tab.
-
Click the Action box, and then select Ignore.
-
Optionally, add a comment as to why this ticket is now ignored, providing visibility to other users to why this action was taken.
-
Click Save.
Ticket Priority
A ticket can also be assigned one of the following priorities: None, Low, Moderate, Important, or Critical. Critical tickets will appear at the top of the ticket list.
Ticket Due Date
The due date option sets a deadline for resolving a ticket. Tickets with due dates that have passed will appear at the top of the list. In addition, the closer a ticket's upcoming due date is to the current date, the higher it will appear on the list.