WebApps Information Gathering
The WebApps Information Gathering step scans the domain of a known web-based application and identifies pages and/or web services that may be vulnerable to potential attacks.
Use the following steps to begin Information Gathering:
- Click the Web View tab of the Entity View. The WebApps RPT steps will appear in the RPT Panel.
- Click WebApps Information Gathering to start the Wizard and press Next to continue.
-
The WebApps RPT applies to Scenarios that you define.
A Scenario serves as a context in which you can test a web application and it will provide clarity to the results of the WebApps modules. You can use multiple scenarios to test the same web application with varying settings, or segment a web application and test each part independently in a different scenario.
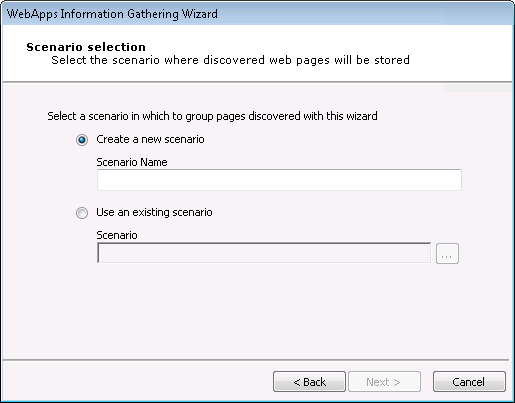
If you are creating a new scenario, enter its name in the Scenario Name field.
If you wish to use an existing scenario, click the appropriate radio button and click the ellipsis (
 ) button to select the desired Scenario. For this option to work, a scenario must already exist in the Web View.
Press Next to continue.
-
On the Information Gathering Mode Selection screen, select one of the information gathering modes.
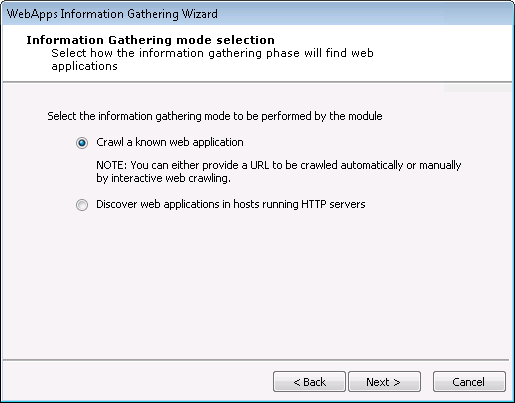
Crawl a known web application: With this option, Core Impact will crawl a web application whose address you provide and attempt to locate pages that it can subsequently test for vulnerabilities. If you select this option, see Crawl a Known Web Application.
Discover web applications in hosts running HTTP servers: If you already have hosts in your Network Entity tab, some of them may have HTTP servers running which can be an indicator that they are hosting web applications. This option will cause Core Impact to evaluate those hosts and attempt to identify web pages. If you select this option, see Discover WebApps in Hosts.
Press Next to continue.
Crawl a Known Web Application
The Automatic and Interactive web crawling methods have different configurations options.
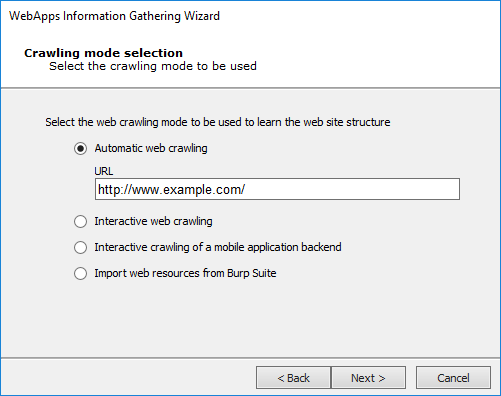
Select one of the available methods (and skip to the appropriate section of this document):
Automatic Web Crawling: Enter the URL where the RPT should begin scanning for pages then click the Next button. If you select this option, see Automatic Web Crawling for additional steps and configurations.
Interactive Web Crawling: Navigate the target web site and Core Impact will capture all visited web pages. If you select this option, see Interactive Web Crawling.
Interactive crawling of a mobile application backend: If you select this option, see Interactive Crawling of a Mobile Application Backend.
Import web resources from Burp Suite: Using this option, users can import the output file from Burp Suite Professional. If you select this option, see Import Web Resources from Burp Suite.
Press Next to continue.
Automatic Web Crawling
With Automatic web crawling, the RPT scans for web pages. Any pages that are found are then displayed in the Web View tab of the entity view.
-
On the Proxy Settings dialog, If a proxy server is needed to access the web application, select the appropriate proxy option and, if necessary, enter the server details.
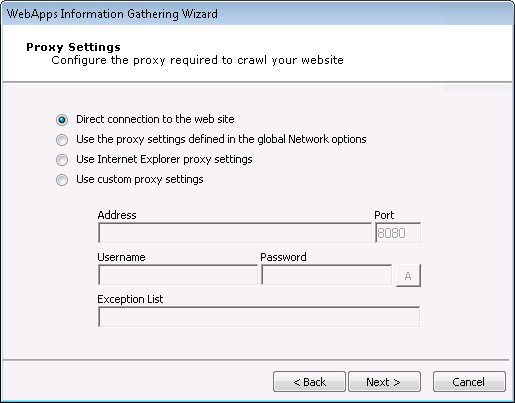
Direct connection to the Web Site: Select to connect without connecting to a proxy server.
Use the proxy settings defined in the global Network options: Select to follow the settings that are in the Tools -> -> form.
Use Internet Explorer proxy settings: Select to follow the settings as defined in your Internet Explorer preferences.
Use custom proxy settings: Select to follow the proxy settings in the fields just below.
Press Next to continue.
-
On the Custom HTTP Headers dialog you can set HTTP headers to use on the requests Impact will run when crawling the application. All requests will have those http headers.
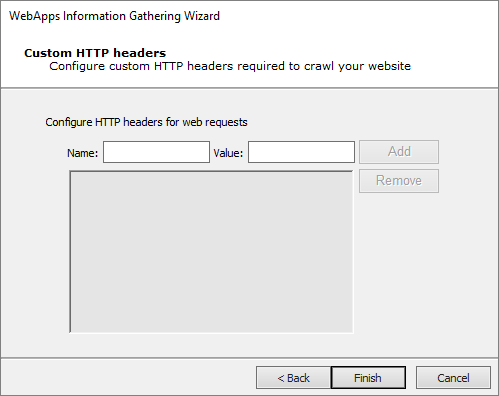
Press Next to continue.
-
On the Automatic Crawling Options dialog, set the Automatic web site crawling configuration options (screen 1 of 2):
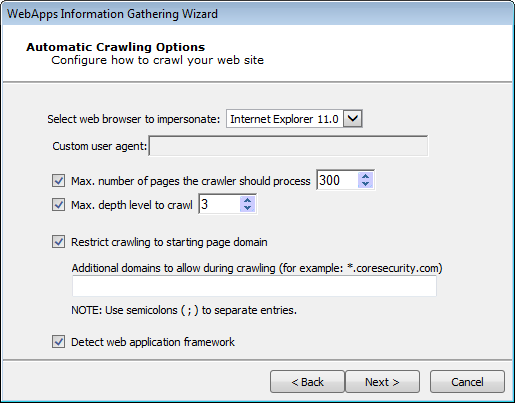
Use the Select a browser to impersonate drop-down menu to determine which browser type and version the WebApps RPT should run the test as.
If you want to set a Max. number of pages the crawler should process, check the box and enter a numeric value.
Select the Max. depth level to crawl. This value dictates how many links deep into the web application the RPT will go. Keep in mind that, even with a low value in this field, there could be many links that the crawler will follow.
If you want the RPT to not venture outside of the domain you entered in step 1, check the Restrict crawling to starting page domain checkbox. If you check this option, you can then enter specific domains other than the starting page domain that are open to the RPT.
Check Detect web server and application framework if you want the RPT to try and discover structural details about the web application.
Press Next to continue.
-
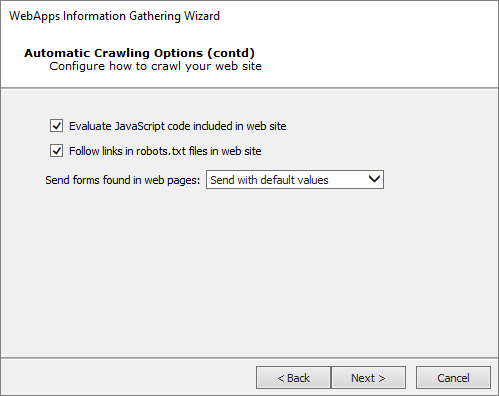
Set additional Automatic web site crawling options (screen 2 of 2):
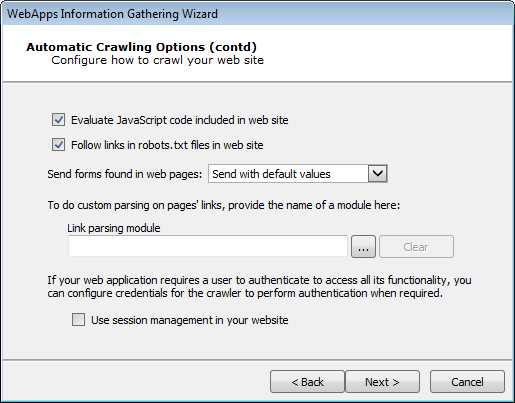
Check Evaluate JavaScript code included in web site if you want Core Impact to evaluate JavaScript code for known vulnerabilities.
Check Follow links in robots.txt files in web site if you would like Core Impact to try and locate a
robots.txtfile that may exist in the root of the target web application's web server. Oftentimes, web application administrators will use arobots.txtfile to instruct search engines and other web robots to not search certain pages. If the Core Impact web crawler locates therobots.txtfile, it can follow the links listed in the file and try to locate further vulnerabilities. Note that this setting will respect the Restrict crawling to starting page domain option.The Send forms found in web pages option will instruct the crawler to try and submit any forms that it finds in the web application. With this option, pages that are available only after the form is submitted can be accessed and lead to potential vulnerabilities. The crawler can Send with default values - use whatever default values are assigned to the field(s) or it can Send with auto-generated data.
Use the Link parsing module field to assign a module to handle dynamic hyperlinks within the web application. This is an advanced feature that requires users to create the custom module.
Please contact Core Security's Customer Support (see Contact Core Security) for a sample plugin module.
If you want the web crawler to log in to the web application, check the Use session management in your website checkbox. Checking this box will add 2 additional steps to the Wizard.
Press Next to continue.
NOTE:If you opted to have the web crawler log in to the web application (Session Management) you will see these next 3 to 5 screens (depending on options selected). Otherwise, you will jump directly to On the Web Services Discovery Options dialog, you can opt for the RPT to look for any SOAP-based web services. Select from the available parameters. If any web services vulnerabilities are identified, they will be listed in the Web view of the entity database..
-
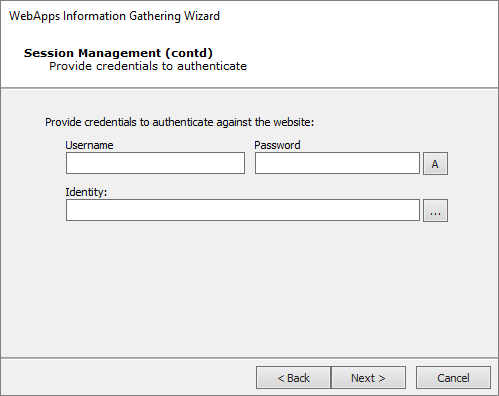
On the Session Management screens, provide credentials and select an authentication method.
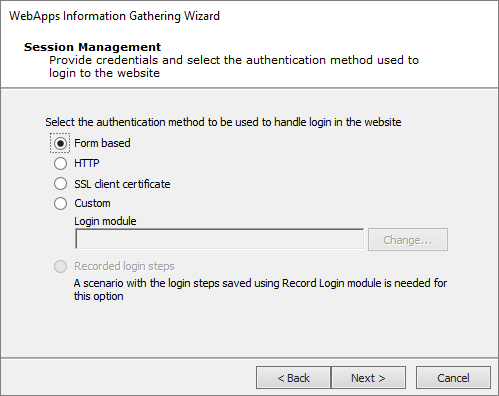
Form based: Use this type if the web application has a login page that contains username and password fields. You will be asked in the next page of the wizard to enter a username and password or to select an existing Identity.
HTTP: Use this type if the web application presents users with integrated Windows authentication (Kerberos or NTLM) before allowing them to view any pages from the application.
SSL client certificate: Use this option to provide a certificate to the Information Gathering step (jump to Session Management - SSL).
Custom: Use this type if the web application has a login page but does not use standard login fields (e.g. username and password). You will need to create a custom module that will match your web application's authentication requirements. The Login on Forms module is provided as a template for use when developing your own custom module (see Custom Modules).
If applicable, enter the Username and Password that should be used to authenticate against the web site.
Recorded login steps: If you have recorded the login steps for your target web application, select this option and the web crawler will use that recording to log into the site. Core Impact will prompt you if it requires any manually input data (CAPTCHA, etc) when it uses the recorded login steps. See Recording Login Steps for information on recording login steps.
Press Next to continue.
-
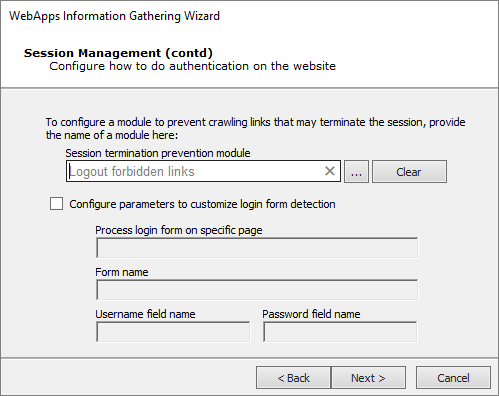
Continue with Session Management options by selecting a Core Impact module that will prevent the RPT from executing links that might terminate the session.
You can extend Core Impact's functionality by writing your own custom modules. For more information about writing custom modules, please contact Customer Support (see Contact Support).
If you chose to Do form based authentication in the previous step, the RPT step will attempt to automatically detect the web application's login page, login form, and user name and password fields. Because there are no standards for login forms, this automatic detection may not succeed, in which case you should opt to Configure parameters to customize login form detection. Once this option is checked, you can enter a specific page, form and username/password fields that the RPT step should use for session management.
Press Next to continue.
-
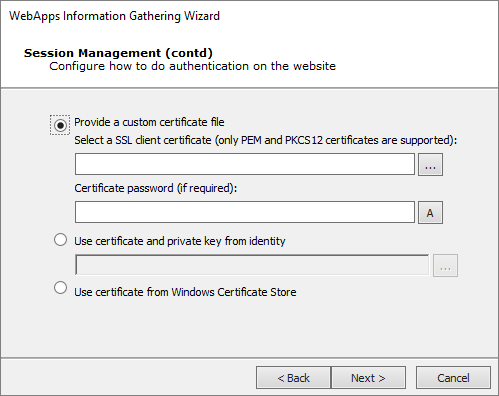
Session Management (alternate 2nd screen)
If you chose SSL Client Certificate authentication in the previous step, configure the certificate details that Core Impact should use for the test.
Press Next to continue to On the Web Services Discovery Options dialog, you can opt for the RPT to look for any SOAP-based web services. Select from the available parameters. If any web services vulnerabilities are identified, they will be listed in the Web view of the entity database.. If you selected Windows Cert Store above this next screen displays.
-
-
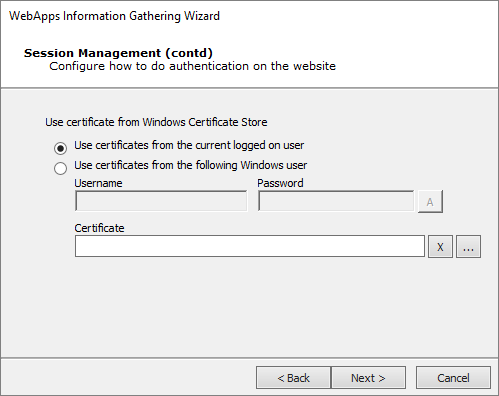
Session Management (3rd screen)
Click Next to continue.
-
-
On the Web Services Discovery Options dialog, you can opt for the RPT to look for any SOAP-based web services. Select from the available parameters. If any web services vulnerabilities are identified, they will be listed in the Web view of the entity database.
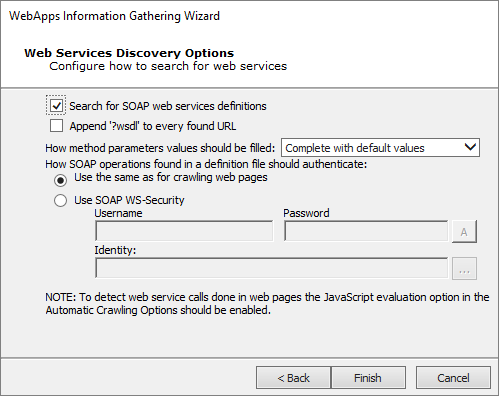
Search for SOAP web services definitions: Check this option if you want the RPT to look SOAP-based web services. Core Impact will look for links to .wsdl files. If any are found, they will be parsed and Core Impact will capture the details of the target web service in the entity database.
Append '?wsdl' to every found URL: It is possible that a web application will use a SOAP-based web service but not have an explicit link to a .wsdl file within its pages. Select this option if you want Core Impact to automatically append any found link with the '?wsdl' extension. Keep in mind that this will double all of the requests made by Core Impact and will cause the Information Gathering step to run longer.
How method parameters values should be filled: Select an option for determining values that the target web service may request.
Complete with default values: For any functions provided by the web service, Core Impact will select the single most likely value to satisfy each function.
Complete with autogenerated data: For any functions provided by the web service, Core Impact will select multiple likely values for each function.
Define the authentication method for SOAP operations:
Use the same as for crawling web pages: Use this option if the SOAP operations will not require authentication, or if authentication is required but you have already entered it for use in Web Crawling.
Use SOAP WS-Security: Manually enter a Username and Password for Core Impact to use to satisfy the SOAP WS-Security.
NOTE:Core Impact can detect SOAP-based or RESTful web services. Because SOAP-based web services always have a .wsdl file, these can be detected using Automatic or Interactive web crawling. RESTful web services employ no such definition file so, in order to detect RESTful web services, you must use Interactive web crawling so that Core Impact can try and detect JSON type calls in the web traffic.
Press Finish to run the automatic crawl process. Once the Wizard closes, the RPT will proceed and attempt to identify pages - if any are found, they will be saved in the Web View under the appropriate scenario.
Interactive Web Crawling
With interactive web crawling, you set your web browser to use Core Impact as a proxy and then navigate your web application. As you navigate the web application, Core Impact will capture each page that you view and add them to the Web View under the appropriate scenario. After selecting the Interactive Web Crawling radio button, continue to configure the RPT:
-
If a proxy server is needed to access the web application, select the appropriate proxy option and, if necessary, enter the server details.
Direct connection to the Web Site: Select to connect without connecting to a proxy server.
Use the proxy settings defined in the global Network options: Select to follow the settings that are in the Tools -> -> form.
Use Internet Explorer proxy settings: Select to follow the settings as defined in your Internet Explorer preferences.
Use custom proxy settings: Select to follow the proxy settings in the fields just below.
Press Next to continue.
-
Custom HTTP Headers screen.
You can set HTTP headers to use on the requests Impact will run when crawling the application. All requests will have those http headers.
Press Next to continue.
-
Set the Interactive Crawling Options.
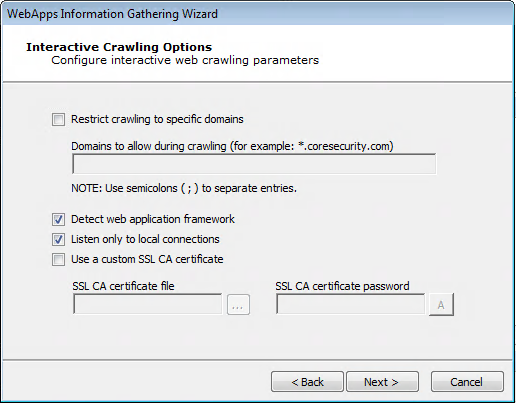
Restrict crawling to specific domain : If you want the RPT to not record pages outside of a specific domain, check the Restrict crawling to specific domain checkbox. If you check this option, you must then enter the specific domain(s) to which the crawler will be restricted.
Detect web application framework: The Detect web application framework is checked by default. This setting will cause the RPT step to find out details about the underlying web application platform.
Core Impact can detect SOAP-based or RESTful web services. Because SOAP-based web services always have a .wsdl file, these can be detected using Automatic or Interactive web crawling. RESTful web services employ no such definition file so, in order to detect RESTful web services, you must use Interactive web crawling so that Core Impact can try and detect JSON type calls in the web traffic.Listen only to local connections: By default, this option is enabled, which means that only connections from the machine where Core Impact is installed can connect to the proxy for Interactive Web Crawling. If you uncheck this option, any device with access to the proxy can connect to it and Core Impact will capture and evaluate the web traffic for pages and web services.
Use a custom SSL CA certificate: This option is necessary for instances when the web app connects to the application server using https (SSL) and authenticates by checking the certificate provided by the server. When the application server is using a certificate authority controlled by the user, you can provide the SSL CA certificate file and the password associated with it, so that Core Impact's web proxy module can generate the necessary certificates on-the-fly for the hosts accessed by the web application during the interactive crawling session.
SSL CA Certificate file: Browse to and select the certificate file
SSL CA certificate password: Enter the password associated with the SSL CA Certificate
Press Next to continue.
-
The final page of the interactive web crawling Wizard contains a notification about how to proceed with the RPT step.
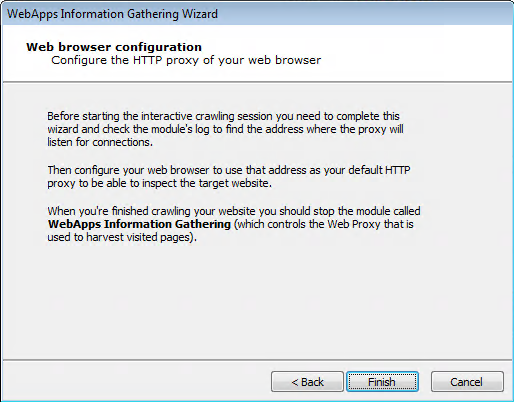
You will need to configure your web browser to use 127.0.0.1:8080 as its web proxy before you begin navigating your web application. When you are finished browsing the application, you will then need to manually terminate the WebApps Information Gathering module in Core Impact.
Press the Finish button.
Once the Wizard closes, check the Module Output pane to learn the HTTP Proxy, then set your browser to use that proxy.
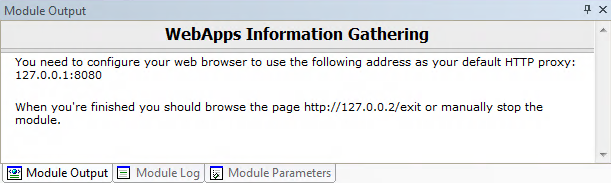
You will manually access and navigate the target web application - Core Impact will save the pages you visit in its entity view under the appropriate scenario.
Interactive Crawling of a Mobile Application Backend
With Interactive web crawling of a mobile application backend, you configure your mobile device to use Core Impact as a proxy and then use your application on your mobile device. As you use the mobile application, Core Impact will harvest the requests being made on the server and use these requests as baselines to test the target backend web services and try to identify vulnerabilities in them.
When a user runs an application (app) on a mobile device, that app typically requires a connection to a backend server. For example, an app providing the weather will need to connect to a remote server using web services in order to receive the latest weather data, then display it on the mobile device.
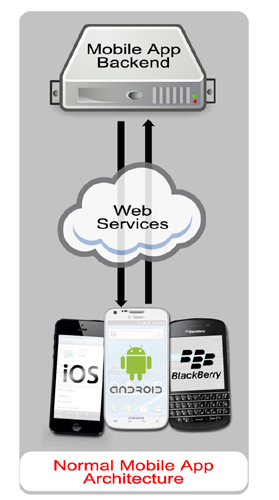
When performing Mobile Application Backend Testing in Core Impact, you are essentially running a WebApps test whereby Core Impact sits in between a mobile app and its backend server. Core Impact will then harvest the requests being made on the server and use these requests as baselines to test the target backend web services and try to identify vulnerabilities in them. This simulates what a malicious person may do in order to exploit and extract information from the servers.
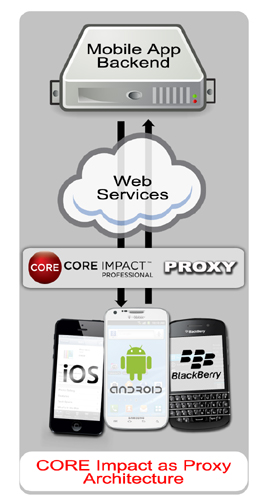
With Core Impact Mobile Application Backend Testing capabilities, you can make sure that the web services used as the backend of your mobile app are not vulnerable to a malicious attack. Use the Interactive crawling of a mobile application backend option when performing WebApps Information Gathering in order to leverage Core Impact's web services testing capabilities to further extend your penetration testing practice.
-
If a proxy server is needed to access the web application, select the appropriate proxy option and, if necessary, enter the server details.
Direct connection to the Web Site: Select to connect without connecting to a proxy server.
Use the proxy settings defined in the global Network options: Select to follow the settings that are in the Tools -> -> form.
Use Internet Explorer proxy settings: Select to follow the settings as defined in your Internet Explorer preferences.
Use custom proxy settings: Select to follow the proxy settings in the fields just below.
Press Next to continue.
-
Custom HTTP Headers screen.
You can set HTTP headers to use on the requests Impact will run when crawling the application. All requests will have those http headers.
Press Next to continue.
-
Set the Interactive Crawling Options.

Restrict crawling to specific domain : If you want the RPT to not record pages outside of a specific domain, check the Restrict crawling to specific domain checkbox. If you check this option, you must then enter the specific domain(s) to which the crawler will be restricted.
Detect web application framework: The Detect web application framework is checked by default. This setting will cause the RPT step to find out details about the underlying web application platform.
Core Impact can detect SOAP-based or RESTful web services. Because SOAP-based web services always have a .wsdl file, these can be detected using Automatic or Interactive web crawling. RESTful web services employ no such definition file so, in order to detect RESTful web services, you must use Interactive web crawling so that Core Impact can try and detect JSON type calls in the web traffic.Use a custom SSL CA certificate: This option is necessary for instances when the web app connects to the application server using https (SSL) and authenticates by checking the certificate provided by the server. When the application server is using a certificate authority controlled by the user, you can provide the SSL CA certificate file and the password associated with it, so that Core Impact's web proxy module can generate the necessary certificates on-the-fly for the hosts accessed by the web application during the interactive crawling session.
SSL CA Certificate file: Browse to and select the certificate file
SSL CA certificate password: Enter the password associated with the SSL CA Certificate
Press Next to continue.
-
The final page of the Interactive crawling of mobile application backend wizard contains a notification about how to proceed with the RPT step.
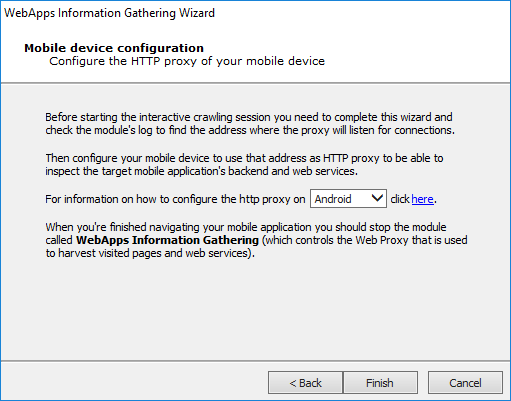
You will need to:
- Complete the wizard and check the Module Output to learn the address where the proxy will listen for connections
- When you are finished using the application, you will then need to manually terminate the WebApps Information Gathering module in Core Impact.
Press the Finish button.
Once the Wizard closes, check the Module Output pane to learn the HTTP Proxy address, then set your mobile device to use that proxy.
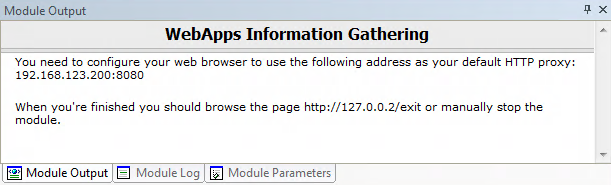
You will manually access and navigate the target mobile application - Core Impact will evaluate the traffic and identify web services that may be vulnerable to subsequent attack.
Import Web Resources from Burp Suite
-
On the Import Web Resources from Burp Suite screen, select an .xml file generated from Burp (Burp is a web application vulnerability scanner). Impact will import that data and run IG starting from what Burp found
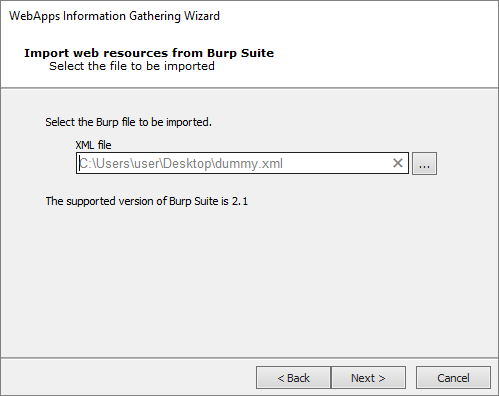
Press Next to continue.
-
If a proxy server is needed to access the web application, select the appropriate proxy option and, if necessary, enter the server details.
Direct connection to the Web Site: Select to connect without connecting to a proxy server.
Use the proxy settings defined in the global Network options: Select to follow the settings that are in the Tools -> -> form.
Use Internet Explorer proxy settings: Select to follow the settings as defined in your Internet Explorer preferences.
Use custom proxy settings: Select to follow the proxy settings in the fields just below.
Press Next to continue.
-
Custom HTTP Headers screen.
You can set HTTP headers to use on the requests Impact will run when crawling the application. All requests will have those http headers.
Press Finish.
Discover WebApps in Hosts
-
On the Hosts Selection screen, click the ellipsis (
) button and select the host(s) that you want Core Impact to scan for Web Applications.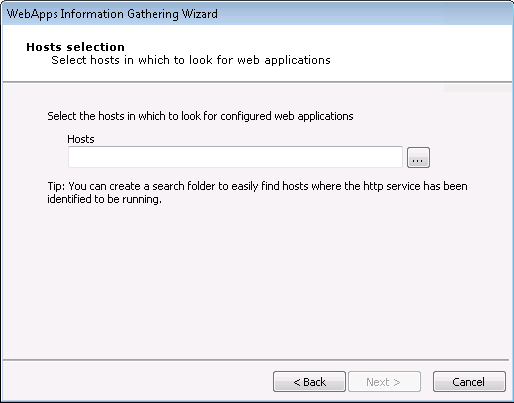
Press Next to continue.
-
Set the Automatic web site crawling configuration options (screen 1 of 2):
Use the Select a browser to impersonate drop-down menu to determine which browser type and version the WebApps RPT should run the test as.
If you want to set a Max. number of pages the crawler should process, check the box and enter a numeric value.
Select the Max. depth level to crawl. This value dictates how many links deep into the web application the RPT will go. Keep in mind that, even with a low value in this field, there could be many links that the crawler will follow.
If you want the RPT to not venture outside of the domain you entered in step 1, check the Restrict crawling to starting page domain checkbox. If you check this option, you can then enter specific domains other than the starting page domain that are open to the RPT.
Check Detect web server and application framework if you want the RPT to try and discover structural details about the web application.
Press Next to continue.
-
Set additional Automatic web site crawling options (screen 2 of 2):
Check Evaluate JavaScript code included in web site if you want Core Impact to evaluate JavaScript code for known vulnerabilities.
Check Follow links in robots.txt files in web site if you would like Core Impact to try and locate a
robots.txtfile that may exist in the root of the target web application's web server. Oftentimes, web application administrators will use arobots.txtfile to instruct search engines and other web robots to not search certain pages. If the Core Impact web crawler locates therobots.txtfile, it can follow the links listed in the file and try to locate further vulnerabilities. Note that this setting will respect the Restrict crawling to starting page domain option.The Send forms found in web pages option will instruct the crawler to try and submit any forms that it finds in the web application. With this option, pages that are available only after the form is submitted can be accessed and lead to potential vulnerabilities. The crawler can Send with default values - use whatever default values are assigned to the field(s) or it can Send with auto-generated data.
Press Next to continue.
-
On the Web Services Discovery Options form, you can opt for the RPT to look for any SOAP-based web services. Select from the available parameters. If any web services vulnerabilities are identified, they will be listed in the Web view of the entity database.
Search for SOAP web services definitions: Check this option if you want the RPT to look SOAP-based web services. Core Impact will look for links to .wsdl files. If any are found, they will be parsed and Core Impact will capture the details of the target web service in the entity database.
Append '?wsdl' to every found URL: It is possible that a web application will use a SOAP-based web service but not have an explicit link to a .wsdl file within its pages. Select this option if you want Core Impact to automatically append any found link with the '?wsdl' extension. Keep in mind that this will double all of the requests made by Core Impact and will cause the Information Gathering step to run longer.
How method parameters values should be filled: Select an option for determining values that the target web service may request.
Complete with default values: For any functions provided by the web service, Core Impact will select the single most likely value to satisfy each function.
Complete with autogenerated data: For any functions provided by the web service, Core Impact will select multiple likely values for each function.
Define the authentication method for SOAP operations:
Use the same as for crawling web pages: Use this option if the SOAP operations will not require authentication, or if authentication is required but you have already entered it for use in Web Crawling.
Use SOAP WS-Security: Manually enter a Username and Password for Core Impact to use to satisfy the SOAP WS-Security.
NOTE:Core Impact can detect SOAP-based or RESTful web services. Because SOAP-based web services always have a .wsdl file, these can be detected using Automatic or Interactive web crawling. RESTful web services employ no such definition file so, in order to detect RESTful web services, you must use Interactive web crawling so that Core Impact can try and detect JSON type calls in the web traffic.
- Press the Finish button. The RPT will begin and you can monitor its progress in the Executed Modules pane.