Configure Scans
For new client accounts, we recommend starting with a host discovery scan to ensure targets are being found by the scanner and that the device count is accurate.
-
From the navigation menu, select Scans > Scan Activity.
-
Select +New Scan from the top right of the page.
-
In Scan name box, choose an appropriate scan name. An example would be "Host Discovery Internal."
-
In the Policy Options area under Scan Policy, select Host Discovery.
-
If scheduling the scan for a future time, change the Start scan on to the appropriate settings for the client.
-
Toggle Add to Active View to OFF. This ensures Active View only contains relevant results when the full vulnerability scans are performed.
-
In Scan Targets, select the asset group which contains the relevant internal IP addresses.
-
Select Create and run.
-
Repeat steps 2-8 for the client's external asset group.
Once both scans have completed their run, you should see them listed in the Scan Activity page. There should be a green bar to the right that reads Completed. Based on the total number of IPs being targeted, the scan times can vary. See What is the difference in scan speeds? for more information.
Under average circumstances, follow up about 24 hours after initializing scans. If the host discovery scans returned the expected number of targets, proceed with creating full vulnerability assessment scans and scheduling them to recur based on client needs. See Create and Run Scans for a full guide.
If the number of targets is lower than expected, see Scan not returning the expected number of assets.
If the number of targets is higher than expected:
-
Check the asset group for accuracy.
-
Check the scan results. If there is a large number of hosts with unknown operating system in the results, consider running another host discovery with ICMP only asset detection. For more information, see the Ghost Hosts.
- Discuss the contracted device count with the client.
Configure Scans
Scanning can be optimized for internal assets, external assets or both.
Configure Scans for Internal Scanning
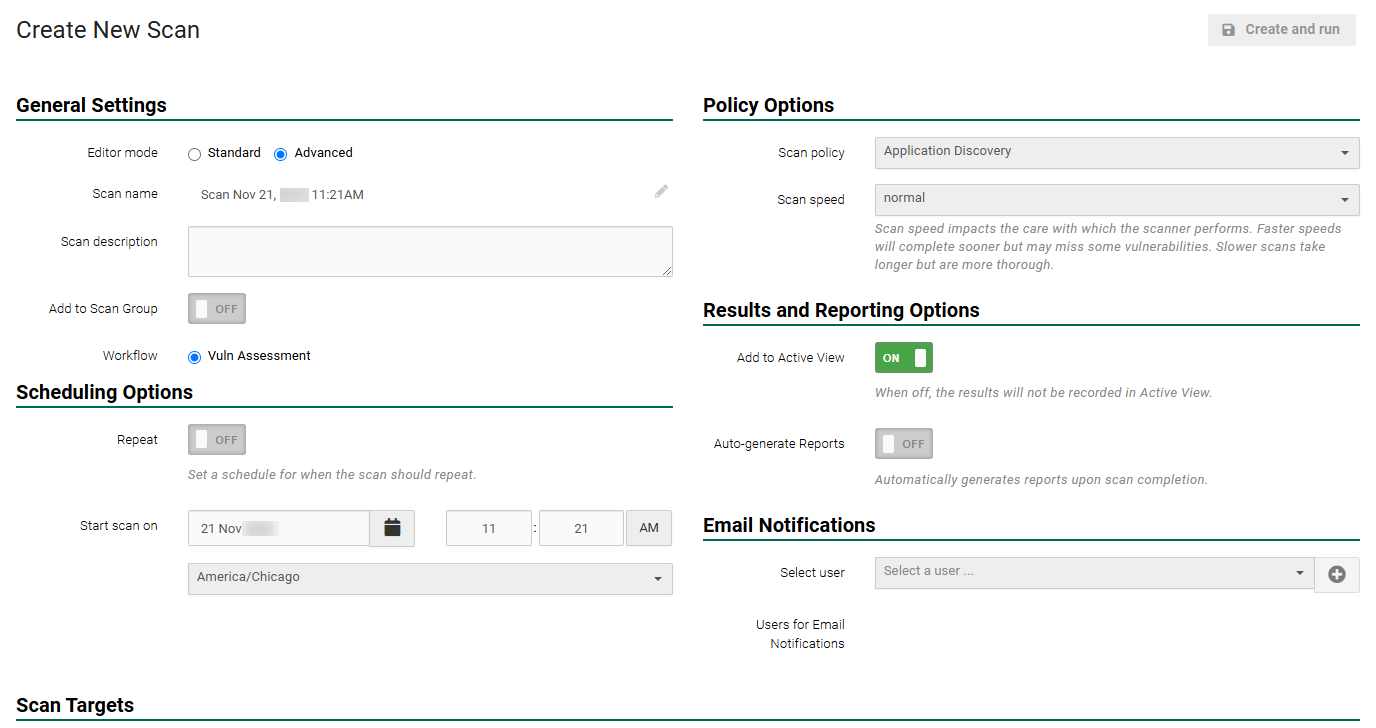
- From the navigation menu, select Scans > Scan Activity.
- Select +New Scan from the top right of the page.
- In Scan name, choose an appropriate scan name. An example would be Application Discovery Internal.
- In the Policy Options area under Scan Policy, select Application Discovery.
- If necessary, change the Start scan on to the appropriate settings for the client.
- Toggle Add to Active View to OFF. This ensures Active View only contains relevant results when the full vulnerability scans are performed.
- In Scan Targets select the asset group which contains the relevant internal IP addresses.
- Select Create and run.
Once the scans have completed their run, you should see them listed in the Scan Activity area. There should be a green bar to the right that reads Completed. Based on the total number of IPs being targeted, the scan times can vary. See What is the difference in scan speeds? for more information.
Configure Scans for External Scanning
There are multiple ways to start a new scan. This is just one way.
- From the navigation menu, select Scans > Scan Activity.
- Select +New Scan from the top-right of the page.
-
In Scan name, choose an appropriate scan name. An example would be Application Discovery External.
NOTE: The Repeat toggle is only applicable to Application Discovery scans, future recurring vulnerability scans should have this option ON. -
In the Policy Options area, under Scan Policy select Application Discovery.
- If necessary, change Start scan on to the appropriate settings for the client.
- Toggle Add to Active View to OFF. This ensures Active View only contains relevant results when the full vulnerability scans are performed.
- In Scan Targets select the asset group which contains the relevant internal IP addresses.
- Select Create and run.
Once both scans have completed their run, you should see them listed in the Scan Activity area. There should be a green bar to the right that reads Completed. Based on the total number of IPs being targeted, the scan times can vary. See What is the difference in scan speeds? for more information.
Under average circumstances, follow up about 24 hours after initializing scan.