Create and Run Scans
When you first start using Fortra VM, it typically runs a host discovery scan primarily to identify the resources on your network and create an initial baseline in Active View. This scan uses the default Host Discovery scan policy, which only checks to identify if an active host is present and determines its fingerprint (for example, hostname, operating system). It does not, however, check for vulnerabilities.
Once the initial Fortra VM scan is complete, you can create your own scans.
-
From the navigation bar, select Scans > Scan Activity or Scheduled Scans. Select + New Scan. The Create New Scan dialog appears.

- If you set Editor mode to Standard, go to step 3. If you set Editor mode to Advanced, go to step 4.
- With Editor mode set to Standard, complete the following scan information:
-
Scan Settings
- Scan name - Select the field to begin entering the name.
-
Target IPs and/or DNS Hostnames - Enter the desired targets for the scan.
-
Scanner Profile - An internal or external scanner profile is populated automatically based on the input targets. To use a different scanner profile, select it from the drop-down list.
-
Auto-generate Reports - Enable to automatically generate default reports upon scan completion.
-
Scheduling Options
- Repeat - Enable to make the scan recurring. If you select ON for the Recurrence Schedule, a dialog box opens and lets you specify when the scan should occur. Recurring scans should be set in accordance with the scan frequency stated in your service agreement (for example, quarterly, monthly).
- Schedule - Select the date, time, and time zone for the scan. If you set up a recurring scan, this field disappears and instead displays Established Schedule, which you can change by selecting the schedule link.
-
With Editor mode set to Advanced, complete the following scan information:

-
General Settings
-
Scan name - Select the field to enter the name.
-
Scan description - If desired, select the field to enter a description.
-
Add to Scan Group - Turned OFF by default. Enable to select a Scan Group source to add this scan to. See Scan Groups for more information.
-
Workflow - Multiple workflow types may be available based on your service subscriptions. Select the desired workflow, if available.
-
Run as courtesy scan - Enable if scan will not be attributed to overall usage.
-
Override usage limits - Enable if you want the scan to run if it override the usage limits.
-
-
Scheduling Options
-
Repeat - Enable to make the scan recurring. If you select ON for the Recurrence Schedule, a dialog opens and lets you specify when the scan should occur. Recurring scans should be set in accordance with the scan frequency stated in your service agreement (for example, quarterly, monthly).
-
Start scan on - Select the date, time, and time zone for the scan. If you set up a recurring scan, this field disappears and displays Established Schedule. You can change this by selecting the schedule link.
-
-
Business Group ACLs
NOTE: This displays only if business groups are enabled. See Business Groups for more information.-
Select Owner Business Group - Select the business group who can edit the scan.
-
Select Accessor Business Group - Select the business group who should see the scan’s results (this cannot be updated after the scan has been run).
-
-
Scan Targets
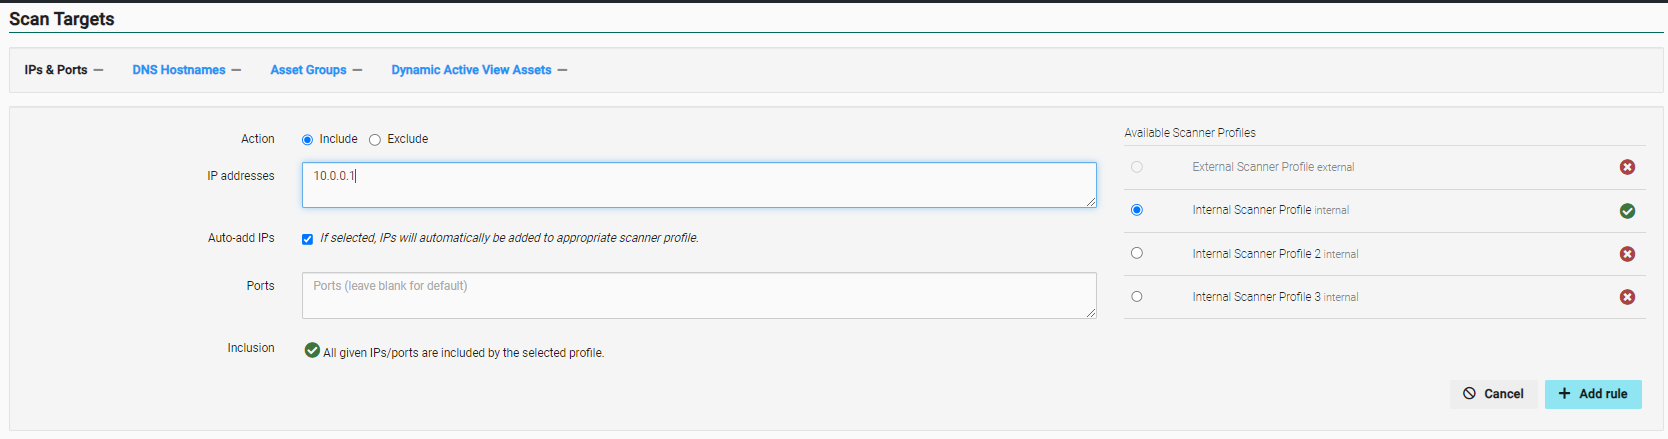
Tab Description and options IPs & Ports Define the IP addresses and associated ports you want to scan. Select the + Add rule button to add each rule to your scan.
-
Action - Choose whether to Include or Exclude a range of IP addresses and / or ports. If you choose Include, the Inclusion section appears.
- IP Addresses - Enter the IP addresses to be included or excluded from the asset group (separate multiple addresses with commas, or enter a range). (Example IP range: 192.168.2.1-192.168.2.255.)
-
Auto-Add IPs - If this is selected, IPs will automatically be added to the appropriate scanner profile.
-
Ports - Enter the ports you want included or excluded from the asset group (separate multiple ports with commas).
-
Inclusion - See if your IP addresses and ports are within the scanner profile’s range (you must first select an available scanner profile to see this information).

-
Available Scanner Profiles - Select the scanner profile to which you want to apply your rules by selecting System > Scanner Management > Scanner Profiles. Your scan rules display at the bottom of the tab. If you need to delete a rule, select the Delete button
 next to it and the resulting check-mark to confirm.
DNS Hostnames Define the hostnames and associated ports you want to scan. Select Save to add each rule to your scan. See What is scanning by DNS hostname? for more information.
-
Action - Choose whether to Include or Exclude hostnames and / or ports.
-
DNS Hostnames - Type the hostnames to be included or excluded from the asset group (separate multiple hostnames with commas). (Example: www.mysite.com.)
-
Ports - Type the ports associated with the hostnames to be included or excluded from the asset group (separate multiple ports with commas).
-
Available Scanner Profiles - Select the scanner profile to which you want to apply your rules. Your scan rules display at the bottom of the tab. If you need to delete a rule, select delete next to it and the resulting check-mark to confirm.
Asset Groups Select the Asset Groups you want the scan to run against. The Preview icon next to an asset group gives you an overview of its rules (for example, IP address range, scanner profiles, asset type).
Dynamic Active Group Assets Define the assets you want to scan using conditional filters.
- Choose an asset or vulnerability criteria (for example, Asset: Type).
- Choose a comparison operator (options depend on the criteria you selected).
- Enter or select a value for the criteria (options depend on the criteria you selected).
- Select the Add button
 next to your rule to add it to your scan. Select the Delete button to delete a rule.) (Optional) Create additional asset rules for the scan.
-
- Policy Options
-
Scan policy - Select the desired scan policy from the drop down list. See Scan Policies for more information.
-
Scan speed - Select the desired speed. Faster speeds will complete sooner but may miss some vulnerabilities. Slower scans take longer but are more thorough. See What is the difference in scan speeds? for more information.
-
- Results and Reporting Options
-
Add to Active View - Enabled by default for subscriptions that include Active View. Turn OFF if you do not want the scan results to display in Active View.
-
Auto-generate Reports - Turned OFF by default. Enable to automatically generate reports upon scan completion. This generates the default reports for the workflow type unless specific reports are selected using the Use Custom Reports List toggle.
-
Password Protect Reports - If password protection is desired, enable and enter a password in the Report Password field.
-
Email Reports - Enable to email the reports to all users on the account with scan notifications enabled.
-
Limit Reports Email - Enable to email the reports only to users specified in the Email Notifications section.
-
Use Custom Reports List - Specify which reports to auto-generate. Once enabled, select the desired report type from the drop down menu, then select + to add the report to the Reports to Generate list.
-
-
Email Notifications - Enable to add users who do not receive automatic scan notifications. If enabled, enter email addresses and select to add them. Your additional scan notification recipients are listed in the Recipients field. Users who have set their account not to receive automatic Fortra VM notifications will get a notification for this scan.
- After selecting your settings, select Create and Run. If you do not want to run the scan immediately, make sure that the Start scan on or Schedule is set to a later time and date. If you schedule the scan, you can view it on the Scheduled Scans page (located by selecting Scans > Scheduled Scans on the navigation menu). If you did not schedule the scan, it initially appears on the Scheduled Scans page before displaying on the Scan Activity page (located by selecting Scan > Scan Activity on the navigation menu).
A web application scan should generally be performed on a staging environment as a part of testing. Web application scans submit forms with test data which may result in data loss or corruption. Do not scan a website without proper authorization. Ensure all relevant administrators are notified prior to performing a scan. A scan may cause the web application to crash and require a restart.
-
From the navigation bar, select Scans > Scan Activity or Scheduled Scans. Select + New Scan. The Create New Scan dialog appears.
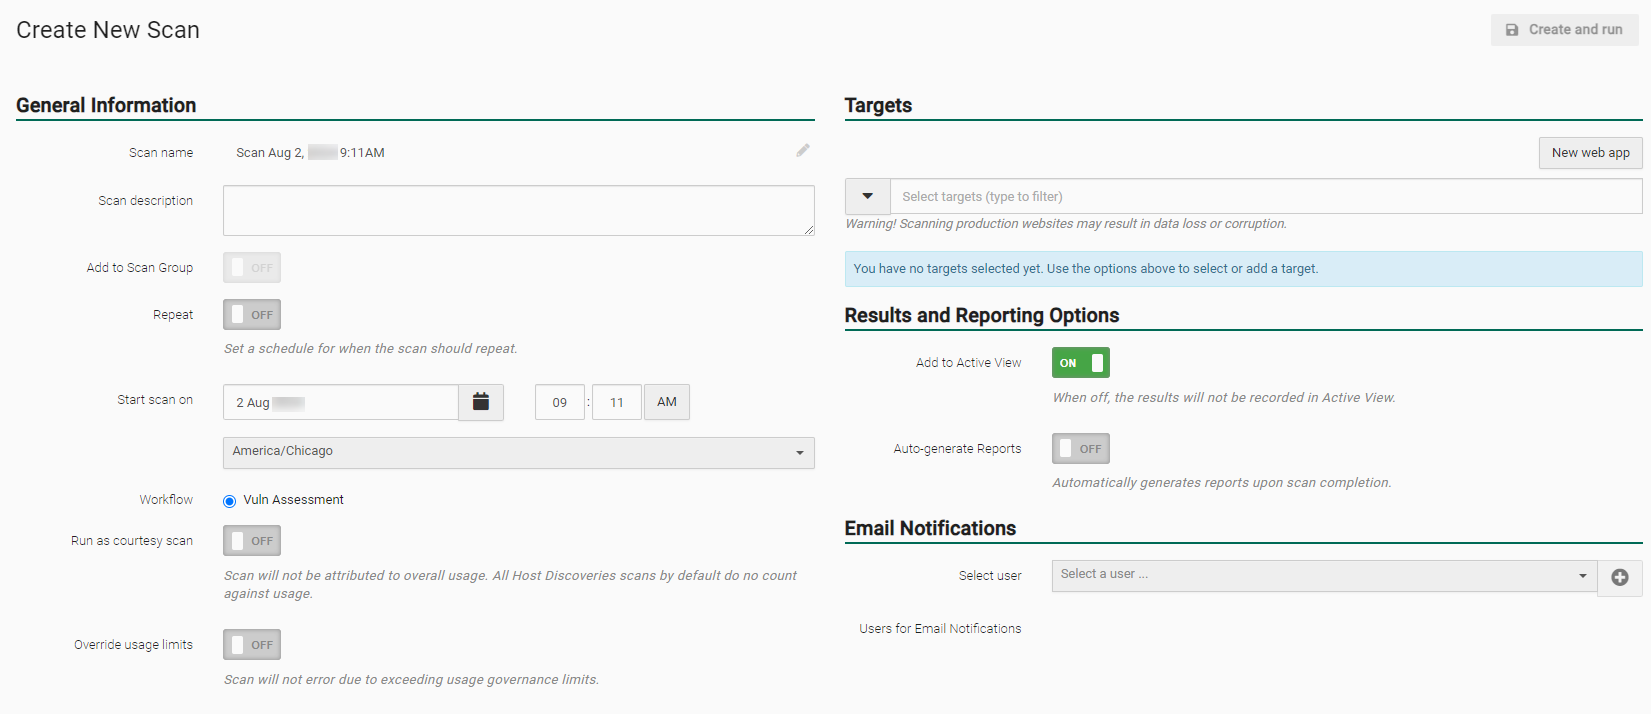
- General Information
- Scan name - Select the field to begin entering the name.
Scan description - If desired, select the field to enter a description.
Add to Scan Group - Turned OFF by default. Enable to choose a Scan Group source to add this scan to. See Scan Groups for more information.
- Repeat - Enable to make the scan recurring. If you select ON, the Recurrence Schedule, a dialog box opens and lets you specify when the scan should occur. Recurring scans should be set in accordance with the scan frequency stated in your service agreement (for example, quarterly, monthly).
- Start scan on - Select the date, time, and time zone for the scan. If you set up a recurring scan, this field disappears and instead shows you the Established Schedule, which you can change by selecting the schedule link.
Workflow - Multiple workflow types may be available based on your service subscriptions. Select the desired workflow if available.
Run as courtesy scan - Enable if scan will not be attributed to overall usage.
Override usage limits - Enable if you want the scan to run if it override the usage limits.
-
Targets
-
Use the drop-down arrow or start typing the name of an existing web app or web app group to add it as a target.
-
New web app - Select to create a new web application target. See Web Apps and Groups for more information.
-
- Results and Reporting Options
- Add to Active View - Enabled by default. Turn OFF if you do not want the scan results to display in Active View.
- Auto-Generate Reports - Turned OFF by default. Enable to automatically generate default reports upon scan completion. See Create and Run Scans for Fortra VM for more information about report auto-generation options.
- From Extra Email Notification, enable to add users who do not receive automatic scan notifications. If enabled, enter email addresses and select to add them. Your additional scan notification recipients are listed in the Recipients field. Users who have set their account not to receive automatic Fortra VM notifications will get a notification for this scan.
- General Information
-
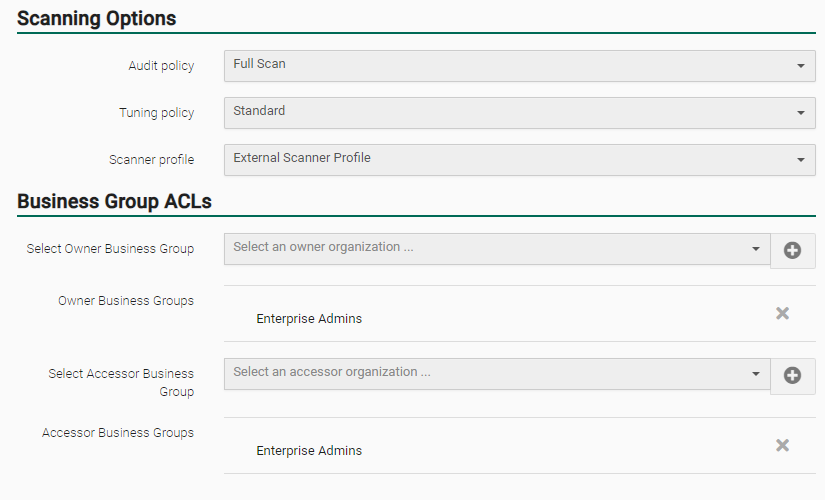
Open the Scanning Options panel.
-
Audit policy - Select an audit policy to specify the type of vulnerability checks and allowances for the scan (options include WAS default policies and user-created ones). See related:
-
Full Scan - Full scan audit policy with recommended settings for performing all tests required for high, medium and low severity vulnerabilities.
-
Light Weight - Light weight audit policy with recommended settings for gentle auditing of web applications.
-
Crawling Only - Crawling only audit policy with recommended settings for generating site maps of web applications, but does not perform vulnerability testing.
-
SQL Injection - SQL injection audit policy with recommended settings for locating SQL injections flaws in web applications.
-
Easily Guessable Credentials - Easily guessable credentials audit policy with recommended settings to locate easily guessable and default credentials in web applications.
-
Cross-site Scripting - Cross-site Scripting (XSS) audit policy with recommended settings to locate XSS flaws in web applications.
-
-
Tuning Policy: Select a tuning policy to specify how a scan is performed. See Work with Tuning Policies for more information.
-
Business Group ACLs
-
Select Owner Business Group - Select the business group who can edit the scan.
-
Select Accessor Business Group - Select the business group who should see the scan’s results (this cannot be updated after the scan has been run).
-
- After making your selections, select Create and run.
If you schedule the scan, you can view it on the Scheduled Scans page (located by selecting Scans > Scheduled Scans on the navigation menu).
If you did not schedule the scan, it initially appears on the Scheduled Scans page before displaying on the Scan Activity page (located by selecting Scan > Scan Activity on the navigation menu).