- Click here to download CuteFTP Server. Save the program (cuteftpserver.exe) to your Desktop.
- Find cuteftpserver.exe on your desktop and double-click it. The InstallShield Wizard will guide you through the installation process. After the Welcome window, you will need to accept the license agreement, and designate the folder location before reaching the Select Components window.
- In the Select Components window be sure to leave FTP Server and Administrator Interface selected.
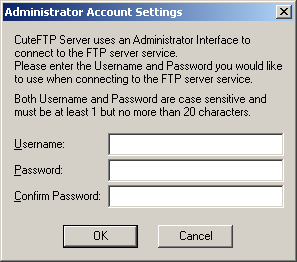
- The Administrator Account Settings prompts you to create a username and password used for to connect with and administer the FTP Server engine. Enter a Username and Password and click OK.
- Leave the Start Administrator Interface check box selected and click Finish.
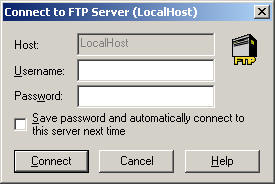
- When the Server Administrator starts, you will be prompted for your Username and Password. It is the same as you entered during installation. Enter them and click Connect.
- The first time you connect to the FTP Server you will be prompted to enter a
Serial Number or a
Trial Serial Number. Click Enter Trial Serial Number, enter your serial number and name, and then click Register.
- After a successful registration, you will need to create your FTP Site - Before you can run the server you must create your FTP "site". This is a simple process with CuteFTP Server's Create New Site Wizard as it is automatically launched the first time you connect to the FTP Server. It can also be accessed from the menu bar under Configuration > Create New Site. You will be asked to name the site, provide authentication options, and root folder locations. Simply click Next to progress through the Wizard to create your first FTP site.
- Once you have created a New Site, you will need to create a user account prior to connecting to the FTP Server with an FTP client such as CuteFTP Home. CuteFTP Server includes a New User Account Wizard to simplify this task. Access it from the menu bar under Configuration > Create New User and follow the step-by-step instructions to create a user account. This involves setting a user ID and password, user level, and user group.
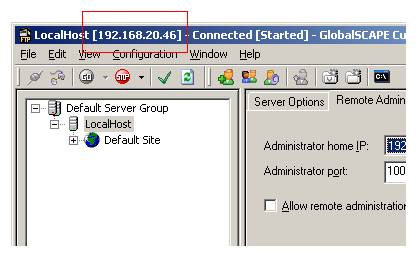
- Login to the server from your FTP client. You will need the username and password from the user account you created above. You will also need the Server's IP address. The IP Address is shown on the title bar of the main CuteFTP Server Administrator Interface window. Or you can use a tool such as http://www.whatismyip.com/ to determine your IP address.
- Routers. If you set up the FTP server behind a router you will likely need to set a static IP address on the server. Depending upon the router manufacturer, you may need specific instructions for router configuration.
- For Linksys Routers: Setting Up an FTP Server behind a Linksys Router
- For NetGear Routers: How Do I Make a Web Server (or ftp server) on My Private LAN Running Behind the RT311 or RT314 Visible to the Internet?
- For D-Link Routers: How can I host an FTP Server behind my router?
- If your equipment is not listed here, refer to the manufacturer's website for special configuration information.
- Windows Firewall. XP Service Pack 2 installs a new version of Windows Firewall that blocks inbound FTP connections. Click here for configuration instructions to allow FTP Connections.
- Enter your FTP server information into your FTP client, connect to the server, and start transferring files.
Software Installation
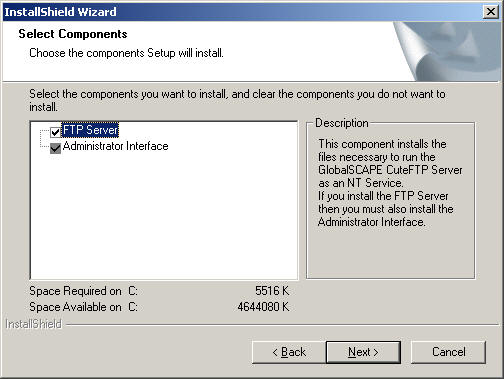
CuteFTP Server consists of two component programs. The Administrator Interface is the tool you use to control the FTP Server engine. The components are separate so you can control your FTP Server locally or from a remote computer. Click Next to continue setup.
When installation is complete the Setup Finished window appears.
The Setup Finished window closes and the Server Administrator Interface will launch.
Server Configuration
The server is configured with the following steps.
The Username and Password for this account are jdoe and asdf.
You can't see the password because it is masked by asterisks.
This configures the server. The next section tells how to configure your FTP client.
Client Configuration
The FTP client is configured with the following steps:

IP address on CuteFTP Server's title bar. This FTP server is located at 192.168.20.46
Note:
Entering FTP server information in CuteFTP Home's Site Manager