![]()
If you create an Upload Rule that sends a file transfer activity report, the file transfer that triggered the Rule is not included in the report.
You can configure EFT Server to copy or move files to a specific location using a particular protocol whenever certain events occur, such as when a report is created. You must provide EFT Server with connection information (protocol and login details) and file information (source path and destination path). (Also see Download Action.)
|
|
If you create an Upload Rule that sends a file transfer activity report, the file transfer that triggered the Rule is not included in the report. |
The copy/move Action can be applied to all File System events, the User Events "Quota Exceeded," "User Login," "User Logout," and the Server Events "On Timer" and "On Rotate Log." The example below uses the On File Upload event.
|
|
When you add a Copy/Move file to host or Download file from host Action to a Rule, the ClientFTP (offload engine) performs retries upon failures (network failures is the typical example) based upon the settings in the Advanced Options dialog box. Be aware that the Copy/Move file to host or Download file from host Action takes place synchronously; that is, EFT Server follows the logic of doing the transfer, including all retries, before moving on to the next Action, such as an e-mail notification. A really long-running transfer that also retries numerous times with large delays will cause the Event Rule to take a long time to complete. |
|
|
If you are using the
EFT Secure Ad Hoc Transfer Module, and if EFT Server and IIS are installed
on the same computer, when creating the Event Rule for Upload notifications,
create an additional Condition for "REMOTE IP does not match 127.0.0.1."
|
To configure EFT Server to copy/move files
Follow the procedure in Creating Event Rules, or select the rule to which you want to add the Action (Once an Event Rule is triggered and assuming all conditions are met, EFT Server launches one or more user-definable Actions, such as executing a command, sending an e-mail, offloading a file, etc. or a combination of multiple actions). For example, create a Scheduler (Timer) Event.
In the right pane, in the Actions
list, click Copy/Move file to
host.

In the Rule pane,
click one of the undefined parameters (e.g., '%FS.PATH%').

The File Copy Options dialog box appears.
On the Connection Options tab, click the Protocol type for the connection: FTP, SFTP, HTTP, or HTTPS. The Port number for the selected protocol changes automatically.
In the Host address box, type the IP address.
In the Authentication section, type the User name and Password needed to establish the connection.
If you are configuring an Event Rule that must authenticate multiple users, select the Use connected client's user name and password to authenticate check box. This option is only available if the Site level setting to allow usernames and passwords as replacement variables is enabled.
If SFTP has been selected as the protocol type, specify the SFTP Public Key File Path, SFTP Private Key File Path, and SFTP Key Passphrase.
If are connecting to a remote host through a SOCKS server, click Socks; otherwise, skip this step. The SOCKS Settings dialog box appears.
Select the Use SOCKS settings below when connecting to remote host check box.
Specify the Socks Type (SOCKS4 or SOCKS5).
Specify the Host name and Port.
If you specified SOCKS5 and the server requires authentication, select the Use Authentication check box, then provide a Username and Password.
Click OK.
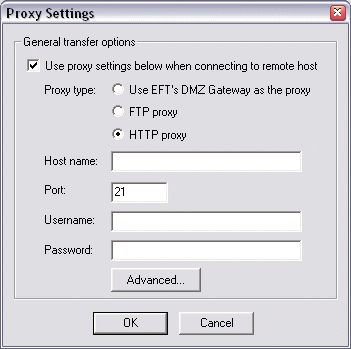
If you are connecting to a remote
host through a proxy, click Proxy (otherwise,
skip this step). The Proxy Settings
dialog box appears.

Specify the Proxy type, Host name, Port, Username, and Password.
To specify
an Authentication Type and login sequence, click Advanced.
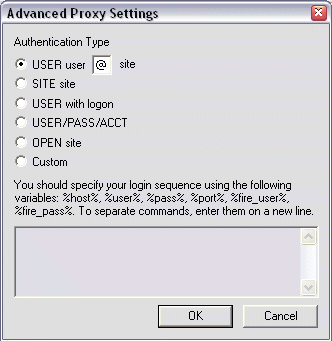
The Advanced Proxy Settings dialog
box appears.

Specify one of the following Authentication Types:
USER user @site if your proxy server requires the USER command followed by your user name and the Site name to allow connection with a remote Site. You can change the @ symbol if a different separator is required by your proxy server.
SITE site if your proxy server requires the SITE command followed by the address of the remote FTP site to allow a connection.
USER with logon if your proxy server requires the USER command followed by a user name and password to allow connection with a remote Site.
USER/PASS/ACCT if your proxy server requires all three commands before allowing a connection to a remote Site.
OPEN site if your proxy server requires the OPEN command followed by the Site name before allowing connection to the Site.
Custom if your proxy server requires a login sequence different from those above. See To create a custom authentication method for a proxy server below for details of creating a login sequence.
Click OK to return to the Proxy Settings dialog box.
Click OK to return to the File Copy Options dialog box.
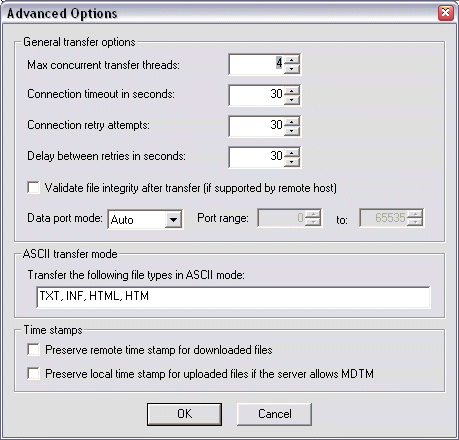
To specify transfer options
and time stamps, click Advanced.
The Advanced Options dialog box
appears.

In the General transfer options area, you can provide more control over Max concurrent transfer threads, Connection timeout, Connection retry attempts, and Delay between retries.
Select the Validate file integrity after transfer check box to specify that the Server should double check binary files to ensure the files downloaded completely and correctly.
In the Data port mode box, click the drop-down list and select one of the following:
Auto - (selected by default) EFT Server initially makes connections in PASV mode. If the PASV connection fails, EFT Server attempts to connect in PORT mode automatically.
PASV - Helps avoid conflicts with security systems. PASV support is necessary for some firewalls and routers, because with PASV, the client opens the connection to an IP Address and port that EFT Server supplies.
PORT - Use PORT when connections or transfer attempts fail in PASV mode, or when you receive data socket errors. When a client connects using PORT, EFT Server opens a connection to an IP address and port that the client supplies. If you select Port, specify the Port range.
In the ASCII transfer mode area, specify the file types that can be transferred.Use a comma and a space between extensions. If you use only a comma with no space, then the rule will not recognize the extension/file type. (TXT, INF, HTML, and HTM are specified by default.)
In the Time stamps area, select one of the following:
Select the Preserve remote time stamp for downloaded files check box to keep a downloaded file's time stamp the same on the local computer as it is on EFT Server.
Select the Preserve the local time stamp for uploaded files if the Server allows MDTM check box to keep an uploaded file's time stamp the same on the Server as it is on the local computer.
Click OK to return to the File Copy Options dialog box, then click the Target File tab.
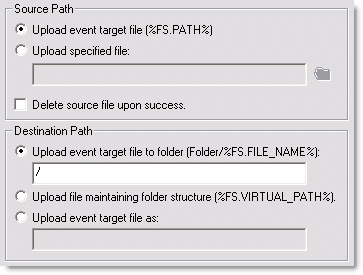
Specify the Source
Path, which can be an event target file (for example, log files
for the On Rotate Log event) or a specific file accessible to EFT Server.

If you want the source file to be deleted after the upload is successful, select the Delete source file upon success check box.
Specify the Destination Path option/location, then click OK.
|
|
For more details of defining a copy/move Action, refer to Monitoring Folders. |
Click Apply to save the changes on EFT Server.
If you are copying or moving the file to another location, and the file upload is a regularly occurring event with a file of the same name, in the File Copy Options dialog box, add the variables %EVENT.DATESTAMP% and/or %EVENT.TIMESTAMP% to the path so that the date (YYYYMMDD) and/or time (HHMMSS) are added to the filename when it is moved/copied. Do not use %EVENT.TIME%, because the colon (e.g., 28 Aug 07 10:01:56) makes it unsuitable for file naming.
For example, in the File Copy Options dialog box, on the Target File tab, in the Destination Options area, click Specify the relative path and filename, then provide the path and variables. For example, type:
C:\Documents and Settings\Administrator\My Documents\upload/%EVENT.DATESTAMP%_%EVENT.TIMESTAMP%_%FS.FILE_NAME%
With this path and variables, when a file is uploaded to the monitored folder, the file is moved to \My Documents\upload and the date and time are prepended to the filename. For example, 20080422_101212_mydailyprogress.doc.
Below is an example of a Rule that monitors a folder and, if a file is added, moves and renames the file, then sends an e-mail. Your parameters might differ; note the forward slash after the name of the destination folder, upload/. (If you specify to move the file, be sure to select the Stop processing this rule check box.)

|
|
The example above is for monitoring network file system changes to a folder; when monitoring folders for files added to the server via the FTP/S and HTTP/S protocols, use File Uploaded, File Downloaded, and other File System events. |
To create a custom authentication method for a proxy server
In the Advanced Proxy Settings dialog box, click Custom, then specify the login sequence in the text box using the following variables:
%host% - sends the host name you typed in the Proxy server options dialog box.
%user% - sends the user name you typed in the Proxy server options dialog box.
%pass% - sends the password you typed in the Proxy server options dialog box.
%port% - sends the port number you typed in the Proxy server options dialog box.
%fire_pass% - sends the password you typed in the Proxy server options dialog box as authentication for the firewall.
%fire_user% - sends the user name you typed in Proxy server options dialog box as authentication for firewall.
Type each variable with percent signs before and after.
Press ENTER to separate commands.
Type any other commands and variables, separating commands with a line break (press ENTER).
Click OK.
|
|
Contact your system administrator for the proper Host name, Port, User name, Password, and proxy type, as well as any required advanced authentication methods. |
Using Wildcards with Event Rule Actions
Copying or Moving a File Triggered on Monitor Folder Event and Renamed