![]()
EFT Server and DMZ Gateway must be installed on separate computers.
For details of clustering with the DMZ Gateway, refer to http://help.globalscape.com/help/guides/InstallingDMZGatewayInCluster.pdf.
After you install and configure DMZ Gateway, refer to Enabling DMZ Gateway for details of enabling the DMZ Gateway service to connect to EFT Server. You can view the release notes, notes.txt, in the installation folder after you have installed the program, or you can view the release notes on the support pages at http://www.globalscape.com/eft/history_dmz.aspx.
|
|
EFT Server and DMZ Gateway must be installed on separate computers.
For details of clustering with the DMZ Gateway, refer to http://help.globalscape.com/help/guides/InstallingDMZGatewayInCluster.pdf. |
To install and configure DMZ Gateway
Close all unnecessary applications so that the installer can update system files without rebooting the computer.
Start the installation wizard and follow the instructions in the wizard (i.e., accept the license agreement and specify an installation path, if other than the default).
After installation is complete, you are offered the options to view the release notes and to open the DMZ Gateway Administrator Interface. The Launch Administrator Interface and Show Readme check boxes are selected by default. Clear the check boxes if you do not want to read the release notes or launch the interface to configure DMZ Gateway. You cannot enable DMZ Gateway in the EFT Server Administrator Interface until you have configured DMZ Gateway.
Click Finish. If you left the Launch Administrator Interface check box selected, a Welcome screen appears.
Click Enter Serial Number or Enter Trial Serial Number to provide the DMZ Gateway serial number, then click Register. The EFT DMZ Gateway interface appears.
In the Server IP box, specify the IP address the DMZ Gateway uses for connections with EFT Server or click All Incoming.
In the Port box, specify the port number that EFT Server and DMZ Gateway use to communicate with each other. The default is 44500. (For HS-PCI-enabled Sites, use a port number other than the default.)
In the Client IP box, specify the IP address the DMZ Gateway allows for client connections or click All Incoming.
In the IP access rules for EFT Servers area, you can limit which IP addresses can connect to the DMZ Gateway by granting or denying access to only one specific IP address or a range of IP addresses. By default, all IP addresses are granted access to EFT Server.
Do one of the following:
Click Denied Access to allow listed in the box below.
Click Granted Access to deny access to all peer EFT Servers except those listed in the box below.
Click Add. The
IP Mask dialog box appears.
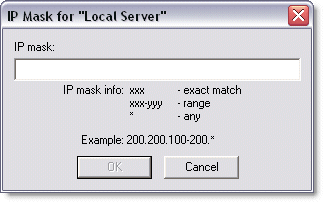
Type the IP address or range of IP addresses that you want to grant or deny access to EFT Server. You can also use wildcards to select ranges of IP addresses.
Click OK.
Click Apply to save the changes on DMZ Gateway. When you make changes to DMZ Gateway, you must stop and restart any Site connected to DMZ Gateway from EFT Server.
Enabling DMZ Gateway (in EFT Administrator)