![]()
IP address changes are propagated to the DMZ Gateway whenever the policy is modified in the administration interface or by the auto-ban logic.
By default, all IP addresses are granted access to EFT Server. EFT Server allows you to grant access to only one specific IP address or a range of IP addresses, or deny access to one specific address or a range of addresses. EFT Server can control TCP/IP access at EFT Server, Site, or Settings Template, or per user. Refer to Controlling Access to the Site by IP Address for details of banning IP addresses.
|
|
IP address changes are propagated to the DMZ Gateway whenever the policy is modified in the administration interface or by the auto-ban logic. |
To grant/deny access by IP Address for a Settings Template or user account
In the administration interface, connect to EFT Server and click the Server tab.
In the left pane, click the Settings Template, or user account, then click the Connections tab.
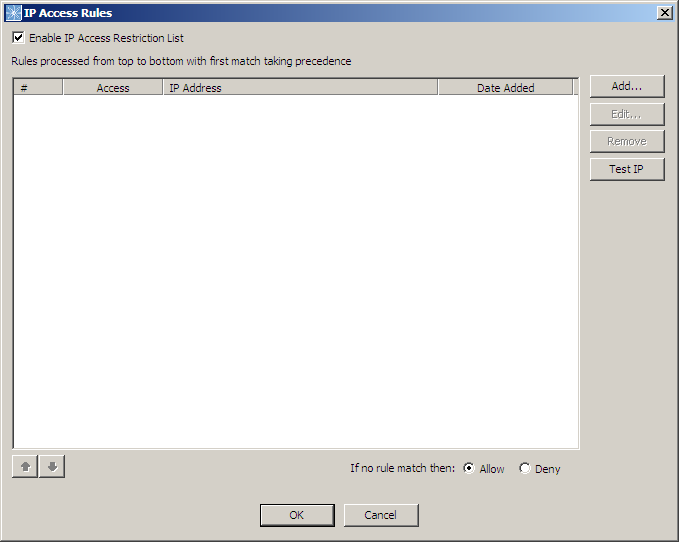
In the Network Usage & Limits area, next to IP access/ban list, click Configure. The IP Access Rules dialog box appears.

To add an IP address to the Rules, click Add. The IP Mask dialog box appears. Specify the IP address or mask, click whether to Allow or Deny the address, then click OK. CIDR notation is supported for both IPv4 and IPv6 literals. For example: 001:cdba:9abc:5678::/64 for blocking an IPv6 LAN or 192.168.29.0/24 for an IPv4 network.
To remove a Rule, click it in the list, then click Remove. A confirmation prompt appears. Click Yes.
To edit a Rule, click it in the list, then click Edit. The IP Mask dialog box appears for you to edit the address. Click OK to save your edits.
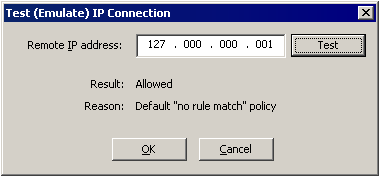
To test whether an IP address is banned or allowed, click Test IP. The Test IP Connection dialog box appears.

Provide an IP address to test, then click Test. The Result (Allowed or Denied) and the Reason the IP is allowed or denied appear in the dialog box.
Click OK to close the dialog boxes.
Click Apply to save the changes on EFT Server.
Setting Maximum Transfers per Session for a User
Setting Maximum Transfer Size for Users
Setting Maximum Transfer Speeds for a User