Protocol Settings
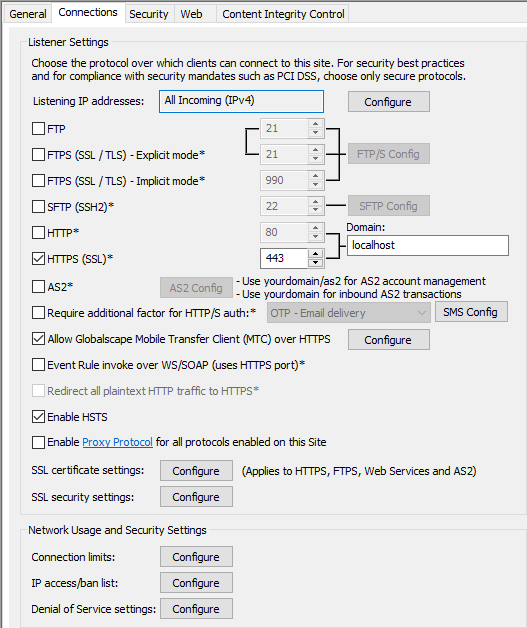
EFT supports the following protocols: FTP/s, HTTP/s, AS2, SFTP, and SSL. The protocols are configured on an EFT Site and then can be enabled or disabled on the Site or Settings Template, or for each user. (SSL must first be enabled/configured on the Server.) The client, not the server, drives the authentication process. That is, if you specify a protocol that the client doesn't use, the client will not be able to connect.
If the check box contains a gray check mark, the user or Settings Template is inheriting permission from its parent.
To enable a connection protocol
-
In the administration interface, connect to EFT and click the Server tab.
-
On the Server tab, click the Site, Settings Template, or user account that you want to configure.
-
In the right pane, click the Connections tab.

-
Do one or more of the following:
-
To allow/disable FTP access, select/clear the FTP check box, and then click FTP Config to configure FTP Settings.
-
To allow/disable FTPS (SSL/TLS) access, select/clear the FTPS (SSL/TLS) check box, then click FTP Config to configure FTP Settings, and next to SSL certificate settings, click Configure to configure SSL certificate settings.
-
To allow/disable the SFTP access, select/clear the SFTP (SSH2) check box, and then click SFTP Config to configure SFTP authentication options.
-
To allow/disable HTTP access, select/clear the HTTP check box.
-
To allow/disable HTTPS access, select/clear the HTTPS (SSL) check box, then, next to SSL Certificate settings,
-
To allow/disable AS2 access, select/clear the AS2 check box. (This check box is disabled if HTTP or HTTPS is disabled.) Click AS2 Config to configure AS2 connections to the Site, then, next to SSL certificate settings, configure SSL certificate settings.
-
To redirect all plaintext HTTP traffic to HTTPS, select the Redirect all plaintext HTTP traffic to HTTPS (enable HSTS) check box. (HTTPS must be selected first.)
-
To enable account management over HTTP or HTTPS, select the Enable account management over HTTPS check box. The IP address for account management appears in the adjacent text box. It is not editable, but you can copy it to paste into emails.
-
To enable WTC access (on the Settings Template or user account), select the HTTPS check box, then select the Allow Web Transfer Client (WTC) over HTTP/S check box.
-
-
In the Domain box, specify the fully qualified domain name that is to be used for HTTP, HTTPS, and AS2 connections, account management, email template links, Workspaces invitations, and so on.
-
Click Apply to save the changes on EFT.
Related Topics
-
FIPS (Federal Information Processing Standard) (enabled on the Server's Security tab)