Send Notification E-Mail Action
You can create an e-mail notification Action for Event Rule and AS2 Transaction success/failure notifications. To save time, you can create an e-mail notification template.
The EFT log will display an error message when a file larger than 30 MB is attached to a Send notification email Action in an Event Rule.
On Sites using AD Authentication, the EFT must have "Log On as a domain user" permission for e-mail notifications to work.
To customize an Event Rule e-mail message
-
Follow the procedure in Creating Event Rules to create a new Rule or select an existing Rule to which you want to add the Action.
-
In the Actions list, double-click Send notification email or click it, and then click Add Action.
-
Click the [select] link. The E-Mail Notification Message dialog box appears. The To box displays the first e-mail address defined in EFT address book on the SMTP tab, but you can change that, if needed. If you want to specify a different address than the prepopulated one from the SMTP tab, select the Override 'From' field check box, then specify the address.
-
Type the e-mail address of other recipients in the To, Cc, and Bcc boxes or click To, Cc, or Bcc to open the Select Names dialog box, which is populated with names and e-mail addresses defined on EFT in the User Account Details of each user account and on the SMTP tab. In the Select Names dialog box, you can type a name in the Type Name or Select from List box (not case sensitive) to find it in a heavily populated list. Select one or more recipients, and then click To, CC, or BCC. If you double-click a recipient, it is added to the To box. For multiple selections, press SHIFT (contiguous) or CTRL (non-contiguous). Click OK to save the changes.
-
In the Subject box, type a descriptive "title" for the e-mail to indicate to the recipient the purpose of the e-mail. You can also add variables. For example, if you want to see the reason an Event was triggered without opening the e-mail, add the variable %EVENT.REASON% to the Subject line.
-
In the Message box, type the text of the e-mail. You can use HTML tags within the body of the e-mail. (Be sure to include the opening and closing <html> and <body> tags.) You can also define an e-mail template for common e-mails and provide a link to the template in the Message area. If the account to which the e-mail is sent accepts HTML-formatted e-mail, you can format the e-mail to suit your needs; you are only limited by your knowledge of HTML. (If the recipient's e-mail server does not accept HTML e-mail, the recipient will see the e-mail in plain text.)
-
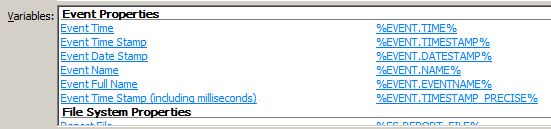
In the Variables box, click a property that you want to insert in the e-mail message. The text surrounded by percent signs, the context variable, is inserted into the body of the e-mail, and will be replaced by EFT with specific information about the Event when the e-mail is sent. Review the available Variables when deciding which variables to add, because some variables cannot be used in e-mail notifications.
-
If you want only the information contained to the variable in your e-mail message, click the context variable in the right column of the Variables box. (For example, if you select %EVENT.TIME% in the right column, the time will be displayed without a text label.)
-
If you want the information and a label, click the text in the left column of the Variables box. (For example, if you click Event Time, the label and the time appear in the e-mail).
-
-
If this is a User Event and you want to send a copy of the message to the involved user, select the Send copy to user check box.
-
Click OK.
-
Click Apply. When the Event is triggered, the e-mail notification is sent. The Send notification email Action in Event Rules puts the message into a send queue unless "Stop processing this rule" is enabled for a failed Action.
If you want to copy the involved user when the Event is triggered, the Rule must be based on a User Event.
You can use the variable %USER.EMAIL% in the To, Cc, and Bcc boxes (%USER.EMAIL% is the e-mail address of the logged-in user who is uploading a file, for example, if defined in the User Account Details dialog box).
For example, if you add the following text and variables to the Subject Line:
EFT Notification: %EVENT.NAME%: %USER.LOGIN%, %EVENT.REASON%
when username jbite uses the wrong password, an e-mail is sent with the following Subject line:
Globalscape EFT Notification: User Login Failed: jbite, Invalid password
%EVENT.NAME% is the Server-defined name for the Event (e.g., File Renamed);
%EVENT.EVENTNAME% is the user-defined name for the Event (e.g.,
My File Renamed Event Rule).
Also, be aware that your recipient might get hundreds of e-mails every day; therefore, "Here's the info you wanted" might not be descriptive enough.
Related Topics