Configuring AS2 Inbound Partners Using the Wizard
(Requires AS2 and HTTP/S module) EFT provides an AS2 Partner Access wizard to assist you in configuring AS2 inbound connections. This wizard is accessible from the AS2 Inbound partner configuration tab and the AS2 Send File to host Action dialog box (in Event Rules). Once completed, the data in the wizard populates the relevant fields on the AS2 Inbound tab and the AS2 Send File to host Action dialog box. The procedure below describes how to use the wizard to configure inbound AS2 partners. You can also configure the account manually on the AS2 Inbound tab for each partner.
Before you start the wizard to configure inbound AS2 partners, you will need to request the following information from your partner:
If you plan to execute a command upon success or failure of AS2 transactions, define the command before configuring your partner access; or you can go back later and edit the AS2 partner manually after you have defined the command.
If you plan to send a notification email upon success or failure of AS2 transactions, you can Create an email Notification Template to use in the email Action.
To configure inbound AS2 partners using the wizard
-
In the administration interface, connect to EFT and click the Server tab.
-
On the Server tab, click the user account that you want to configure. This account is one that your partner uses to exchange EDI messages with you.
-
In the right pane, click the Connections tab.
-
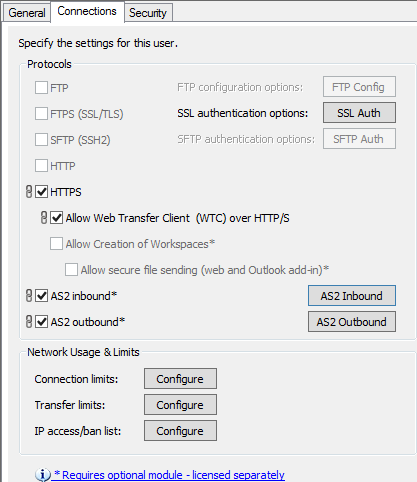
Select the AS2 inbound check box and then click AS2 Inbound. The AS2 Inbound Settings dialog box appears.
- Click Setup Wizard. The AS2 Partner Inbound Wizard appears.
- Click Next. The AS2 certificates page appears.
-
In the Your AS2 certificate public key box, the certificate that you specified when you created the Site appears.
-
In the Your partner's AS2 certificate public key box, type the path or click the folder icon to select your partner's public key file.
- Click Next. The AS2 identifier page appears.
-
In the Your AS2 ID (AS2-To) box, your globally defined ID appears. You can use the same ID you defined for EFT when you enabled the AS2 inbound listener or you can define a different ID for each partner.
- In the Your partner’s AS2 ID (AS2-From) box, specify this partner's ID (provided to you by the partner that you are defining).
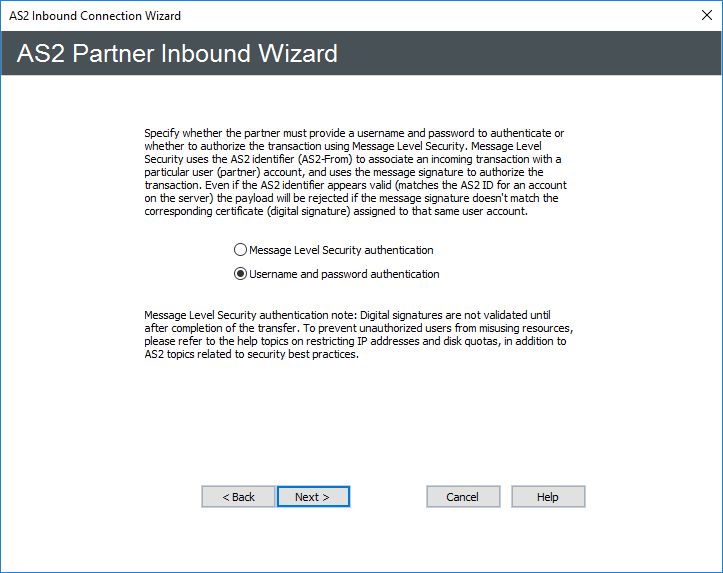
- Click Next. The authentication page appears.
-
Specify whether this partner must provide a username and password to connect or if EFT will authorize transactions from this partner using Message Level Security.
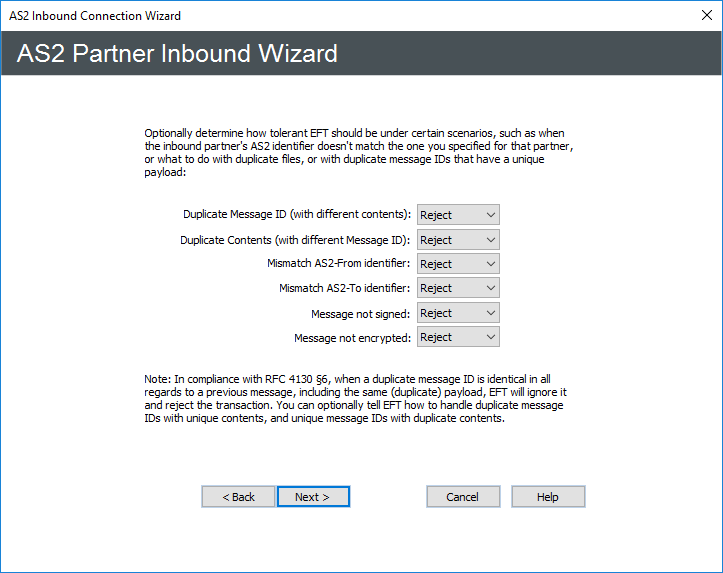
- Click Next. The tolerance options page appears.
-
(Optional) When a duplicate message ID is identical in all regards to a previous message, including a duplicate payload, EFT will ignore it and reject the transaction. You can tell EFT to accept or reject duplicate message IDs with unique contents, unique message IDs with duplicate contents, and mismatched AS2-From or AS2-To identifiers. For each option, the default is to reject the transaction. If you specified Message-Level Security (MLS) authentication on the previous page, the Mismatch AS2-From identifier and Message not signed options cannot be changed. Specify whether to Accept or Reject messages for each of the following instances:
-
Duplicate Message ID (with different contents)
-
Duplicate content (with different Message ID)
-
Mismatch AS2-From identifier (cannot change to Accept for MLS authentication)
-
Mismatch AS2-To identifier
-
Message not signed (cannot change to Accept for MLS authentication)
-
Message not encrypted
-
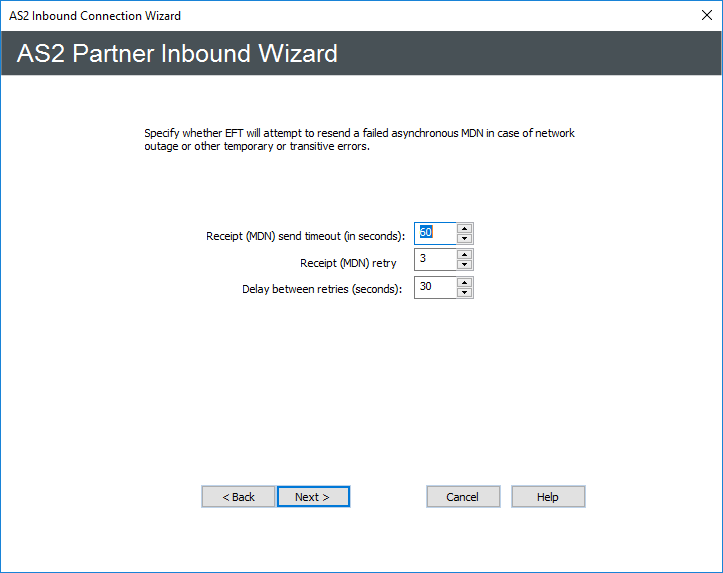
Click Next. The resend options page appears.
- Specify whether EFT will attempt to resend failed asynchronous MDN in case of network outage or other temporary (transitive) errors.
-
Receipt (MDN) send timeout (seconds). Range: 0-600; (0 = no timeout); the default value = 60 seconds
-
Receipt (MDN) retry. Range: 0-999; (0 = no retry); the default value = 3 retries.
-
Delay between retries (seconds). Range: 0-600; (0 = no wait); the default value = 30 seconds.
- Click Next. The commands and notifications page appears.
-
(Optional) EFT can run predefined commands (such as launch a script) or send an email notification upon successful or failed transactions (after all retries have been exhausted or failed to receive the MDN receipt after the specified wait time). Select one or more of the following check boxes, then click Edit to configure the email notification or specify the Command to use.
-
Send email notification on transaction success
-
Send email notification on transaction failure
-
Run command on transaction success
-
Run command on transaction failure
- Click Next. The optional post receipts page appears.
-
(Optional) In the Move received file(s) to folder box, specify a location to move received files, including local, shared, or UNC path names. (Leave blank to not move the file.)
-
In the Rename file(s) using mask box, provide a name for the file, if you want to change it. (The variable %FS.FILE_NAME% appears in the box by default.)
- Click Next. Configuration is complete.
-
Click Finish. Now that you have completed the AS2 inbound partner configuration wizard, you should contact your partner and ask them to connect and transfer a test file. Refer to Troubleshooting AS2 Connections for details.
If the AS2 features are not available for the user, then AS2 is disabled on the Settings Template or the Site. Enable and configure AS2 on the Site before enabling AS2 on the Settings Template and user accounts.


AS2-From and AS2-To form a pair for identifying the sending and receiving partnership. That is, they form a composite key for identifying the parties involved in the data exchange.

Refer to AS2 Transaction Success and Failure Notifications for more information.

You can keep the existing filename or use EFT’s extensive variable selection to rename the file, and add pre- or post-pending dates, times, and other information. For example, if you want to add the date and time to the filename, you would provide the following variables in the Rename file(s) using mask box:
%FS.FILE_NAME%_%EVENT.DATESTAMP%_%EVENT.TIMESTAMP%

The information provided in the wizard is updated in the account's AS2 Inbound tab. To make further adjustments to the partner's configuration, you can edit the AS2 Inbound tab directly.