Defining a Connection Profile
Create a Connection Profile that you can reuse in Event Rules, rather than defining external servers every time you create a new rule.
- Using the DMZ Gateway as a proxy is not available when using Cloud Connection profiles (Requires CCM). EFT uses the AWS SDK, which does not support the SOCKS protocol, which is required to proxy communications via the DMZ Gateway.
- Contact your system administrator for the proper host name, port, user name, password, and proxy type, as well as any required advanced authentication methods.
To define a Connection Profile
-
Right-click the Connection Profiles node, then click New Connection Profile.
-
In the Connection Profile name box, provide a name for the profile.
-
In the Description box, provide a description for the profile.
-
In the Connection details area, click the Protocol list to specify a protocol for the connection: Local (Local File or LAN), FTP (standard File Transfer Protocol), FTP SSL/TLS (AUTH TLS), FTP with SSL (Explicit encryption), FTP with SSL (Implicit encryption), SFTP using SSH2 (Secure Shell), HTTP (HyperText Transfer Protocol), HTTPS (Secure HTTP access), FAST - Accelerated Transfer, Cloud storage connectors.
-
Local /LAN:
-
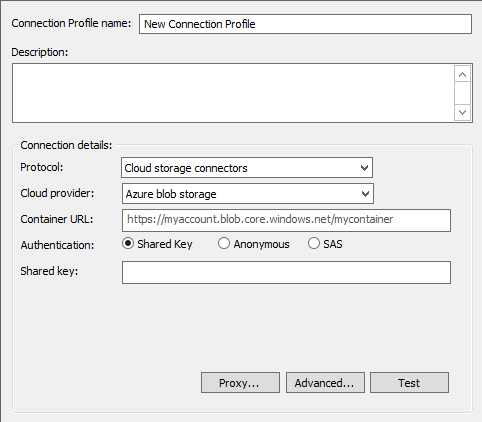
For Azure:
-
Specify the Container URL, Authentication option, and Shared key or SAS token, and, if needed, Proxy and Advanced options.
-
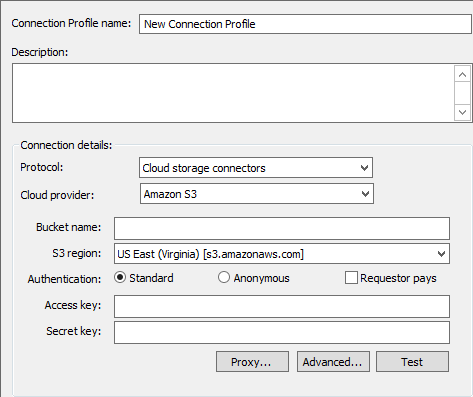
For Amazon S3:
-
Specify the Bucket name, S3 region, Authentication options, Access key, and Secret key, then scroll down for Proxy and Advanced options.
-
Bucket names can contain lowercase letters, numbers, and hyphens.
-
Each label must start and end with a lowercase letter or a number.
-
A Bucket name cannot start or end with a period.
-
Bucket names must be at least 3 and no more than 63 characters long.
-
Bucket names must not be formatted as an IP address (for example, 192.168.5.4).
-
As a best practice, always use DNS-compliant bucket names regardless of the region in which you create the bucket. For example, MyAWSBucket is a valid bucket name, even though it contains uppercase letters. If you try to access this bucket by using a virtual-hosted–style request (http://MyAWSBucket.s3.amazonaws.com/yourobject), the URL resolves to the bucket myawsbucket and not the bucket MyAWSBucket. In response, Amazon S3 will return a "bucket not found" error.
-
For more information regarding restrictions, limitations, and naming, refer to Creating object key names in the Amazon documentation.
-
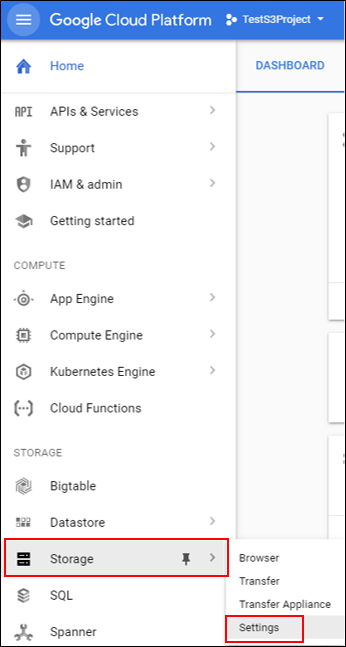
Log in to Google Cloud, then click Storage > Settings.
-
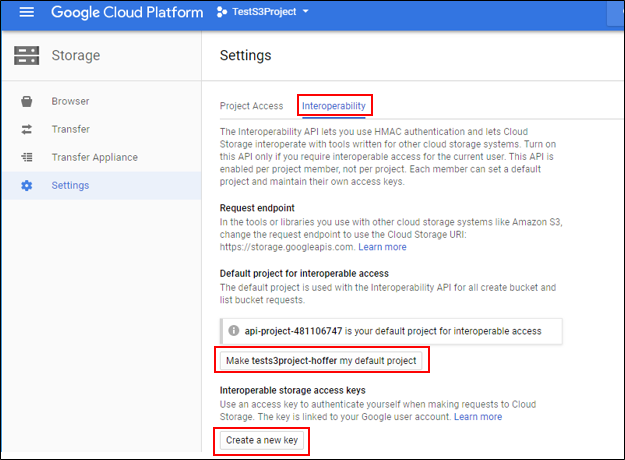
In Settings, click Interoperability.
-
Under Default project for interoperable access, click the Make <project name> my default project, then click Create a new key.
-
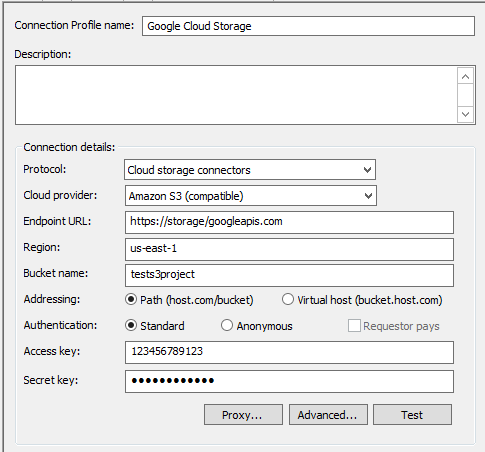
In EFT, configure a Connection Profile to use the AWS S3 (compatible) connection:
-
Use the Endpoint URL https://storage/googleapis.com.
-
Specify the Bucket name you created in your Google Cloud Storage project
-
For Addressing, click Path (host.com/bucket).
-
Specify the Access Key and Secret Key as shown in your Google Cloud Storage console for "Interoperable storage access keys."
-
If you chose anything except Local or a cloud provider, do the following:
-
In the Host address box, type the IP or host address of the EFT to which you want to connect.
-
The Port number for the selected protocol changes automatically based on the offload method. Provide a different port number, if necessary.
-
In the Username and Password boxes, type the username and password used to authenticate.
-
In the Test Path box, type a path to the remote folder that you will access with this Connection Profile, such as root /.
-
If you chose a protocol that uses SSL (FTPS or HTTPS), provide the client and remote server's SSL certificate information.
-
If you chose SFTP, provide the client SFTP certificate information.
-
(Optional) Select the Use connected client's login credentials to authenticate check box if you want to use the local system account to authenticate. The availability of this check box is controlled by the Persist username and password credentials for use in Event Rule context variables check box on the Site's Security tab.
-
(Optional) If you connect to EFT through a Socks server, click SOCKS. Refer to Using a SOCKS Proxy Server for details of configuring the SOCKS connection.
-
(Optional) To configure advanced transfer options, click Advanced. The Advanced Options dialog box appears. Refer to Advanced Transfer Options for details.
-
To verify the connection settings, click Test.
If you selected Local (Local Files or LAN), provide the Windows account username and Password for connecting to remote shares (not local folders). These credentials are used only if/when a resource cannot be accessed using the credentials under which the EFT service is running. The Optional credentials override boxes allow you to specify an alternate set of logon credentials for accessing remote network shares to which the EFT service account may not have access (due to security constraints). If alternate credentials are specified, EFT will use its current security token (associated with the “Log on as” account specified in the EFT service settings) for local folder access and then new security token (associated with the alternate logon credentials) for the remote source folder accessed over network connections (e.g. network shares).
EFT does not perform any sort of validation on the Bucket name created. Be aware of the following AWS restrictions when creating the name:
Configure Google Cloud Storage access: