Advanced Transfer Options
The Advanced Options dialog box provides options for advanced transfer such as data port mode, connection retry attempts, filename encoding, time stamps, cloud transfers, and so on. These optional settings are available in the Connection Profile, File Offload configuration (Protocol Upload Action), File Download configuration (Protocol Download Action), Cloud: Upload and Download Actions, and the Web Services Action.
To configure advanced transfer options
-
Click Advanced. The Advanced Options dialog box appears.
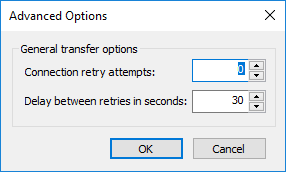
For Local/LAN transfers:
-
Specify the Connection retry attempts and Delay between retries. When files are being transferred with Event Rules (copy/move), if there are connection problems (for example, the network is unavailable), the server will attempt to establish a connection the number of times specified in Connection retry attempts. When EFT is able to re-establish the connection, it continues to transfer the file even if there are multiple interruptions.
Other protocols:
-
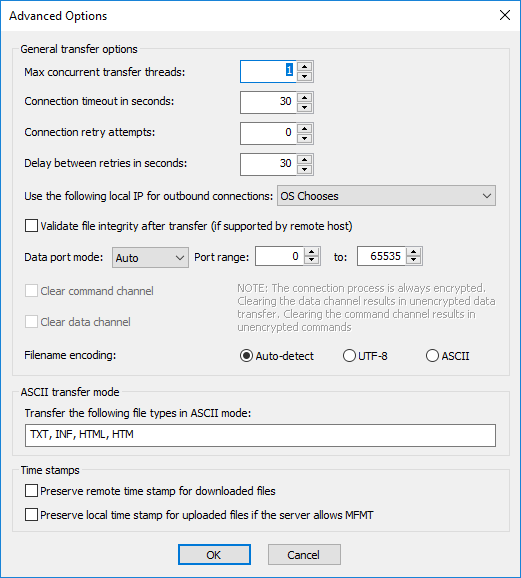
In the General transfer options area, you can provide more control over Max concurrent transfer threads, Connection timeout, Connection retry attempts, and Delay between retries. When files are being transferred with Event Rules (copy/move), if there are connection problems (for example, the network is unavailable), the server will attempt to establish a connection the number of times specified in Connection retry attempts. When EFT is able to re-establish the connection, it continues to transfer the file even if there are multiple interruptions.
-
Next to Use the following local IP for outbound connections, a list box contains an option labeled OS Chooses followed by a list of available IPv4 addresses and available IPv6 addresses (loopback addresses are not displayed). EFT only allows one physical IP to be selected at a time in an event rule, which cannot be replicated to the other HA nodes for obvious reasons. When the rule runs, the connection will fail on the second node with a 10038 failure, indicating that there is no IP or socket available. Click a single IP address from the list or let the operating system of EFT select the source IP based on the Site’s listening IP settings. If the computer has multiple IP addresses available and/or both IPv4 and IPv6 addresses, you can specify an IP address to use or click OS Chooses.
-
(To specify an outbound IP address in an HA environment) In this drop-down list, you can specify a class C subnet for outbound connections. When the Event Rule executes, EFT performs a local check to see which IP addresses are available locally, and chooses the correct one based on the list selected.
-
-
Select the Validate file integrity after transfer check box to specify that EFT should double check binary files to ensure the files downloaded completely and correctly. (Not applicable to SFTP.)
-
In the Data port mode box, click the drop-down list and select one of the following (not applicable to SFTP):
-
Auto—When Auto is selected, EFT initially makes connections in PASV mode. If the PASV connection fails, EFT attempts to connect in PORT mode automatically.
-
Active—When Active mode is selected, EFT opens an additional port and tells the remote server to connect to <IP:PORT_RANGE> to establish a data connection. This is useful when the server is behind a firewall that closes all unnecessary ports. If you select this mode, specify the port range from which the client will choose. (For security best practices, Active mode is not allowed when brokering outbound connections through DMZ Gateway.)
-
Passive—When Passive mode is selected, EFT tells the remote server to provide <IP:PORT> to which EFT can connect to establish a data connection. This is useful when a client is behind a firewall that closes all unnecessary ports. Helps avoid conflicts with security systems.
-
-
Select the Clear command channel check box to send FTP commands in clear text. (Only available when FTPS is specified.)
-
Select the Clear data channel check box to transfer files without encryption. (Only available when FTPS is specified.)
-
In the Filename encoding area, specify whether the filename is encoded as UTF-8 or ASCII.
-
To conserve Unicode file names, the remote server must support UTF-8 and advertise UTF-8 in its FEAT command.
-
To conserve Unicode file content you must transfer the file using binary transfer mode or save the file using UTF-8 encoding before offloading it in ASCII mode. (Refer to Knowledgebase article #11113 for more information.)
-
To enforce binary transfer mode for text files with UTF-8 encoded content, you should remove all the extensions from the ASCII transfer mode area in the next step or transfer files with extensions that don’t match those on the ASCII types list.
-
Text (ASCII) files transferred in binary mode will retain their carriage return (CR) and line feed (LN) hidden characters which are not supported by *nix systems by default.
-
-
In the ASCII transfer mode area, specify the file types that can be transferred. Use a comma and a space between extensions. If you use only a comma with no space, then the Rule will not recognize the extension/file type. TXT, INF, HTML, and HTM are specified by default. If an asterisk (*) is specified, all files are downloaded in ASCII mode, even if that file doesn't have an extension. (To conserve Unicode file content, you must transfer the file using binary transfer mode. To force download in binary, clear the "file types" box.)
-
In the Time stamps area, select one of the following:
-
Select the Preserve remote time stamp for downloaded files check box to keep the time stamp the same on the destination file as it is on remote file.
-
Select the Preserve the local time stamp for uploaded files if the server allows MDTM check box to keep an uploaded file's time stamp the same on remote server as it is on the source file system. (Not applicable to SFTP.)
-
-
Click OK.
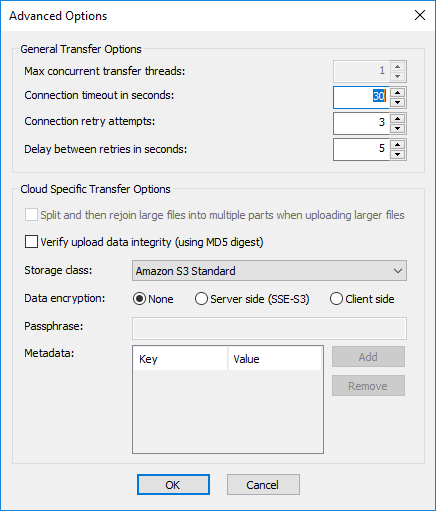
Amazon Storage:
Azure Storage:
- General Transfer Options are the same as above.
- If you expect large file uploads (such as video), select the Split and then rejoin large files into multiple parts when uploading larger files check box.
- Select the Verify upload data integrity (using MD5 digest) check box to assure file integrity
- Amazon only:
- In Storage class, specify which cloud storage to use: Amazon S3 Standard, Amazon S3 Standard - Infrequent Access, Amazon S3 Redunancy Storage (RRS),
-
Data encryption options include None, Server side (SS3-S3), and Client side.
-
Provide the Passphrase to access the storage.
-
Add any Metadata to capture.
-
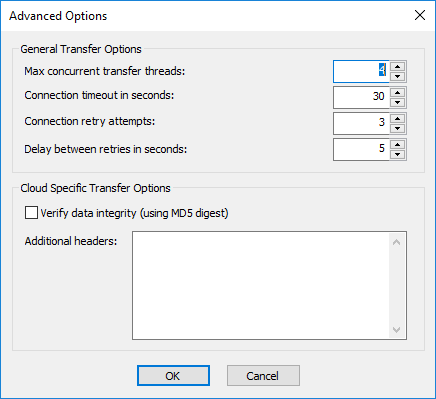
Azure only:
-
Additional headers: Add header information as needed, in the format header:value
-
-
Click OK to save the configuration.
-
Can I use context variables?
-
What is the difference between Amazon S3 vs Amazon S3 (compatible)?
-
>Are the values in metadata passed as custom headers in the request to S3?
FAQs:
Context variables are supported for passphrase and Metadata.
Amazon S3 (compatible) allows you to manually specify some of the fields (Endpoint URL, Region, host format). For example, for using with S3-compatible storage, such as Google or others. (refer to Defining a Connection Profile for details)
Metadata are passed as a custom header, with a name that starts with "x-amz-meta-". For example:
x-amz-meta-metadatakey: MetadataValue