System: Report Action
(Requires ARM) When the Auditing and Reporting module is activated, you can configure an Event Rule to generate a report, then email it or save it to a file. If you add the Generate Report Action to a Rule, you must also tell EFT what to do with the report (save it or email it or both). When a report is generated by the Generate Report Action, a temporary, enumerated copy of the report is created and stored locally in the EFT installation folder. The temporary copy is deleted once the Event Rule context is out of scope.
To facilitate compliance with PCI DSS requirement
10.6, EFT automatically generates a report of
PCI/High Security-related configuration and functions. The report
is converted to HTML and then emailed or saved to a file specified
by the EFT administrator.
The automatic Generate Report
Action never prompts for parameters because it will be run from
the service on a timer, and thus does not allow interaction by
a user. Reports that require parameters but do not have sufficient
administrator-defined parameters will not run.
Example of a Report Event:

To create an Event Rule with the Generate Report Action
-
Follow the procedure in Creating Event Rules to create a new Rule, or select the Rule to which you want to add the Action.
-
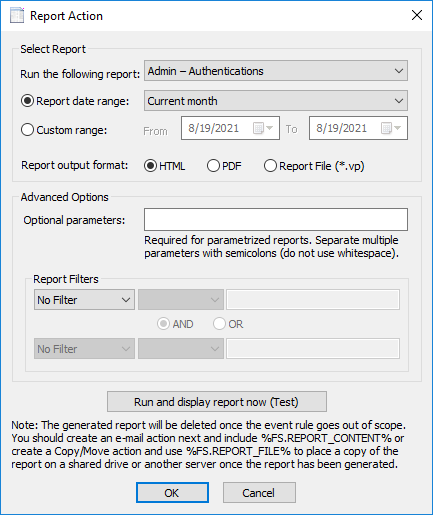
In the Actions list, double-click Generate Report, or click it, and then click Add Action. The Report Action dialog box appears.
-
In the Run the following report box, click the down arrow to select a report from the Reports directory. (Custom reports also appear in the list.) Refer to Descriptions of Preconfigured Reports for a description of the Globalscape-defined reports.
-
Click Custom range to specify a custom date range in the From and To boxes or click Report date range and click the drop-down list to specify one of the following options:
-
Include all dates. If the selected dates include future transactions (for example, if the ending date for the report is today's date), the future transactions will not appear in the report.
-
Today. From 00:00:00 to the current time.
-
Yesterday. The previous day from 00:00:00 to 00:00:00.
-
Last 24 hours. The previous 24 hours from the current time.
-
Month to date; Quarter to date; Year to date. Starting from the first day of this month, quarter, or year, and ending today. (Quarters begin January 1, April 1, July 1, and October 1.)
-
Current week; Current month (default); Current quarter; Current year. Starting from the first day of this week, month, quarter, or year, and ending with the last day of this week, month, quarter, or year. (Quarters begin January 1, April 1, July 1, and October 1.)
-
Last week; Last month; Last quarter; Last year. Starting from the first day of last week, month, quarter, or year, and ending with the last day of last week, month, quarter, or year. (Quarters begin January 1, April 1, July 1, and October 1.)
-
Last 30 days. Starting from 30 days ago, and ending with today's date.
-
Last 12 months. Starting 12 months ago from today’s date, and ending with today's date. For example, if today is July 2, 2007 and this date range is selected, the report would run from July 2, 2006 through July 2, 2007.
-
-
In the Report output format area, specify the format of the report output: HTML, PDF, or VP (report file).
-
In the Advanced Options area, specify Optional parameters (separated by semicolons) for the report, which are evaluated from left to right. You can specify Event Rule variables. For example, if the report definition chosen in the Run the following report box requires two parameters for filename and username (in that order in the report definition), then the Optional parameters box can be populated with *.txt;myname to specify a filename parameter of *.txt and a username parameter of myname.
-
In the Report Filters area, specify filters with AND or OR. Available filters depend on report selected. (If you test the report and do not see the desired results, adjust your filters.)
-
To run the report in real time to verify that the Action was configured correctly, click Run and display report now (Test).
-
Next, you should create an email Action and include the %FS.REPORT_CONTENT% variable or create a Copy/Move Action and use the %FS.REPORT_FILE% variable to place a copy of the report on a shared drive after the report has been generated.
The variable %FS.REPORT_CONTENT% can be added to email notifications. When %FS.REPORT_CONTENT% is added to the body of email notifications, the content is displayed inline in the email in HTML format. (You must specify the HTML format in the Report output format area, )
The variable %FS.REPORT_FILE% can be used in copy/move, OpenPGP, and Custom Command Actions that have a failure Event defined, but should not be used for Actions that do not have a failure Event defined. Instead, use %FS.REPORT_CONTENT% for email notifications, because this variable represents a copy of the contents of the file rather than a link to the file, which is only good so long as the file exists. For a complete list of EFT variables, see Variables. Do not use %FS.REPORT_FILE% in email notifications.
Related Topics