Protocol: Upload Action
(Requires FTC module) You can configure EFT to upload (also known as "offload") files to a specific location using a particular protocol whenever certain Events occur, such as when a report is created. You must provide EFT with connection information (protocol and login details) and file information (source path and destination path).
The Upload Action can be applied to all File Server Events; the User Events "User Quota Exceeded," "User Logged In," and "User Logged Out"; and the Server Events "Timer" and "Log Rotated."
-
If you create an Upload Rule that sends a file transfer activity report, the file transfer that triggered the Rule is not included in the report.
-
When you add a Upload file to host action to a rule, the Client FTP offload engine performs retries upon failures (network failures is the typical example) based upon the settings in the Advanced Options dialog box. Be aware that the Protocol Upload Action does the transfer, including all retries, before moving on to the next Action, such as an email notification. A long-running transfer that also retries numerous times with large delays will cause the Event Rule to take a long time to complete.
-
A Move Action over the local file system updates the variables FS.PATH, FS.FILE_NAME, and FS.FOLDER_NAME to match the NEW file location.
-
When EFT opens a file for copy, it uses FILE_SHARE_READ sharing mode. This mode ensures that a file cannot be changed by another process while EFT copies it, preventing corruption of the file.
-
Configure the retry logic in the Copy Action for Local (Local Files or LAN) offload events. If an Event Rule triggers and you had large amounts of small files that were copied over a LAN share, some of the files could copy over at 0 KB. This retry logic will try the copy again if the file is locked or in use so the destination file will not have a 0 kb size.
Refer to Connection Profiles for details of setting up a Connection Profile before defining the Action.
To configure EFT to upload files
-
Follow the procedure in Creating Event Rules, or select the Rule to which you want to add the Action. For example, create a Scheduler (Timer) Event.
-
In the right pane, in the Actions list, double-click Protocol: Upload Action.
-
In the Rule Builder, click one of the undefined parameters (for example, '[select]' or '/%SOURCE.FILE_NAME%').
-
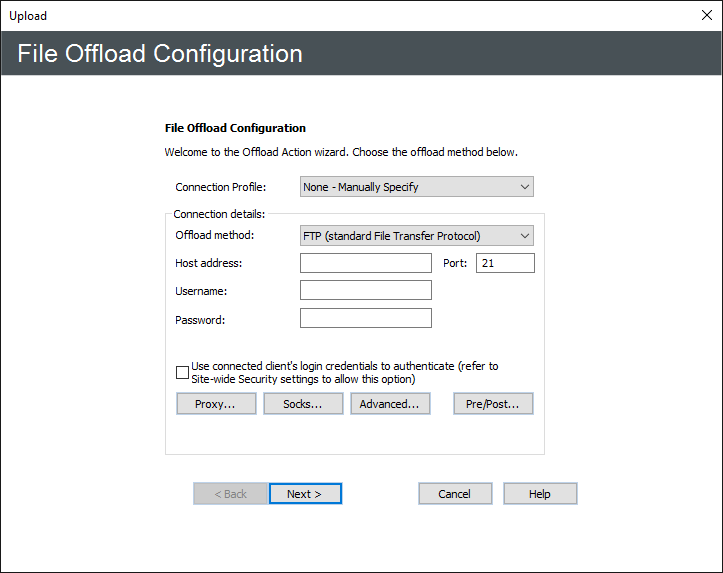
In the Connection Profile box, specify a connection profile for this Event. If none is specified, you will need to configure the Connection details as described below.
-
On the Offload method box, specify a protocol type for the connection: Local (Local File or LAN), FTP (standard File Transfer Protocol), FTP SSL/TLS (AUTH TLS), FTP with SSL (Explicit encryption), FTP with SSL (Implicit encryption), SFTP using SSH2 (Secure Shell), HTTP (HyperText Transfer Protocol), HTTPS (Secure HTTP access).
-
(Optional) If you selected Local (Local Files or LAN), under Optional credentials override, provide the Windows account username and Password for connecting to remote shares (not local folders).
-
These credentials are used for the remote destination folder ONLY for upload actions. The source (Local) folder will still use EFT server service account at all times. (When using download (PULL) actions over LAN, the same concept applies, but credentials will be used for the source directory and EFT server service account for the destination.)
-
Only if/when a resource cannot be accessed using the credentials under which the EFT service is running do you need to include the optional credentials. The Optional credentials override feature allows you to specify an alternate set of logon credentials for accessing the destination network shares to which the EFT service account may not have access (due to security constraints).
-
If alternate credentials are specified, EFT will use its current security token (associated with the "Log on as" account specified in the EFT server service settings) for LOCAL folder access and then a new security token (associated with the alternate logon credentials) for the remote destination folder accessed over network connections (e.g. network shares).
-
Think of Local Transfer as an operation (offload or download) with a remote server.
-
Think of "Optional credentials override" as "credentials to access remote server."
-
For download action, it is "credentials for source folder."
-
For upload (offload ), it is "credentials for destination folder."
-
"Credentials to access local folder" ("source" for offload and "dest" for download) is Event Rule execution context (EFT account, or Folder Monitor account for FM rules, or Connected Client account for client-originated rules on an AD site):
-
Download: local (EFT) <= remote ("override credentials")
-
TEST1: Offloads file from "local" Share A (access as EFT account, i.e., X) to "remote" folder B (access as Y) => Fails, as X has no permissions on A.
-
TEST2: Downloads file from "remote" Share A (access as Y) to "local" folder B (access as EFT account, i.e., X) => Succeeds, as Y has permissions on A and X has permissions on B.
-
If you chose Local, click Advanced to configure retry attempts, then skip to the Source File Path page step.
-
If you chose anything but Local do the following;
-
In the Host address box, type the IP address.
-
The Port number for the selected protocol changes automatically based on the offload method. Provide a different port number, if necessary.
-
(Optional) Provide the Username and Password needed to establish the connection.
-
To configure advanced options, click Advanced. Refer to Advanced Transfer Options for details.
-
Select the Use connected client's login credentials to authenticate check box if you want to use the local system account to authenticate. The availability of this check box is controlled on the Site's Security tab by the Persist username and password credentials for use in Event Rule context variables check box.
-
If you chose SFTP, provide the client SFTP certificate information.
-
If you chose a protocol that uses SSL (FTPS or HTTPS), provide the client and remote server's SSL certificate information.
-
If you are connecting to a remote host through a SOCKS server, click SOCKS and provide the SOCKS connection information.
-
If you are connecting to a remote host through a proxy, click Proxy. Provide the proxy connection information.
-
To specify transfer options and time stamps, in the Offload wizard, click Advanced. Specify the advanced transfer options.
-
(optional) To define commands to occur before and after this operation, click Pre/Post. Refer to Pre and Post Commands for details.
-
In the Source path box, provide the path to the file(s) that you want to offload. (No validation is performed.) For example, type:
-
Select the Delete source file after it has been offloaded check box if you want to delete the file after it is copied/moved. (If the file is marked read-only, it will not be deleted.)
-
Select the Except when check box if you do not want to delete the source file after it is offloaded if the offload was skipped.
-
Select the If the source file is missing treat as success check box if you want the Action to be considered successful even if the source file is missing.
-
Click Next. The Destination File Path page appears.
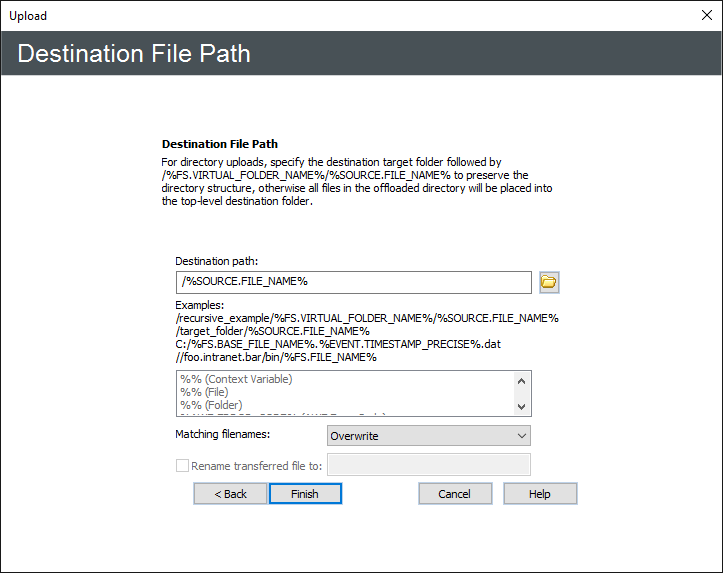
- In the Destination
path box, specify the location in which to save the offloaded
file. (No validation is performed when you type a path; the Folder
icon
 is only available
for local transfers.)
is only available
for local transfers.) -
You can specify variables, such as \pub\usr\%USER.LOGIN%\%FS.FILE.NAME%.
-
In the Variables box, double-click the variable(s) that you want to add to the path.
-
In Move Actions over the LOCAL FILE SYSTEM, the %FS.PATH%, %FS.FILE_NAME%, and %FS.FOLDER_NAME% context variables are updated to match the new file location.
-
In the Matching filenames box, specify whether to Overwrite, Skip, Smart Overwrite, or Numerate files that exist with the same name. (Refer to Smart Overwrite for more information about Smart Overwrite.) This setting only applies to the initial transfer, not when the transfer is interrupted and then resumed. When resuming, EFT will follow the Smart Overwrite settings (that is, performs a CRC match for the files; if the files are identical, the destination file is not overwritten).
-
Overwrite—Overwrite any existing file with the same name.
-
Skip—Skip the offload if a file with the same name exists in the destination directory.
-
Smart Overwrite—EFT performs a CRC match for the files. If the files are identical, the destination file is not overwritten. Refer to Smart Overwrite for more information about this feature. (Supported only on FTP transfers.)
-
Numerate—If a file in the destination folder has the same name as the file you are transferring, EFT renames the transferred file to "Copy of file.txt." If the same transfer occurs again, EFT renames the transferred file to "Copy (2) of file.txt" and so on.
-
If you want to rename the file, select the Rename transferred file to box and specify a new name.
-
You can rename the file when it is transferred. For example, when "myfile.doc" is uploaded, you might want to save it as "status_%EVENT.DATESTAMP%.doc" or something else more identifiable.
-
You can also use variables in the Rename transferred file to box. For example, /%FS.FILE_NAME%.%EVENT.TIMESTAMP%
-
For LAN renames, you must include the full path to the file.
-
Only FTP and FTPS are currently supported.
-
EFT executes a RNFR + RNTO sequence for FTP transfers on the remote server. If the remote server supports cross-folder rename (as EFT does), it is possible for Rename-Pathname-Filename variable to point to a different folder than the Offload Destination folder.
-
The Offload transaction status will be FAILED if the rename fails, even though the file was transferred.
-
The Status Viewer will display the Rename-To value in the Remote Path field for Offload.
-
Click Finish then click Apply to save the changes on EFT and/or add other Actions and Conditions to the Rule.
If you are copying or moving the file to another location, and the file upload is a regularly occurring Event with a file of the same name, in the Offload Action wizard, add the variables %EVENT.DATESTAMP% and/or %EVENT.TIMESTAMP% to the path so that the date (YYYYMMDD) and/or time (HHMMSS) are added to the filename when it is moved/copied. Do not use %EVENT.TIME%, because the colon (for example, 28 Aug 07 10:01:56) makes it unsuitable for file naming.

The Upload/File Offload Configuration wizard appears.
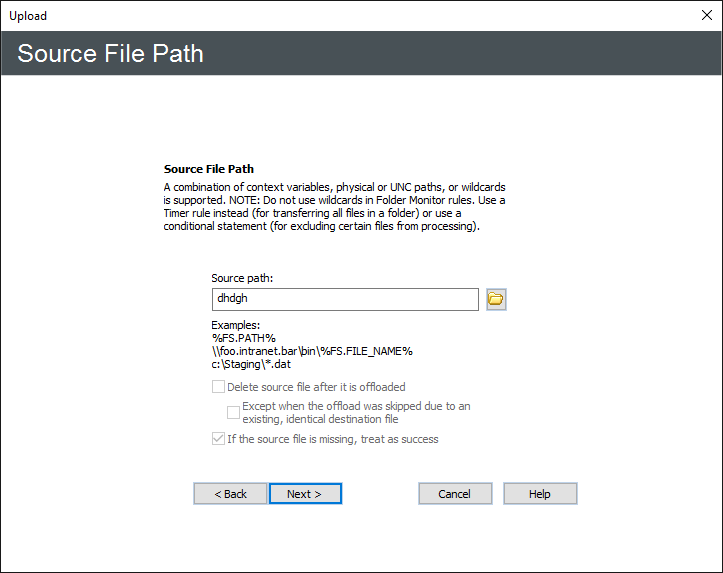
C:\Staging\*.dat or \\mydomain\common\jsmith\file.txt
You can leave Source path blank or use %FS.PATH% to offload the files associated with the Event that triggered the Action. In a Timer Event, there is no context variable available for the path, so you must specify a file name.
If you type a path to a folder that does not exist, the Event Rule will fail. Be sure you have the path defined correctly, e.g., make sure to use the proper slash. In general, forward slashes / are used in remote paths, and backward slashes \ are used in local Windows paths. Do not use both.
For example, in the Offload Action wizard, in the Destination path box, provide the path and variables. For example, type:
C:\Documents and Settings\administrator\My Documents\upload\%EVENT.DATESTAMP%_%EVENT.TIMESTAMP%_%FS.FILE_NAME%
With this path and variables, when a file is uploaded to the monitored folder, the file is moved to \My Documents\upload and the date and time are prepended to the filename. For example, 20080422_101212_mydailyprogress.doc.
Related Topics