Terms of Service Agreement
(Requires HTTP/S, Workspaces, RCM) The EFT web portal Terms of Service agreement can be used to identify or specify whether a user has consented to use of their personal data. This information can help you stay in compliance with GDPR and other privacy regulations. From the Site's Web tab, you can configure the Terms of Service agreement, which affects all users on the Site, all web-based portals upon new account registration, anonymous pickup or drop-off, and upon first login. For user-specific settings, refer to Specify Terms of Service and Privacy Policy Options.
-
If accessing EFT for the first time via FTP, FTPS, or SFTP, and the Terms of Service agreement is mandatory for service, the connection will fail. The user must first connect via the Web Transfer Client (HTTPS portal) to accept the Terms of Service. The administrator can instead set the status for the Terms of Service for a given user manually, on user account's General tab in the EFT administration interface. Additionally, you can change the EFT login banner to provide instructions to login via the Web Transfer Client before logging in via FTP, FTP, or SFTP.
-
If the Terms of Service agreement is set to the default (enabled, but not mandatory) and the user implicitly agrees to the Terms of Service (by continuing to use the service), then no record is audited to the EFT database.
-
For anonymous users, accepting the Terms of Service sets a cookie for 12 hours so that the user doesn't have to consent for each action within that 12 hours.
-
For an example of a Terms of Service agreement, refer to https://policies.google.com/terms.
To enable the Terms of Service agreement
-
In the administration interface, connect to EFT and click the Server tab.
-
On the Server tab, click the Site you want to configure.
-
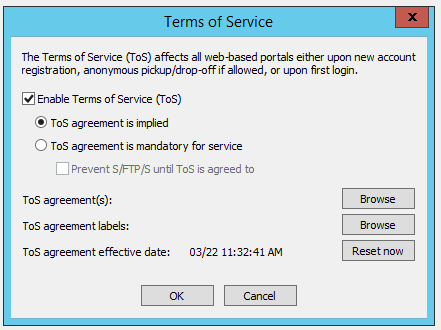
On the Web tab, next to Terms of Service, click Configure. The Terms of Service dialog box appears.
-
Select the Enable Terms of Service check box, then specify whether the agreement is implied or mandatory for service. If the agreement is mandatory, select the Prevent check box to prevent access over FTP, SFTP, or FTPS until the Terms of Service agreement is accepted.
-
To view the agreement(s) or the agreement labels, click Browse. The Windows File Explorer opens to the EFT installation folder. (NOTE: You can't actually "browse for files." Instead, you must edit the JSON file, as described below.)
-
Refer to Edit the Terms of Service agreement and agreement labels for how to edit the Terms of Service agreement and agreement labels files.
-
To reset the agreement effective date, such as when publishing a new agreement, click Reset now.
-
Click OK, then click Apply on the Web tab.
Edit the Terms of Service Agreement and Agreement Labels
The TermsOfService agreement and TermsOfServiceLabels files are JSON files (similar to XML) that must be edited for your organization's agreement. (The labels in the JSON file are case-sensitive.)
-
Save a copy of each before you edit the originals so that you have a backup.
-
Open the TermsOfServiceLabels.json file and the TermsOfService.json file in the EFT installation folder, in a text editor, such as Notepad.
-
Change the text to whatever your organization requires, or to another language. However, do not change any text that is between the quotation marks, as that is a variable used by EFT. The opening and closing curly brackets { } are also required.
-
Use basic HTML formatting tags (<p>, <li>, etc.) to create your Terms of Service. The "content" label must be kept, as well as opening and closing curly brackets { }.
-
You can make different Site-specific policies and language-specific policies:
-
Create a "Custom" folder under the Web directory and copy the Templates folder to the Custom folder that you just created:
…\Globalscape\EFT Server\Web\Custom\Templates -
For server-specific customizations place the custom file in:
…\Globalscape\EFT Server\Web\Custom\Templates -
For site-specific customizations place the custom file in:
…\Globalscape\EFT Server\Web\Custom\MySite\Templates
C:\Program Files\Globalscape\EFT Server\Web\Templates\
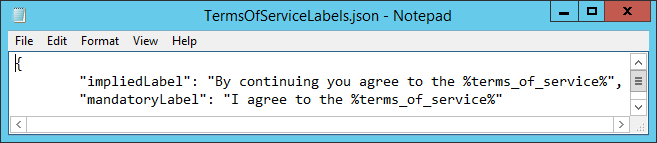
The Labels file is used to change the default text that appears when you have specified that the Terms of Service are implied or when it's mandatory to continue. For example, the default text when the agreement to the terms is mandatory is in English, "I agree to the terms of service."
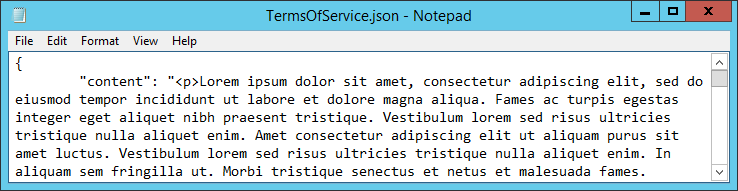
The TermsOfService.json file contains "dummy text" ("lorem inpsum dolor...") that you will replace with the text of your agreement:
{
 "content": "<p>These are the Terms of Service ... </p>"
}
You will need to clear the cache of the web browser to see your changes.
Related Topics