-
Launch the Mail Express Server administration interface. (e.g., click Start > Programs > Globalscape > Mail Express > Mail Express Admin or double-click the desktop shortcut).
-
Log in using the Mail Express Server administrator username and password that you specified during installation of the server.
-
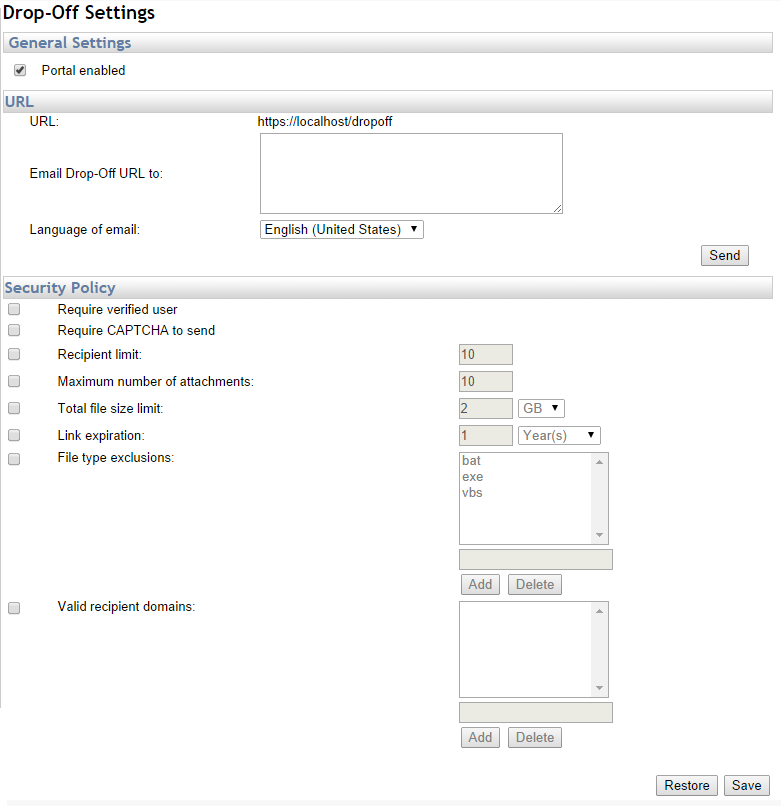
In the navigation pane, click Portal Settings > Drop-Off Settings. The Drop-Off Portal Settings page appears.
-
To enable the Drop-Off portal, select the Portal enabled check box.
-
(Optional) If you want to send the Drop-off URL to one or more recipients, you will first have to define the mail server. To email the Drop-Off portal URL (address) to a list of users:
-
In the Email Drop-Off URL to box, type the email addresses, separated by commas.
-
In the Language of email box, specify the language preferred by the recipients to whom you are emailing the Drop-Off URL.
-
Click Send.
-
To allow access to the Drop-Off portal only to verified (not anonymous) users, select the Require Verified User check box.
-
To require drop-off users to use CAPTCHA, select the Require CAPTCHA to send check box.
|

|
CAPTCHA (Completely Automated Public Turing Test To Tell Computers and Humans Apart) is a program that displays a test that humans can pass, but a computer is not likely to pass, such as reading a series of distorted letters and typing the same letters into a box, in an effort to limit the amount of spam emails.
|
-
To limit the number of recipients the sender can specify, select the Recipient limit check box, then specify the number in the box, from 1 to 100. 10 is the default.
-
To limit the number of attachments allowed in the Drop-Off portal, select the Maximum number of attachments check box, then specify the number of attachments.
-
To limit the total file size of one transfer, select the Total File size limit check box, then specify the file size in the boxes.
-
To expire download links, select the Link expiration check box, then specify the duration. If no link expiration is defined, packages will be purged based on the file retention policy. When you modify the file expiration value, you are modifying this setting for all future transfers. Packages that are active within the system retain the expiration value in place at time that they were created. (Link expiration can be from 1 hour to 99 years.) Recipients should be reminded to save a copy of the attachment if they will need to refer to it after the link expiration date.
-
To exclude specific file types from being transferred, select the File type exclusions check box, then list up to 50 file extensions in the box. (Wildcards are not supported.)
-
To add file extensions to the list, type the file extension in the small box, then click Add.
-
To remove a file extension from the list, click the file extension in the list, then click Delete.
-
To limit the domains to which drop-off users can send files, select the Valid recipient domains check box. (The domain is everything that comes after the @ symbol in the email address. For example, if the address is mike@example.com, the domain is example.com.)
-
To add domains to which drop-off users can send files, type the domain in the small box, then click Add. (Changes are not saved until you click Save.)
-
To remove domains to which drop-off users can send files, click the domain in the list, then click Delete. (Changes are not saved until you click Save.)
The domain validator looks for an exact match with valid recipient domains OR if the email address is a sub-domain of a valid recipient domain. For example, if the valid recipient domain is scape.com, valid email addresses are anyuser@scape.com or anyuser@anysubdomain.scape.com, but not anyuser@globalscape.com.
-
Click Save to save your changes, or click Restore to reset the boxes to their previous setting. If you navigate away from the page without clicking Save, your changes are discarded.