Adding or Editing a Security Group
If you have a large number of users in HelpSystems One, you may find it useful to put them in groups. Security groups allow you to place your users in a container and assign them permissions (or remove permissions) at the top level, rather than at a user level.
Security groups also minimize the number of roles you need to assign a user directly. This is helpful if you only want to give users permissions they actually need (such as giving accountants the Accounting Users role or Robot Schedule engineers the Robot Schedule Engineers role). Instead of assigning three roles to a user (Accounting Users, Accounting Supervisors, and Accounting Managers), you could create three different security groups (ACCOUNTING, ACCOUNTING SUPERVISORS, ACCOUNTING MANAGERS) and assign users to them. When they no longer need the roles attached to the security group, you can remove them from the group.
A note on LDAP authentication
If you use LDAP authentication, you can use an LDAP Group distinguished name* in your security groups that will automatically assign certain users to the group when they first log on. These users are determined by the information in the distinguished name, such as a matching CN name. Once the users are added, they are given the permissions of whatever roles are assigned to the security group with minimummanagement from the administrator. (LDAP permissions can be nested if a user is part of multiple security groups.)
Adding or Editing a Security Group
-
In the Navigation Bar, click User Security under settings, then click Security Groups.
- On the Security Groups tab, click Add to add a new group or click
 Show Actions next to any existing group and click Edit Group to edit it.
 -
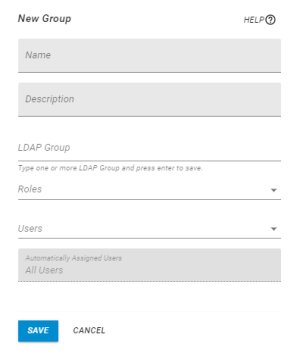
On the New/Edit Security Group pane, enter the Name and Description of the Security Group you want to create.
-
If you are using LDAP as your Authentication method, enter the distinguished name (DN) for your LDAP Group. This DN is used to search for users in your LDAP server and add them (if they match) to this Security Group when they first log on to HelpSystems One.
-
Select the Role you want to add to the Security Group.
NOTE: If you haven not created any Roles yet, see Roles. -
If you want to add specific users to the Security Group, select them from the drop-down.
-
Ensure the Security Group is authorized to the correct HelpSystems One areas and products.
NOTE: You can only add authorities through a Role. Permissions are additive if multiple Roles are assigned to the Security Group. -
Click Save.
When you are finished, the new Security Group will show up on the Security Groups page.
