Getting Started
Automate Ops Console is a simple yet intuitive web-based interface that allows you to conveniently monitor, control, and manage your Automate Enterprise resources anywhere, at any time, by the way of a web browser. You can use the Automate Ops Console to access information about Workflows, Tasks, Processes, Agents, and system resources for each of your Automate Enterprise installations so you can quickly ascertain the overall status of your automation environments, all from a single location. You can also use it to manually execute your workflows or run individual tasks or processes on specified agents.
Before you can use the Automate Ops Console to monitor and control your Automate Enterprise resources, you must first do the following:
- Enable API Security in Automate Enterprise Management Console.
- Establish a connection between Automate Ops Console and Automate Enterprise.
API Security
API Security gives administrators the ability to manage and protect Automate Enterprise API resources through encryption and authentication. With Automate Enterprise Standard Edition, you must first turn RESTful API on in order to expose the API in Automate Ops Console. With the Enterprise Edition, you also have the capability of assigning elements of authority to users or user groups based on the amount of access they should have on specific API lists when using Automate Ops Console.
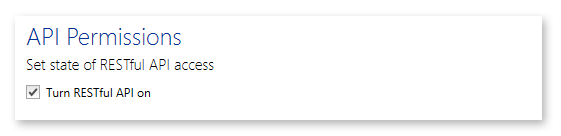
To turn on RESTful API (Standard Edition):
- From Automate Enterprise Management Console, navigate to Options -> Server Settings -> API Security.
-
From the API Security page, add a check-mark to the option Turn RESTful API on (turned off by default).
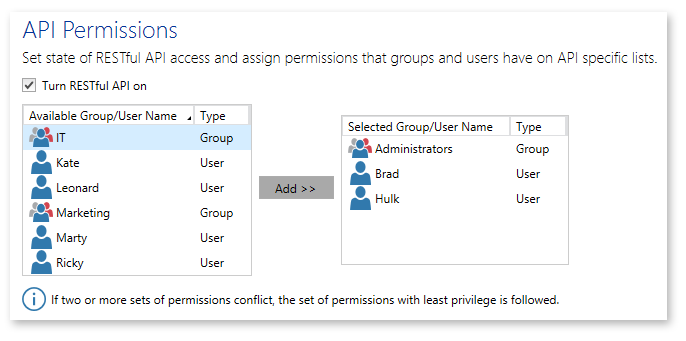
To turn on RESTful API and set API permissions (Enterprise Edition):
- From Automate Enterprise Management Console, navigate to Options -> Server Settings -> API Security.
-
From the API Security page, add a check-mark to the option Turn RESTful API on (turned off by default).
-
Do one of the following:
- Select the desired user or group from the Available Group/User Name (top left) pane and click Add to add it to the Selected Group/User Name (top right) pane.
- Double-click a user or group from the Available Group/User Name pane. This will add it to the Selected Group/User Name pane.
-
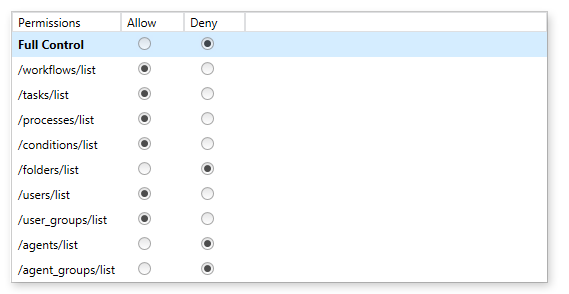
Select the user or group from the Selected Group/User Name pane and for each permission level in the Permissions (bottom) pane, specify whether that user/group should be allowed or denied access to the resource.
-
When finished, click OK to save your settings.
Automate Connection
Before you can use the Automate Ops Console, you must establish a connection between Automate Ops Console and Automate Enterprise. This can be done from the Automate Ops Console's Products or Quick Start page.
To establish a connection from the Products page:
- In the navigation pane, click Products under the Settings menu.
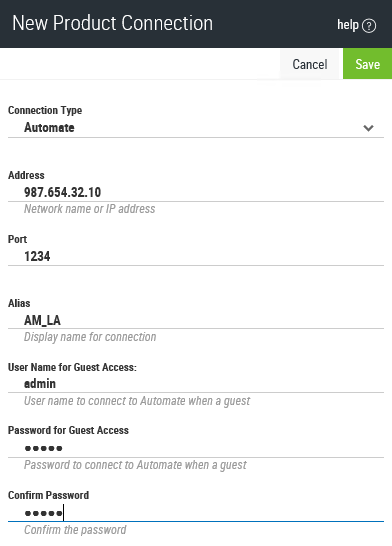
- Click + Add.
- Enter the following parameters:
- Connection Type - The type of connection to establish. You must select the option Automate as the connection type.
- Address - The computer name or IP address of the computer where Automate Enterprise is installed.
- Port - The communication port to use for this connection.
- Alias - The display name to associate with this Automate Enterprise connection. This name will be used throughout the interface as a way to identify this connection.
- User Name for Guest Access - A valid user name used to log onto Automate Enterprise.
- Password for Guest Access - The password to authenticate the user name entered above.
- Confirm Password - Re-enter the password as a form of confirmation.
- Click Save to save your settings.
To establish a connection from the Quick Start page:
- In the navigation pane, click Quick Start under the Automate menu.
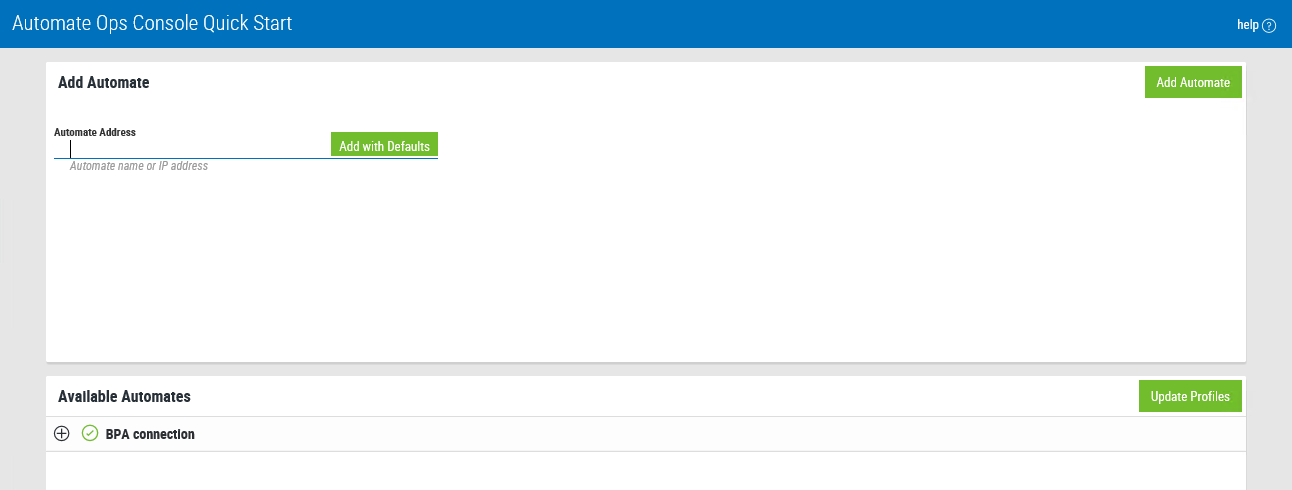
- Click Add Automate.
- Enter the following parameters:
- Connection Type - The type of connection to establish. You must select the option Automate as the connection type.
- Address - The computer name or IP address of the computer where Automate Enterprise is installed.
- Port - The communication port to use for this connection.
- Alias - The display name to associate with this Automate Enterprise connection. This name will be used throughout the interface as a way to identify this connection.
- User Name for Guest Access - A valid user name used to log onto Automate Enterprise.
- Password for Guest Access - The password to authenticate the user name entered above.
- Confirm Password - Re-enter the password as a form of confirmation.
- Click Save to save changes. The new connection will appear under the Available Automate Enterprises section.
The Quick Start page also allows you to create a new connection that uses the same properties as your default Automate Enterprise by the way of the Default Automate parameter on the Automate Preferences page.
To establish a connection that uses default server properties:
- In the Automate Address parameter, enter the computer name or IP address of the computer where Automate Enterprise is installed.
- Click Add with Defaults. All necessary properties such as Port, Alias, User Name and Password will be retrieved from the default Automate Enterprise. The new connection will appear under the Available Automates section.