How to Get There
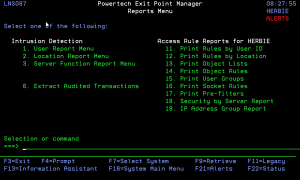
To display the Reports Menu, select option 80 on the Exit Point Manager Main Menu.
What it Does
The Powertech Reports menu is used to assist you with the reporting of status information regarding the security of your system.
The options are listed for you to select. They are as follows:
Intrusion Detection
The Intrusion Detection section provides support for extracting audited transactions from any Powertech Audit Log journal that is online. Selection criteria are provided so that you can extract transactions based on attributes of the transaction such as user profile, location, server, function, date/time, etc. Most of the selection criteria support generic search terms. The extracted transactions can be printed, deposited into a database file, or streamed into a CSV-formatted file suitable for use by a spreadsheet application.
- User Report Menu. Select option 1 to report on user network access attempts. See User Reports Menu.
- Location Report Menu. Select option 2 to report on location network access attempts. See Location Report Menu.
- Server Function Report Menu. Select option 3 to report on server/function network access attempts. See Server Function Report Menu.
- Transaction Report Menu. Select option 4 to report on attempts to access data and objects, and attempts to run programs and commands. See Transaction Report Menu.
- Group Report Menu. Select option 5 to report on group network access attempts. See Group Report Menu.
- Powertech Audit Report command. Select option 7 to use the LPWRRPT command to create reports by user, location, server/function, user group, or transaction. See Powertech Audit Report command panel.
- Work with IFS Files. Select option 10 to display reports in the IFS. See Work with IFS Files panel.
Access Rule Reports
The Access Rule Reports section provides reports listing various configuration and rule settings that you have configured. The Access Rule Reports section includes the following reporting menu options:
- Print Rules by User ID. Select option 11 to print rules by user ID. See Printing Rules by User and Authorities by User Report command.
- Print Rules by Location. Select option 12 to print rules by Location. See Printing Rules by Location. and Authority by Location Report panel.
- Print Object Lists. Select option 13 to print a list of the Object Lists defined on your system. See Print Object Lists panel.
- Print Object Rules. Select option 14 to print object rules by user or location. See Print Object Rules panel.
- Print User Groups. Select option 15 to print a listing of User Groups. See Print User Groups Report.
- Print Socket Rules. Select option 16 to print a listing of Socket Rules. See Print Socket Rules Report.
- Print Pre-Filters. Select option 17 to print a listing of Pre-Filters. See Pre-filters Report panel.
- Security by Server Report. Select option 18 to print a listing of the server and function properties you have configured. See Security by Server Report.
- IP Address Group Report. Select option 19 to print a listing of the IP Address Groups you have configured. See IP Address Group Report.
Reporting Group
The Reporting Group section allows you to create and work with reporting groups.
- Work with Reporting Group Profiles. Select option 80 to display the Work with Reporting Groups panel. Use this panel to create groups and assign users to them. After you associate users to a reporting group, you can report on the entire group by selecting option 5, Group Report Menu, on the Reports Menu. See Work with Reporting Groups panel.
Command Keys
F3 (Exit): Exit the screen without processing any pending changes.
F4 (Prompt): Provides assistance in entering or selecting a command.
F7 (Select System): Use this command key to work with data from a different Silo System.
F9 (Retrieve): Displays the last command you entered on the command line and any parameters you included. Pressing this key once shows the last command you ran. Pressing this key twice shows the command you ran before that, and so on.
F11 (Legacy): Switches back to the deprecated legacy view of this menu.
F13 (Information Assistant): Displays the Information Assistant menu with several types of assistance available. Press this key to access more information about the IBM i system, such as, what's new for this release of the IBM i system, how to comment on information, and where to look for IBM i information in books and online.
F16 (System Main Menu): Displays the IBM i Main Menu (MAIN).
F21 (Alerts): Displays the Alerts panel where Powertech products can post errors, warnings or other general notifications to the administrator.
F22 (Status): Displays the Operational Resources pop-up window containing the status of several operation aspects of Powertech products.
