User authority rules are useful to control access to servers and functions for particular users or groups of users (User Groups). User security rules are evaluated only if a location rule specifies to use *USER security rules. (Exit Point Manager includes one default user rule for each server; see Default User Rules). Like Location rules, User rules can be used to define actions for access to a server, or for access to a specific function of a server (e.g. DELETEFILE).
All default location rules include the same parameters and are set with the same default values. See Parameters and Default Values.
The Work with Security by User panel lets you select the servers to which you want to add or maintain user authority rules.
- From the Main Menu, select option 2 to display the Work with Security by User panel.
- Press F6 to create a new rule. The Create User Rule panel appears.
- Enter the following details:
- User Rule Type: U for user or G for User Group.
- User: The user profile or User Group (press F4 to prompt).
- Server: The IBM i server (press F4 to prompt).
- Function: The IBM i server function (press F4 to prompt).
- Authority: The authority assigned to the user for this server/function (press F4 to prompt).
- Switch Profile: The name of a user profile whose authority is used to process the transaction instead of the authority of the User initiating the transaction (press F4 to prompt).
- Audit • Message • Capture: Whether or not to audit, message, or capture these transactions. See Create User Rule panel for details.
- Press Enter to create the User Rule.
- On the Exit Point Manager Main Menu, choose 7, Work with User Groups.
- Press F6 to create a new User Group.
- Specify the Sequence Number, User Group (name), and Description. The Sequence Number indicates the order in which this User Group will be evaluated by the exit point programs. For more details, see Work With User Groups.
- Press Enter to create the User Group. You return to the Work with User Groups panel.
- Choose 8, Work with Members, for the User Group you just created. The Work with User Group Members panel appears.
NOTE: Adding OS User Groups to a Exit Point Manager Group is not recommended.
- Enter 1 for the profiles you would like to add as members to the User Group and press Enter. The User Group name appears under the Group column for the profile and a message indicates the profiles that have been added. Repeat for any additional profiles. Or, use 4 to remove members from a User Group.
- Press F3 to return to the Work with User Groups panel. Now, when you create or edit a user rule, choose User Rule Type G to select the User Group (instead of a profile).
- On the Exit Point Manager Main Menu, choose 7, Work with User Groups.
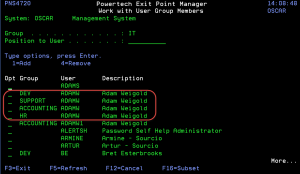
- Choose 8 for a User Group. The Work with User Group Members panel appears. Here, an entry appears for every user and group combination. For example, if ADAMW is in multiple User Groups, user ADAMW will be listed multiple times - once for each User Group in which he is a member.
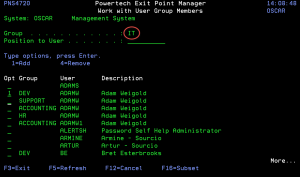
- Choose 1 for the user(s) you want to add to the currently selected User Group. (If multiple entries exist for a user, choose any one.)
NOTE: Adding OS User Groups to a Exit Point Manager Group is not recommended.
- Press Enter to add the chosen user(s) to the User Group. In the above example, profile ADAMW will be added to the IT User Group.
- On the Exit Point Manager Main Menu, choose 7, Work with User Groups.
- Choose 8 for a User Group. The Work with User Group Members panel appears. Here, an entry appears for every user and group combination. For example, if ADAMW is in multiple User Groups, user ADAMW will be listed multiple times - once for each User Group in which he is a member.
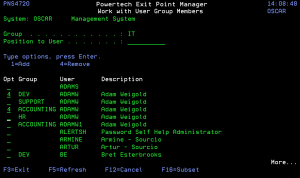
- Choose 4 for the user entries that should be removed from their corresponding group.
- Press Enter to remove the user(s) from the corresponding group(s). In the above example, profile ADAMW will be removed from the DEV and ACCOUNTING User Groups.
- On the Exit Point Manager Main Menu, choose 7, Work with User Groups.
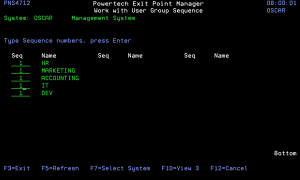
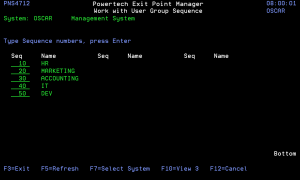
- Press F10 to open the Work with User Group Sequence panel.
- Use the entry fields to order the User Groups in the sequence in which Exit Point Manager will evaluate the User Groups. For example, if there are three User Rules with User Groups for a specific Server/Function, and all three have ADAMW as a member, the User Rule for the User Group with the lowest sequence number will be used by the exit programs first.
- Press Enter. The above configuration will change the order to Accounting, IT, Dev, HR, Marketing.
This example shows how you might use server user rules to allow the POWERUSER user profile to download files from IBM i using FTP, while preventing other users from performing that function.
This requires the addition of two rules. The first rule rejects attempts to download a file by all users, while the second rule specifically allows the user POWERUSER to download a file. Since the rule to allow POWERUSER to download a file is more specific than the rule to prevent downloading, it takes precedence.
- First, create a new user rule that sets the SENDFILE function of the FTP server to reject for all users (*PUBLIC).
- Enter the following values in the Create User Rule panel.
- User = *PUBLIC. The rule will be in effect for all users.
- Function = SENDFILE. This is the function used by the FTP server to download files from IBM i.
- Authority = *REJECT. Exit Point Manager will reject any FTP SENDFILE transactions.
-
Now, create another rule to allow POWERUSER to use the SENDFILE function.
- User = POWERUSER. The rule will be in effect for all users.
- Function = SENDFILE. This is the function used by the FTP server to download files from IBM i.
- Authority = *OS400. Exit Point Manager will reject any FTP SENDFILE transactions.
Since this second rule is more specific than the other rules in effect, it is evaluated first, allowing POWERUSER to download files, but restricting all other users from the SENDFILE function.
- In the Work with Security by User panel, choose 3 for the rule you want to copy. The Copy User Rule panel appears.
- Make the desired changes and press Enter to create the new rule.
Choose 5 (Display) on the Work with Security by User panel to display the User Rule Derivation panel. The User Rule Derivation panel provides user rule detail information, including parameter settings, Active Rule and Rule Derivation information.
- If you want to delete all Exit Point Manager authority rules for a specified user, in the Work with Security by User panel, press F16 to open the User Rules Subset panel.
- For Select User, enter the user profile associated with the rules you want to delete and press Enter.
- Use 4 for all the rules in the list to delete them.
You also have the option to set rules across multiple servers at one time from the Work with Security by User panel. Press F2 to display the Add User Rules panel. This panel allows you to create user rules for all Servers.
See Add User Rules panel.
Default User Rules
Exit Point Manager ships with default user authority rules for all supported IBM i servers. View these rules by referring to the *PUBLIC rules on the Work with Security by User panel.
Server IDs
Exit Point Manager supports the following servers and provides one default user rule for each server.
| Exit Point Server | Description |
|---|---|
| *CLI | Call Level Interface |
| *DDM | *Distributed Data Management Server |
| *DRDA | Distributed Relational Database |
| *DQSRV | Data Queue Server |
| *FILESRV | File Server |
| *FTPCLIENT | IBM i FTP Client |
| *FTPSERVER | IBM i FTP Server |
| *NDB | Native Database Request |
| *RMTSRV | Remote Command and Distributed Program Call Server |
| *RTVOBJINF | SQL Retrieve Object Information |
| *SQL | Database Server Initialization |
| *SQLSRV | SQL Server |
| *TELNET | Telnet Device Initiation/Termination |
| *DATAQSRV | Optimized Data Queue Server |
| *FTPREXEC | FTP Execute Remote Command (REXEC) |
| *REXEC_SO | Remote Execute Command Signon Server |
| *TFRFCL | File Transfer Server |
| *TFTP | Trivial FTP Server |
| *CNTRLSRV | License Management Central Server |
| *FTPSIGNON | FTP Logon Server |
| *LMSRV | License Management Server |
| *MSGFCL | Message Function Server |
| *RQSRV | Remote SQL Server |
| *SIGNON | Signon Server |
| *VPRT | Virtual Print Server |
| QNPSERV | Network Print Server |
ShowCase Exit Points
Exit Point Manager provides access control and monitoring for exit points that are specific to the ShowCase software suite:
| Exit Point Server | Description |
|---|---|
| *VISTA A Showcase corporation server. (*VISTA) |
ShowCase *VISTA Clients |
| *VISTAPRO A Showcase corporation server. (*VISTAPRO) |
ShowCase *VISTAPRO Clients |
| DATADIST A Showcase corporation server. (DATADIST) |
ShowCase DATADIST Clients |
| VISTA_ADMI A Showcase corporation server. (VISTA_ADMI) |
ShowCase VISTA_ADMI Clients |
 Previous