Importing and Exporting Maps
Exporting Data From Maps
Exporting, Servers, and Clients
When you use the Export commands to retrieve information, you are exporting from the Intermapper Server, and saving it using the Intermapper client. The client is either running on the same machine as the server, or you are using Intermapper Remote Access to connect to an Intermapper Server and retrieve the data.
Intermapper exports data about the devices on its maps.
Why Export?
The two Export commands are intended for different purposes:
- Export Map - creates a file containing a visual representation of the map. This includes Intermapper's native .MAP format, which includes all data associated with the devices on the map, which you can import to another Intermapper server.
- Export Data - creates a text-based file you can use for database-related activities. It contains data from fields you choose from selected tables associated with the selected maps, as well as tables that contain data not specific to maps or devices.
Export a map to retrieve a visual representation you can use for your purposes. You can do the following:
- Transfer a map to a different server in native .MAP format.
-
Use a PNG, SVG, or Visio file in a presentation, marketing piece, or other use.
NOTE:- SVG is supported on all platforms if you have a paid license versus a free or trial license.
- Visio files are supported if the client is on a Microsoft Windows system. To export maps to Visio, you must have the full version of Visio 2013 or higher installed.
- Send an image of a map to illustrate a problem you are troubleshooting.
Export data for use in database-related applications. For example,
- To review the map's configuration to check for consistency
- To edit the map data using some external tool, and then re-import it (using the Import Command (Pg. 1) ) back into the map, updating the affected devices.
- To use the configuration in some down-stream application
You can export data for all maps, or for selected items (which could be maps or devices.)
Exporting Maps
You can export maps in a number of formats, each intended to provide a visual representation of the map. When you export a map in native .MAP format, all the data associated with that map is saved. In all other formats, a visual representation of the map is created.
To export a map:
- From the Export submenu, choose Export Map
This command is available as follows:From the File menu, when a map is selected in the Map List window.
NOTE:Fortra recommends that you do not export too many maps to Visio at a time.
- From the File menu in any Map window.
- From a context menu when you right-click a map from the Map List or Device List window,
-
From the Files of type menu, select one of the following file formats and click Save:
Exporting Data
Save a text file containing information about a map, devices, interfaces, notifiers, or users, intended for use in database-related applications.
To export data:
- From the File menu's Export submenu, select Export Data. A standard file dialog appears.
-
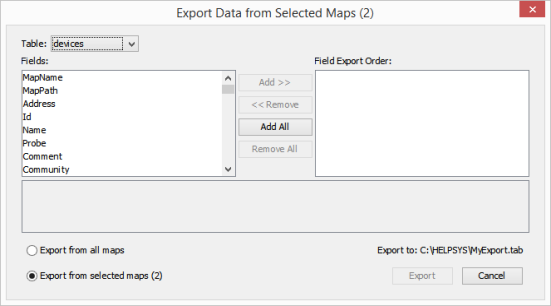
Choose a file name, location, and file output format as described in the table below. The Export Data window appears (also shown below).
From the Table menu, select devices (device attributes), vertices (appearance attributes), maps, notifiers, notifierrules, users, or schema (output file attributes).
NOTE: The schema file contains attributes of all the tables as described in the attribute topics listed above. As with the other export tables, you can specify the columns you want to export, as well as the order of the columns, as described in the following steps. - From the Fields area, click to choose the fields you want to export. Shift-click to select a contiguous series, or Ctrl-click to choose non-contiguous fields.
- Click Add. The selected fields appear in the Field Export Order box. If you want to export all fields, click Add All.
- In the Field Export Order box, drag the field names up or down to set the order you want the fields to appear in the export file.
- Select Export data from all maps or Export this map.
- If you want to export data only for the selected items on the map, click Export selected items.
- From the Output format drop-down menu, choose one of the formats as described below.
- Click Export. A standard File Save dialog is displayed.
- Select a name and location for the export file and click Save. The export file is saved in the specified location.
Export the data in one of these formats:
The following table shows the Intermapper tables you can export to data files in the selected format.
The Source column indicates whether the table contains information specific to the map or information specific to the server.
| Table | Source | Description |
| Devices | Server |
Contains information about devices and their Device Attributes. If the ProbeXML field is included in the export, the ProbeXML D-Set for the specified notifier is included for each device on a selected map, as described in About D-Sets. |
| Vertices | Map |
Contains information about the locations of devices on maps as described in Vertex Attributes Available only when a map is selected, either from the Map List window or from the Map Window. |
| Interfaces | Map |
Contains information about Interfaces, as described in Interface Attributes Available only from the Map window. |
| Maps | Server | Contains information about the maps on your server, as described in Map Attributes |
| Notifiers | Server |
Contains information about the Notifiers defined on your server, as described in Notifier Attributes. If the NotiferXML field is included in the export, the NotfierXML D-Set for the specified notifier is included for each notifier for each active notifier on a map, as described in About D-Sets. |
| Notifier Rules | Server | Contains the rules for each notifier as described in Notifier Rules Attributes. |
| Users | Server | Contains a list of users defined on your server as described in User Attributes. |
| Schema | Server | Contains the information for each Attributes table described above. |
| Retention Policies | Server | Contains information about the retention policies defined on your system as described in Retention Policy Attributes. |