Using Auto-Discovery
You can use Auto-Discovery to create a new map. Auto-Discover scans your network and creates an IP-based, Layer 3 view of the map.
For more information, see Mapping With Layer 2.
For existing maps, you can use the manual technique to convert the map. For new maps created with Auto-Discovery, use the automatic technique.
To use Auto-Discover to create an initial network map:
- From the File menu, select New. The New Map Constructor window is displayed.
- Type a map name and click Next.
- In the Enter a starting host name, or IP address text box,
type or paste the host name or IP address you want to use as the starting point for
auto-discovery.
A name is suggested for you. It is the DNS name or IP address of a router, or if there is no router, the computer Intermapper is running on. Accept the default or type any of the following: - To discover a range of addresses rather than all addresses, type them in the Enter an IP address range to discover text box. Use hyphens, wildcards, and CIDR slash notation to specify an IP address range. For more information, see Entering an IP Address Range.
- If you have SNMP-speaking devices in your network, type an SNMP Community string in the Specify an SNMP Community text box.
- Select your Discovery Options, as explained in The Auto-Discovery Window below.
- Click the Filter button to set a filter for the discovery.
-
Click OK to start the Auto-discovery process. A Discovery Status bar is displayed. The status bar shows progress statistics for subnets, queued routers, and addresses remaining to be scanned.

- As the network is scanned, discovered devices appear in the current map (or in a list if you cleared the Automatically Layout check box). When Intermapper finds all devices within the specified subnet, the Discovery Status bar disappears.
-
 Click
the Map View button near the upper left corner of the Map window to view
your network as a map, showing devices and networks as icons, with the interconnections
between them.
Click
the Map View button near the upper left corner of the Map window to view
your network as a map, showing devices and networks as icons, with the interconnections
between them.
To stop the auto-discovery process:
Click Cancel to stop the discovery process and to avoid adding new devices or networks. All devices added before you stop the process remain in the list.
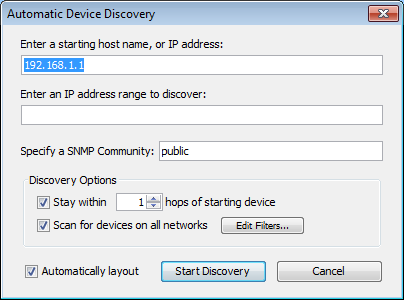
Automatic Device Discovery Window
You control the starting point, the SNMP Community string, the breadth of the network search, and the kinds of devices that are automatically added to the map using the Automatic Device Discovery window.
- Starting host name - The DNS name, IP address, or WINS name of a device to use as a starting point for the auto-discovery.
- IP Address Range - Use hyphens, wildcards, and CIDR slash notation to specify an IP address range.
- Specify an SNMP community -The SNMP read-only community string to be used to interrogate all devices. (Intermapper attempts to read SNMP information using the specified community string. It is set to public by default.
- Stay within NN hops of starting device - Stops autodiscovery after Intermapper searches the specified number of hops from the starting device.
- Scan for devices on all networks - Specify the device kinds to automatically add to the map. Select the check box or click Edit Filters to open the Network Scanning window.
- Click Automatically layout to allow Intermapper to automatically lay out the map.
- Click Start Discovery to initiate a scan of the specified host.
Network Filter Dialog
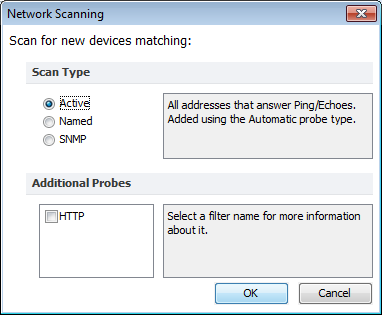
Select one of the following the filters you want to use to add devices to the map:
- Active - Intermapper performs a complete IP address scan for each network. A device is added for each IP address that responds.
- Named - Each IP address in the subnet is looked up in the DNS. If a corresponding name is present, the device is added to the map.
- SNMP - Intermapper sends an SNMP GetRequest to each address in the range. Any device that responds is added to the map and uses the SNMP Basic Traffic probe. If the device does not respond to SNMP, the probe is set to Ping/Echo.
- HTTP - If the device responds to an HTTP request, an HTTP probe is added to the device (along with SNMP Basic Traffic or Ping/Echo probe), and the device becomes a probe group.
What Happens During Auto-Discovery?
During auto-discovery, Intermapper attempts to discover all devices on a network, based on the IP address and SNMP string provided. It does this by querying the router and ARP tables. Then, using any scan filters specified in the Network Scanning window, it scans all attached subnets, mapping all devices it finds, until it reaches the hop count specified in the Discovery Options section of the Automatic Device Discovery window. It then performs the following processes concurrently and iteratively until the specified limits are reached:
- If Intermapper discovers an SNMP speaking router, it attempts to discover the interfaces the router has and what other routers are connected to those interfaces. Intermapper then queries each of the discovered routers for their connected networks and begins auto-discovery on each network.
- For each network or subnet discovered, Intermapper pings every address on that subnet to find more active or named devices.
- When Intermapper finds a device, it uses several techniques to characterize it. For example, it sends SNMP queries (with the specified SNMP community strings) to determine what kind of device is present.
WARNING: In auto-discovery mode, Intermapper might ping or query every device address on a subnet. If your network has an intrusion detection system, autodiscovery might trigger intrusion alarms. Be sure to check with the network manager before using this feature.
NOTE: It might take a long time to perform auto-discovery on a large subnet (a Class A or B subnet). Intermapper limits its auto-discovery queries to two per second so that it does not overload any networks. Therefore, it takes about 32,000 seconds (just under 10 hours) to completely scan the class B subnet (with 65,535 addresses).To create your maps more quickly, you can type or paste one or more host DNS names, IP addresses, IP address ranges, or WINS names in the Add Devices window (Insert menu). (WINS names must be preceded by "\\".) Intermapper immediately adds them to the map and connects them to the proper network.
You can also import a list of devices from a text file. For more information, see Importing Data Into Maps .
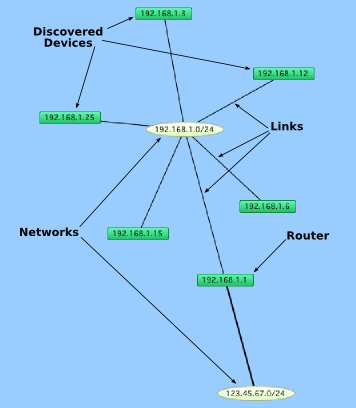
The following is a typical map after auto-discovery is complete: