Configuring Notifiers
Notifiers have the following attributes:
- A notifier name.
- The type of notification to send
- A schedule of hours during which the notification should be sent
- A set of parameters determined by the notification type. This information is required to allow the notification to be sent. For example, an E-mail notifier requires a valid email address.
- In the Name text box, type a notifier name.
- From the Notifier Type menu, select a notifier type.
- In the Configuration panel, specify the configuration information for the selected notifier type.
- From the Scheduled Hours panel, choose the hours during which the notifier is active.
-
Click Test Notifier Configuration to send a test notification.
NOTE: The Test Notifier Configuration button checks to make sure that the notifier is configured correctly and that a notification is placed in the queue. The notification can fail to be delivered, even when the notifier is configured correctly. - Close the Configure Notifier window.
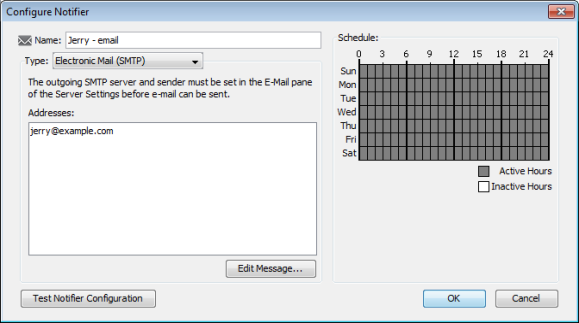
- Use the left side of the window to select the notification type and to set the notifier parameters.
- Use the right side of the window to edit the notification schedule.
When you select the notifier type from the Notifier Type menu, the left pane changes to show the parameters required for the selected notifier type.
Removing a Notifier
To remove a notifier:
- From the Edit menu, select Server Settings. The Server Settings window is displayed with a list of settings in the left pane.
- From the Server Configuration section of the Settings list, select Notifier List. The Notifier List window is displayed.
- Select the notifier you want to remove.
- Click Remove. A confirmation dialog is displayed.
- Click Yes. The selected notifier is removed from the Notifier List.
Configure Notifier Window Reference
Name
Enter a name in the Name text box. The name can be any descriptive text string.
Tip: If the notifier is active only at certain times of the day or week, you can include a description of the time period as well. For example, you could assign names such as Weekend Pager and Second Shift Pager to notifiers that had those time schedules.
Notifier Type
From the Configure Notifier window's Notifier Type menu, select a notifier type. For more information, see Notifier Types (Pg. 1).
Scheduled Hours
Select a range of hours during which this notification should be sent.
- Active hours are shown in gray.
- Inactive hours are shown in white.
To set a range of hours:
- Click and drag across a range of hours.
- Click and drag across all blocks to invert the selection.
To add or remove hours from the schedule:
Click an individual cell to make it active or inactive.
To activate or deactivate all hours in the schedule:
- Double-click the Active Hours legend to activate all hours in the schedule.
- Double-click the Inactive Hours legend to deactivate all hours in the schedule.
To edit the message sent with the notification:
Click Edit Message. The E-mail Notification page (Pg. 1) shows the editing interface.
Test Notifier
From the Configure Notifier window, click Test Notifier. The notification is sent immediately, with the state of Test.
After you create notifiers, you can attach them to all devices (the default notifier is used for all new devices) or to one or more devices.