Device Info Window
Use the Device Info window to view and edit information about a device.
To use the device window:
- Click a section on the left to edit that info type.
- Edit the info as described below.
- Click Apply to save your changes.
- Click OK to save your changes and close the Info window.
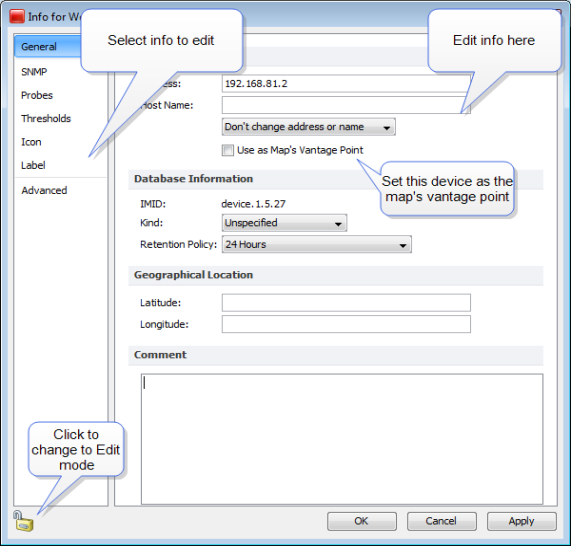
General Pane
Use the Device Info window General pane to edit general information about the device.
Editing General Info
- Address - The device address that is used when the device is polled.
- Host Name - The device's host name that is used to resolve the address.
- Resolve - Select address to set name, name to set address, or neither.
- Use as Map's Vantage Point - Select to use this network as the map's Vantage Point.
- IMID - The Intermappers internal device ID. (This info is read-only.)
- Kind - The device type.
- Retention Policy - The Retention Policy to specify how data for this device is saved.
- Latitude - The device latitude.
- Longitude - The device longitude.
- Comment - The device comments.
SNMP Pane
Use the Info window SNMP pane to view available SNMP information. This is a read-only pane, so there are no options to edit.
Probes Pane
Use the Device Info window Probes pane to view and edit the device's probes.
Editing Probe Info
From the Probes pane, you can add and remove probes, and edit a probe's information.
To edit probe information:
- Make the map editable by clicking the lock icon at lower left.
- To change the probe, right-click (or Ctrl-click) the probe you want to edit and select Set Probe from the context menu. The Set Probe window is displayed.
- Select the probe you want to use and edit the settings as needed.
- Click OK to close the Set Probe window.
To add a probe:
- Click the plus sign (+) at the bottom of the Probes pane. The Set Probe window is displayed.
- Select a probe from the probe list on the left.
- Edit the probe settings as needed.
- Click OK to close the Set Probe window.
Thresholds Pane
Use the Device Info window Thresholds pane to view and edit threshold settings for the device.
Editing Threshold Info
To edit the threshold information:
- Open the Info window for the device you want to edit.
- Ensure the map is in Edit mode.
- Click Thresholds to view the Thresholds pane.
-
Select the Ignore Outages check box to suppress alerts for the device when it goes down or comes up.
NOTE: The Ignore Outages check box suppresses alerts with respect to outages, not to other state changes, thresholds, or any alerts triggers by probes attached to the device. This is useful if a device such as a laptop or mobile device goes up or down (or leaves the network completely) as part of its normal operation. - Clear the Use Map Defaults check box.
- Edit the information as needed.
- Click Apply to activate the changes without closing the window or click OK to activate and close the window. The selected device uses the new values.
Icon Pane
Use the Device Info window's Icon pane to change the icon for the device.
Editing Icon Info
To change the device's icon:
- From the menu at the top of the pane, select an icon set.
- Scroll through the set and select an icon. You can see what it looks like by clicking it. You can see what it looks like in different states by clicking the colored buttons below the preview area.
- After you find an icon you want to use, click Apply to activate the icon without closing the window or click OK to activate the icon and close the window.
Label Pane
Use the Device Info window's Label pane to edit the device's label.
Editing a Label
A label can contain any combination of text, variables, and JavaScript. For detailed information on editing labels see Editing Labels and Dynamic Label and Alert Text.
Advanced Pane
Use the Advanced pane to specify the mapping behavior of a device and whether to collect Layer 2 information.
Mapping Behavior
- Determine network information for each port separately - Use this option when mapping Routers.
- Propagate all network number information from one port to all ports - Use this option when mapping switches.
- Do not propagate network information about the ports - Use this option when mapping hubs and end systems.
Layer 2
- Poll this address for Layer 2 information - Clear this check box to prevent this device's IP address from being polled for Layer 2 information. This is equivalent to the Remove switch from Layer 2 database command, available when you right-click a switch in the Layer 2 view's Filter pane.
- Allow Layer 2 connection - Clear this check box to prevent Intermapper from making a connection from this device to other devices on the map using Layer 2 information.