Workflow overview
A major component of the Database Monitor software is the ability for Database Monitor to watch the database for important events and to respond to these events by either notifying one or more people, or by automatically launching custom programs. This part of Database Monitor is referred to as the Workflow component. Files that are added to Database Monitor are constantly being watched and have all of their activity logged to the audit trail files. In addition, for each action that takes place that affects the database, just after logging the transaction, Database Monitor will analyze the change against the existing workflow entries for the file being affected and, if the criteria for the workflow entry are matched by the changes that have been made, the actions specified in the workflow will be performed.
Simple Workflow example
Consider the following simple example: The traffic manager, Bob, needs to know each time a shipment is sent to BigBoy Motors, the company's largest customer, because Bob likes to call Ed Big, BigBoy's owner, and let him know personally that a shipment is on its way. Database Monitor can do this easily. The general steps for setting it up are as follows:
- Add the Shipment file to Database Monitor in the Database Monitor Configuration - Files panel.
- Create a new workflow entry, calling it "Notify Bob about shipment to BigBoy."
- Add a criterion to the workflow saying only react when "record added to file."
- Add a criterion to the workflow saying only react when "customer" is "BigBoy."
- Add Bob as a user to be notified for the workflow.
Using these steps you can set up a "notification" workflow in a matter of minutes. Even the simple criteria shown can be quite useful. The following procedure describes how to create this Workflow:
- Choose option 11 from the Database Monitor Menu system to open the Database Monitor Configuration - Files panel.
- To add a file, enter its library at the top of the screen. You can use F4 to prompt for the file in the File field. See Configuration - Files.
- After the file has been added, enter 20 for the file that requires a workflow. Choosing action 20 for a file in Database Monitor will bring up the Workfow Header Entries panel (IDT510-01). From here you can see a listing of the existing workflows for this file, along with a shorthand notation showing the various criteria that make up the workflow.
- Press F6 to add a new workflow. The following screen appears.

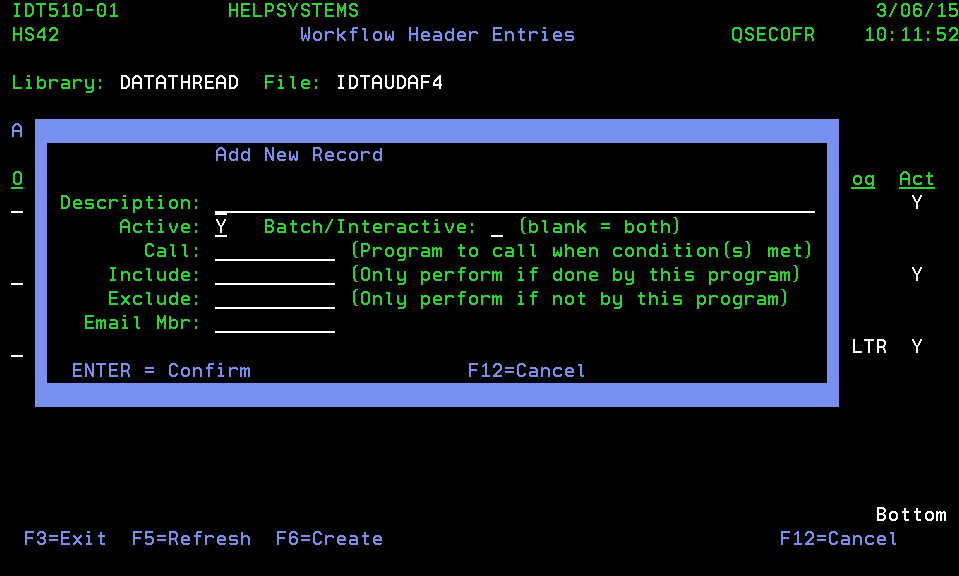
The description can be anything that uniquely describes this workflow. There are also two canned entries that can be made into the description to perform specific functions within Database Monitor.
The first is *NOTRACK. A *NOTRACK entry is made to prevent the tracking of a record change based on the selection criteria of the workflow. When a *NOTRACK workflow is entered for a file, the Database Monitor program that is in charge of selecting which record changes to track will determine if this record should be included based on the entered selection criteria within this workflow. NO TRACKING DATA WILL BE KEPT FOR A RECORD THAT MEETS THE SELECTION CRITERIA WITHIN A *NOTRACK WORKFLOW.
The Second is *CONTEMP. The *CONTEMP entry allows the use of the workflow selection criteria to determine if a contemporaneous signature screen is required for a database change. There can be any number of *CONTEMP entries per file. They can be defined by entering a description after the *CONTEMP entry in the description field. This description will be displayed within the contemporaneous signature screen to let the user know what they are signing for. When multiple CONTEMP entries are used for a single file, there is the option of allowing one signature to propagate for all changes, or enforcing a signature for each change within the record. This entry can be found within the system parameters and is called SGNALL*C. If this entry is a N the system will require the individual signature for all *CONTEMP entry selection criteria that is met.
Note: For a *CONTEMP the field being tested requires a 'Y' in the signature position within option 15 of the table maintenance.
All of the selection criteria defined later in this document are valid for use within the *NOTRACK and *CONTEMP entries. An Email Member can be entered to customize the e-mail sent when a change is processed that activates this workflow.
Please see the section on custom E-Mail Members for further help.
Consider the example shown below. Here, the file TSTCST, in library INODEV, has one active workflow entry, called "New Customer Created in Region 102". There are two conditions that must both be met for this workflow to be activated:
- A record was added to the file, and
- The region field (CSREG) is equal to 102.
One other minor condition is listed under the B/I column, which specifies that this workflow only activates when from an "interactive" job. Batch updates will not cause this workflow to fire.
The screen above shows a very simple example of a workflow, with its conditions. The only piece not yet mentioned has to do with "what to do" when these criteria are met. You may see this by placing an 11 on the workflow to see its users assigned and other actions. Below is a sample of what this might look like:
As the screen above shows, when this workflow gets activated the planning department gets notified. For a detailed look at the aspects of workflows, see the following sections: