Endpoints
How to get there
In the HelpSystems One Navigation Pane for Powertech Antivirus, choose Endpoints.
Or, on the Home page, click View for an item in the Endpoints Status section.
What it does
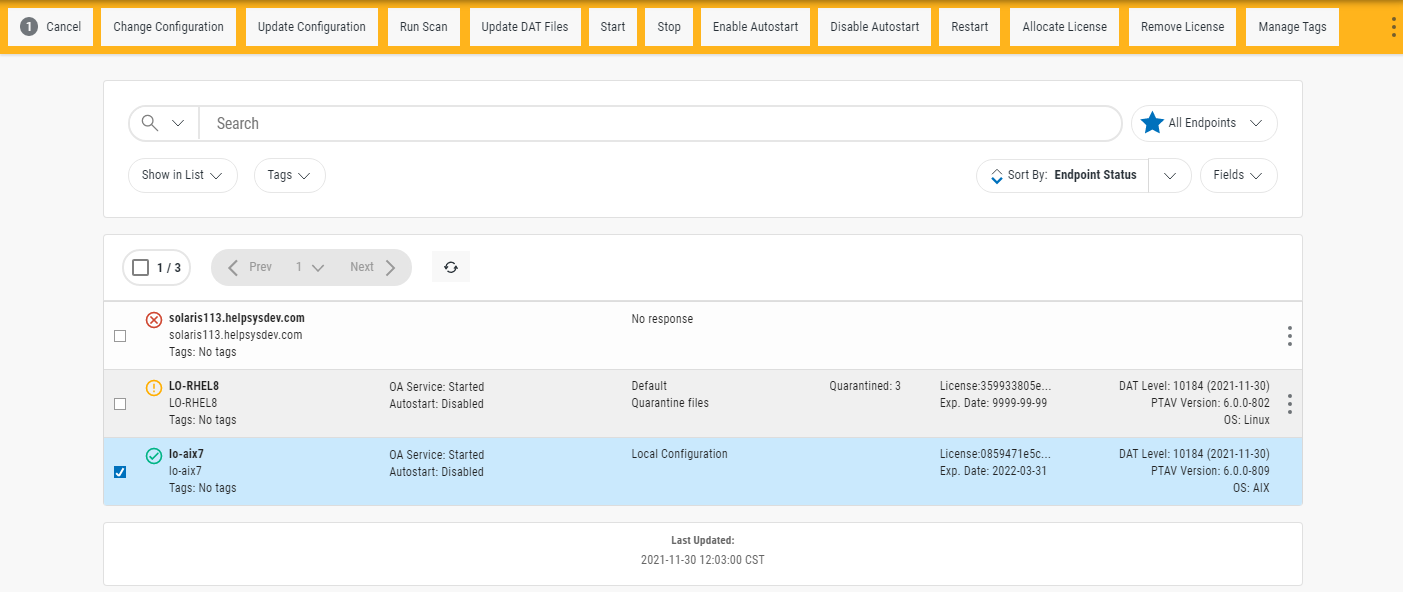
The Endpoints page indicates the status of registered endpoints and allows you to manage the HelpSystems One PTAV Service, which allows you to run On-Demand scans and update virus definitions on endpoints. This list excludes endpoints that have not been allowed, as well as endpoints that have been blocked. (See Connection Settings page for details.)
Identifying the Endpoint Status
 Ok. No issues found.
 Warning. No major issues found, but warnings reported.
 Critical. Issues found. Action required.
 Down. The endpoint did not respond to the last health check request.
Options
 (Show Actions)
Select this to show a menu with the following options. The options shown vary depending on the operating system of the endpoint:
- Properties. Opens the Endpoint Properties pane, where you can identify endpoint status details and license information, modify the endpoint alias, and perform additional actions.
- Run Scan. Opens the Run Scan page, where you can make final adjustments to the Configuration being used and run the scan.
- Update DAT Files. Choose this option to update the virus definitions (DAT files) on the endpoint.
- Start. Starts the On-Access service and performs and installs the anti-virus service control file into the system area if needed.
- Stop. Stops the On-Access service.
- Enable Autostart. Configures Powertech Antivirus to start on future reboots of the endpoint. Install is performed if needed.
- Disable Autostart. Configures Powertech Antivirus to not start on future reboots of the endpoint.
- Restart. Restarts selected endpoints. Selected endpoints that are not running are also started. Install is performed if needed.
- Manage Quarantine. If quarantined files exist for an endpoint, this option is available. Choose this option to open the Quarantined Files page, where you can view and manage quarantined files.
- Allocate License. Choose this option to allocate the license to the selected endpoint.
- Remove License. Choose this option to remove the license from the selected endpoint.
- Close. Choose Close to dismiss the Actions menu.
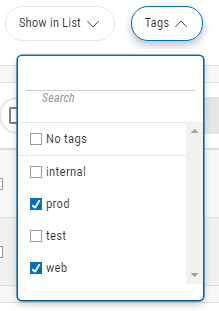
Tags
Use the Tags drop-down list to specify the endpoints you would like to display in the endpoints list.
-
Click Tags to open the drop-down list. This list includes all tags that have been defined. Tags can be defined and assigned to endpoints in the Endpoint Properties pane, or in the Manage Tags dialog box (available from the Endpoints screen).
-
Type in the Search field to display only tags that include the submitted text.
-
Use the check boxes to select the tags that are assigned to the endpoints you would like to display in the endpoints list.
-
Use the "No tags" check box to display endpoints that have no tag assigned.
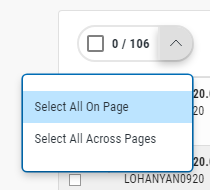
Select All; Select All On Page • Select All Across Page
Check this box to select all on the page or across pages. Use the adjacent drop-down list to indicate the action to be taken when checking this Select All check box.
-
Choose Select All On Page to indicate this check box should select all endpoints on the current page only.
-
Choose Select All Across Pages to indicate this check box should select all endpoints, including all endpoints listed on subsequent pages.
Selected Endpoints
Select one or more endpoints using the check box to the left of each endpoint in the list. When you do so, many of the same options described above, and additional configuration options, appear in a yellow Show Actions menu bar at the top of the screen. This menu bar allows for changes to multiple endpoints simultaneously.

The options shown vary depending on the operating system of the endpoint. The additional configuration options are:
- Change Configuration. Choose this option to change the Configuration on the endpoint.
- Update Configuration. Choose this option to update the Configuration on the endpoint in order to restore the current Configuration settings.
Manage Tags. Choose this option to open the Manage Tags dialog box. This dialog box allows you to assign tags to the selected endpoints, remove tags from the selected endpoints, create new tags, or delete existing tags. Tags that are assigned to endpoints can be used to filter the endpoint list on the Endpoints page.
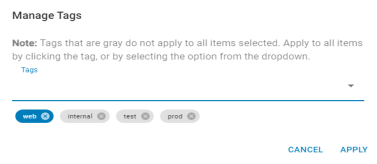
Blue tags (
 ) are already assigned to all selected endpoints. Gray tags (
 ) are assigned to one or more of the selected endpoints. Click a gray tag to assign it to all selected endpoints.
To assign an existing tag to all selected endpoints, type the tag text and press enter. Or, click
 to display the list of existing tags, then click a tag in the list, or press the down arrow key until the tag is highlighted and press Enter, to assign it to all selected endpoints.
To create a new tag, type the desired tag text and press Enter. (If the tag already exists, it will be assigned to all selected endpoints.)
- Cancel. Dismiss the Manage Tags dialog box without making changes.
- Apply. Assign blue tags to all endpoints. Delete any existing tags from the selected endpoints that were removed on the Manage Tags dialog.

Tags can also be managed and assigned for an endpoint in the Endpoint Properties pane.