Network Attack and Penetration
The Network Attack and Penetration RPT step uses previously-acquired information about the network (such as the information you gathered using the Network Information Gathering step) to automatically select and launch remote attacks.
For each target host, this step requires the following information, all of which is obtained automatically by the Network Information Gathering step:
- IP address: The targets have to be in the Entity View. This can be done either by hand ( -> in the Entity View) or by using a Network Discovery module.
- OS and architecture: In order to build the correct payload, attacks need to know the target host's operating system and architecture. This can be obtained by using the modules in the OS detection module folder or set by hand using the Entity Properties dialog. Refer to Entity Properties for more information.
- Port and service information: For each host, a listing of network services listening on specific ports is needed. This can be done by using a Port Scanning module and the service identification module (Service Identification) in the Information Gathering module folder, or set by hand using the Entity Properties dialog. Refer to Entity Properties for more information.
To run the Network Attack and Penetration step, follow this procedure:
- Make sure that the Network RPT is active.
- Click on Attack and Penetration to open up the Network Attach and Penetration Wizard and press Next to start.
-
In the Target Selection window, press the ellipsis (
 ) button.
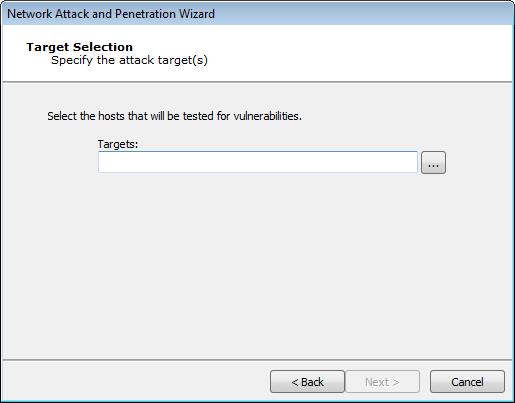
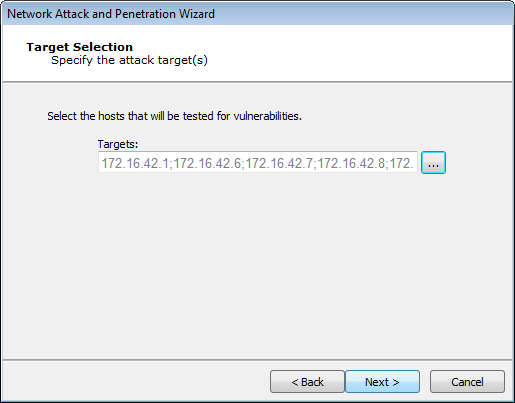
The Entities Selection window displays. Select the host(s) that you wish to target with the Attack and Penetration. Only hosts that are represented in the Entity View can be targeted. Press the OK button to return to the Wizard.

Back at the Wizard, press Next to continue.
-
On the Attack Method window, select the Attack method(s) to be performed and their sequence.
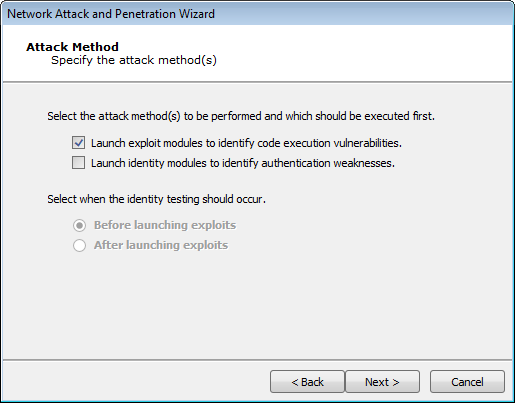
- Select Launch Exploit Modules to identify code execution vulnerabilities if you want the Attack and Penetration to attempt to find vulnerabilities in the target hosts' OS or any installed programs. See Launch Exploit Modules
- Select Launch Identity Modules to identify authentication weaknesses if you want the Attack and Penetration to attempt to gather identities (usernames/passwords, cookies, SSH keys, etc.) from the target host(s). See Launch Identity Modules .
- If you select both of these options, select whether the identity testing should execute before or after the exploits are launched.
- Press Next to continue to either Launch Exploit Modules or Launch Identity Modules.
Launch Exploit Modules
-
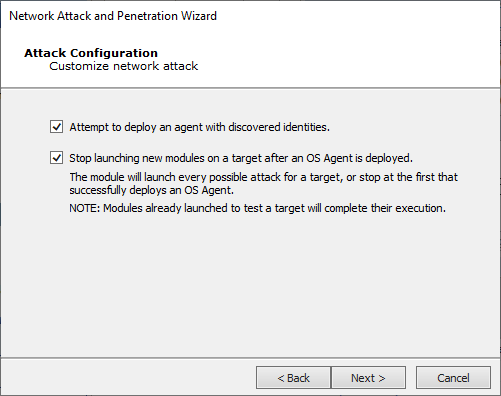
If the Exploit Modules attack method was selected, the option presented on the Attack Configuration screen, lets you choose whether or not to stop launching new modules on a target after an OS Agent is deployed.
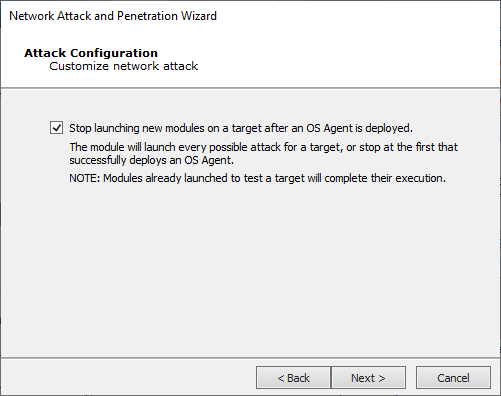
Press Next to continue.
-
If the 'Stop launching...' option on the previous screen is unchecked the execution order option becomes unavailable on the Network Attack Setup screen.
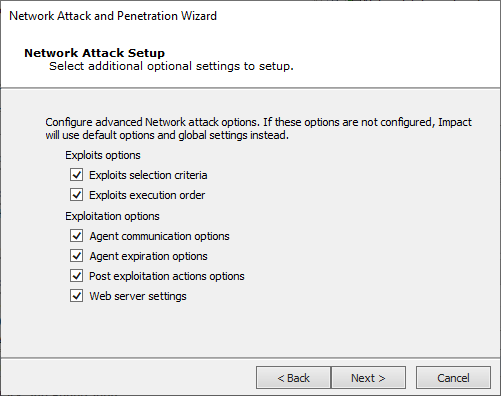
Select any of the Exploits or Exploitation options and press Next to access each one's settings screens.
-
Exploits Selection Criteria
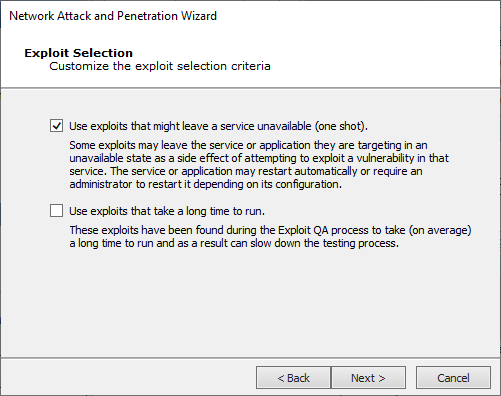
- Some exploits could potentially leave a target service unavailable. These exploits can be excluded from this test by unchecking the Use exploits that might leave a service unavailable checkbox.
- Some exploits could take a long time to exploit a specific server, due to a long brute-force process. These exploits can be excluded from this step by unchecking the Use exploits that take a long time to run checkbox.
Press Next to continue (or Finish if this is last or only item selected).
-
Exploits Execution Order
This step specifies how exploits are prioritized by the RPT:
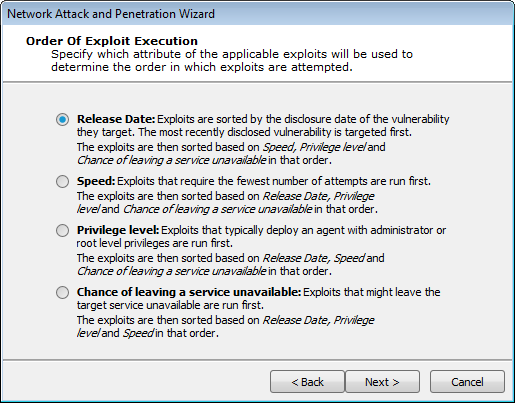
Release Date: Exploits are sorted by the disclosure date of the vulnerability they target.
Speed: Exploits that require on average the fewest number of attempts are run first.
Privilege Level: Exploits that deploy an agent with administrator privileges are run first.
Chance of Leaving a Service Unavailable: Exploits that might leave the target service unavailable are run first. This option will not be visible if you did not select the Use exploits that might leave a service unavailable option in the previous step.
Each of the Order of exploit execution options operate at the port and service level of targeted hosts. Because port and service level attacks run in parallel, it may appear that your selection is not given priority over the others. For example, if you select Speed as the primary order attribute, a slow-running exploit may still run before fast ones if it is the only applicable exploit for a specific service on the target host.##
Press Next to continue (or Finish if this is last or only item selected).
-
Agent Communication Options
Select a Connection Method for deployed agents to use.
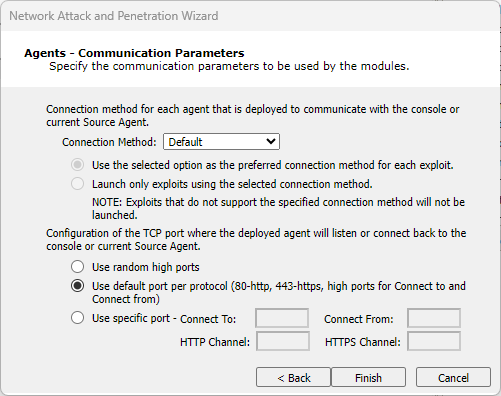
Connection Method... - Select the method for each agent that is deployed to communicate with the console or Current Source Agent.
Default: Connection method set as default by each exploit will be used.
NOTE:The connection could be different for each triggered exploit as it will depend in its metadata.
Reuse connection: Same connection used to exploit the target will be reused to set the agent’s communication channel.
Connect to target: Connection will be performed from the source agent to the target (usually Core Impact).
Connect from target: Connection will be performed from the target to the source agent.
HTTP Channel: Validate that the value configured in the input is opened to listen for connections.
HTTPS Channel: Validate that the value configured in the input is opened to listen for connections.
Only exploits with the specified connection method will be run (if you select "Reuse connection", only exploits with that capability will be selected). For more information regarding agent connection methods see Establishing Agent Communication Channels.
Configuration of the TCP Port... - Set the port where the agent will listen by checking one of the following:
Use Random High Ports: A random high port (by default 40000-60000, can be changed if behind a NAT) will be used for each needed connection method.
Use Default Port per Protocol: Port 80/tcp will be used for HTTP channel; port 443/tcp will be used for HTTPS channel; and random high ports will be used for both ConnectoTo and ConnectFrom connection methods.
Use Specific port: Set the port number that will be used by triggered exploits based in their configured connection method.
Press Next to continue (or Finish if this is last or only item selected).
-
Agent Expiration Options
Select Expiration Settings for deployed agents to use. You can Use global settings (which are defined in the Agent Options), set a specific date, or disable expiration.
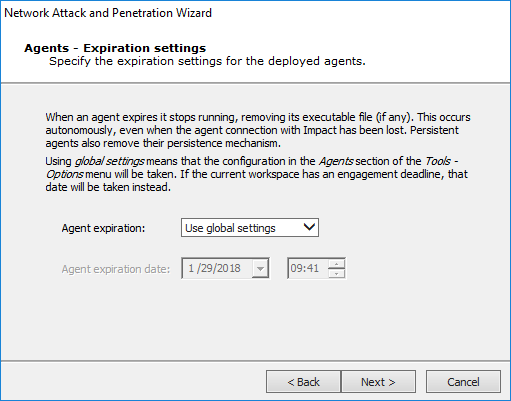
Press Next to continue (or Finish if this is last or only item selected).
-
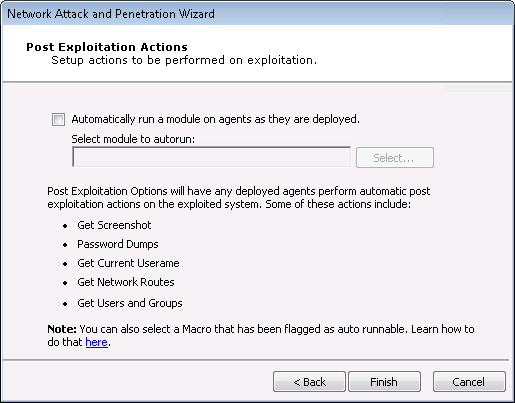
Post Exploitation Actions Options
If you want any modules to run as soon as an agent is connected, check the Automatically run modules on agents as they are deployed checkbox. Then click the Change... button to select the module you wish to run.
If you would like multiple modules to autorun, create a macro module (see Create Macro Modules) that is made up of the modules you wish to run, then enter the macro module into the autorun field.
-
Web Server Settings
Use these settings to customize the web server used for the attack.
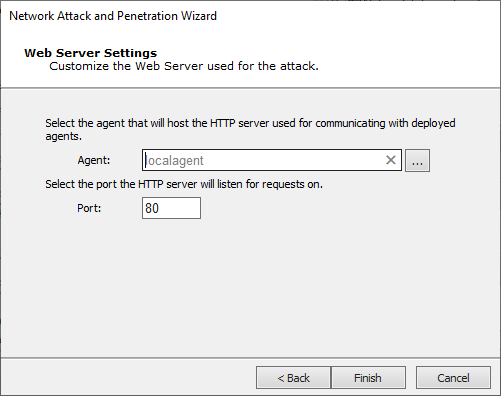
Agent - Select the agent that hosts the HTTP server.
Port - Select the HTTP server listener port.
NOTE:Validate that the host where the configured agent is running can receive connections from the targets in the configured port.
-
-
Press the Finish button.
The module will run and information will be displayed on the Executed Module Info Panel of the Console. The Network Attack and Penetration step will run multiple attacks in parallel against each target host. Each exploit automatically launched by this step will be shown as a child of the Attack and Penetration module in the Execute Modules panel. You have successfully launched an attack.
Launch Identity Modules
-
If the Identity Modules attack method was selected, the options presented on the Attack Configuration screen, let you choose whether or not to deploy an agent with discovered identities, and/or stop launching new modules on a target after an OS Agent is deployed.
Press Next to continue.
-
Depending on the options selected on the previous screen you may see all or some of the items on the Network Attack Setup screen.
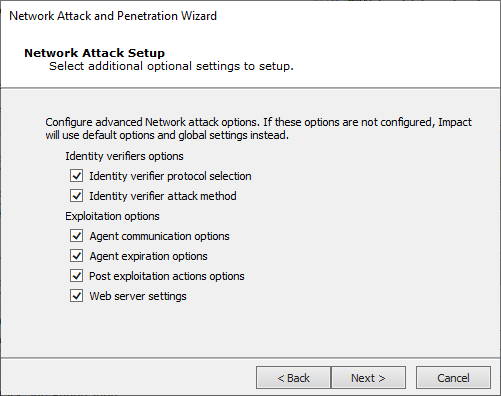
Select any of the Identity verifiers or Exploitation options and press Next to access each one's settings screens.
-
Identity Verifier Protocol Selection
If you opted to Launch Identity modules to identify authentication weaknesses, this step specifies which identity modules are run during the Attack and Penetration.
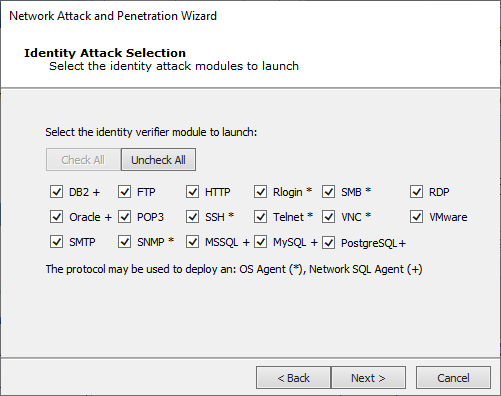
Select the service for which you want Core Impact to test for identities and press Next to continue.
-
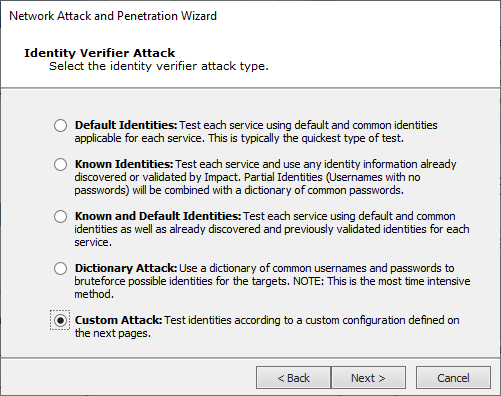
Identity Verifier Attack Method (next screen says: Identity Verifier Attack)
Select one of the Identity Verifier Attack Types and press Next to continue.
-
Default Identities
Attack Type:
Quick - A short list of the most common identities for each service will be used
Deep - An extended list of common identities for each service will be used
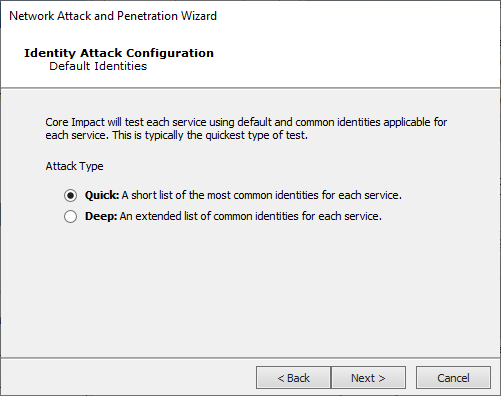
Press Next to continue to the Common Identity Attack Configuration.
-
Known Identities
Use the default password list or pass a custom file to Core Impact

Press Next to continue to the Common Identity Attack Configuration.
-
Know and Default Identities
Attack Type
Quick - A short list of the most common identities for each service will be used
Deep - An extended list of common identities for each service will be used
Passwords: Use the default password list or pass a custom file to Core Impact
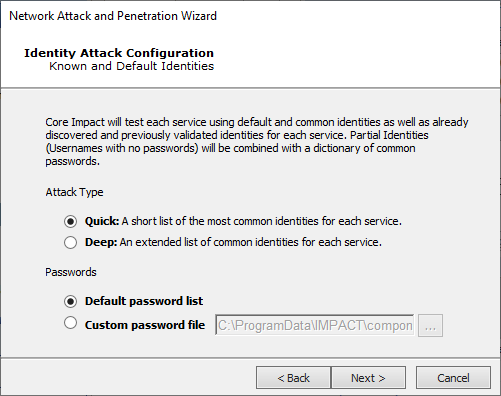
Press Next to continue to the Common Identity Attack Configuration.
-
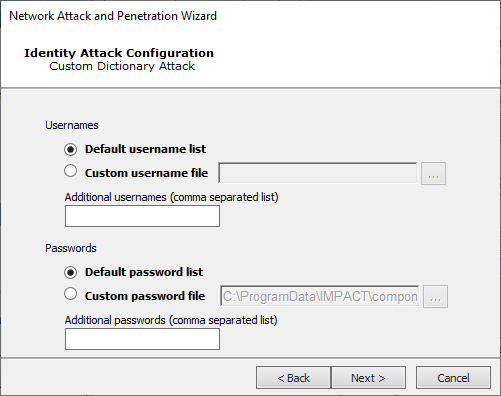
Dictionary Attack
You will need to define the Custom Dictionary Attack. For both Usernames and Passwords, you can supply a text file that contains the text strings you wish to use for the test and/or type in a list of text strings separated by commas.

Press Next to continue to the Common Identity Attack Configuration.
-
Custom Attack
You will need to define the Custom Dictionary Attack. For both Usernames and Passwords, you can supply a text file that contains the text strings you wish to use for the test and/or type in a list of text strings separated by commas.
Press Next to continue.
The Identity Attack Execution Configuration screen refers to the identities that Impact has already discovered. You can configure to include them (and in which way) in the test.
You can set to include if previously validated identities will be used; include identities based on how they were obtained (through IG, or through an import); different combinations you ca do with usernames and provided password lists; and restrict passwords to only alphanumeric.
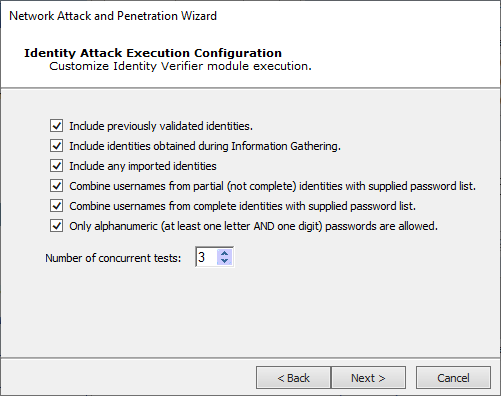
Press Next to continue.
On the Custom Identity Attack Configuration screen, you can specify how many common identities for different services will be tested when triggering the Identity Verifier modules. There are some common identities for each service, and you can set whether to go deep in the list, or keep it quick.
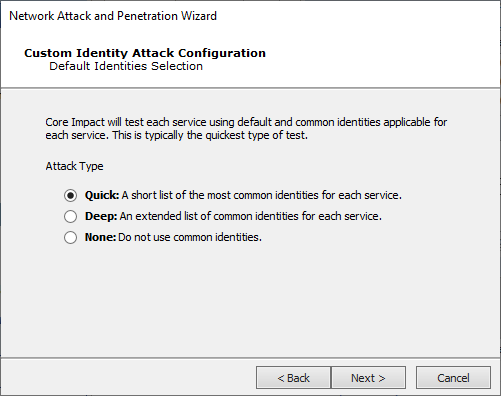
Press Next to continue.
The Common Identity Attack Configuration screen is the final panel displayed for the five Verifier Attack Methods (Default, Known, Known and Default, Dictionary, and Custom).
With this step in the Wizard, you can:
- Attempt to deploy an agent with discovered identities
- Stop testing that protocol on that machine when a valid account is identified
- Test each username with an empty password and common combinations
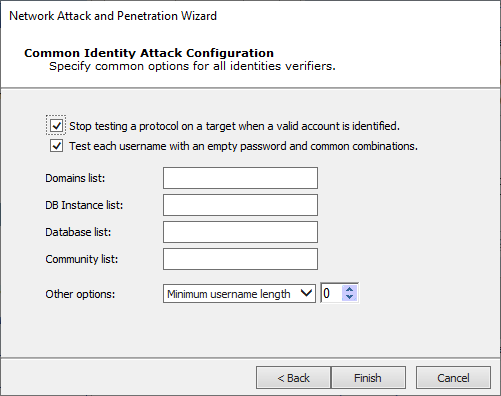
Either press Finish (if shown) or Next to continue with the remaining exploitation options.
-
-
Agent Communication Options
Select a Connection Method for deployed agents to use.
Connection Method... - Select the method for each agent that is deployed to communicate with the console or Current Source Agent.
Default: Connection method set as default by each exploit will be used.
NOTE:The connection could be different for each triggered exploit as it will depend in its metadata.
Reuse connection: Same connection used to exploit the target will be reused to set the agent’s communication channel.
Connect to target: Connection will be performed from the source agent to the target (usually Core Impact).
Connect from target: Connection will be performed from the target to the source agent.
HTTP Channel: Validate that the value configured in the input is opened to listen for connections.
HTTPS Channel: Validate that the value configured in the input is opened to listen for connections.
Only exploits with the specified connection method will be run (if you select "Reuse connection", only exploits with that capability will be selected). For more information regarding agent connection methods see Establishing Agent Communication Channels.
Configuration of the TCP Port... - Set the port where the agent will listen by checking one of the following:
Use Random High Ports: A random high port (by default 40000-60000, can be changed if behind a NAT) will be used for each needed connection method.
Use Default Port per Protocol: Port 80/tcp will be used for HTTP channel; port 443/tcp will be used for HTTPS channel; and random high ports will be used for both ConnectoTo and ConnectFrom connection methods.
Use Specific port: Set the port number that will be used by triggered exploits based in their configured connection method.
Press Next to continue.
-
Agent Expiration Options
Select Expiration Settings for deployed agents to use. You can Use global settings (which are defined in the Agent Options), set a specific date, or disable expiration.
Press Next to continue.
-
Post Exploitation Actions Options
If you want any modules to run as soon as an agent is connected, check the Automatically run modules on agents as they are deployed checkbox. Then click the Change... button to select the module you wish to run.
If you would like multiple modules to autorun, create a macro module (see Create Macro Modules) that is made up of the modules you wish to run, then enter the macro module into the autorun field.
-
Web Server Settings
Use these settings to customize the web server used for the attack.
Agent - Select the agent that hosts the HTTP server.
Port - Select the HTTP server listener port.
NOTE:Validate that the host where the configured agent is running can receive connections from the targets in the configured port.
-
-
Press the Finish button.
The module will run and information will be displayed on the Executed Module Info Panel of the Console. The Network Attack and Penetration step will run multiple attacks in parallel against each target host. Each exploit automatically launched by this step will be shown as a child of the Attack and Penetration module in the Execute Modules panel. You have successfully launched an attack.