Setting up the Properties of Each Step

Now that you've added steps to the route, choose what each step does. To set up what each step does, edit the step's properties.

For each step:

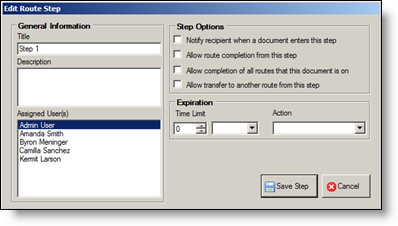
  • Choose the step's title.

  • Assign one or more Webdocs users to the step.

  • Set how long a document can sit in a routing inbox before action is taken.

  • Choose the step's actions. Actions include notifying the route manager, moving the document to the previous step, or moving the document to the next step.

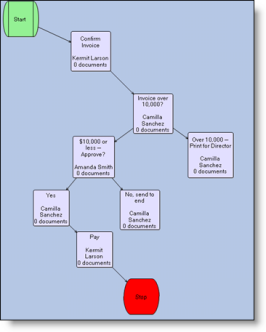
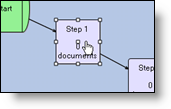
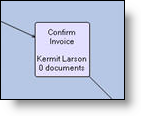
For example: This is how a sample route looks before and after you set up its properties:

To set properties for a route step:

  1. In the blue designer area, double-click the step whose properties you want to set up.

    Edit Route Step displays.

  2. Set up the step's properties based on the following:

    For...

    Choose...

    Title

    The name of this step.

    Description

    Any notes for yourself and other administrators. The description is only visible from the Webdocs Route Designer.

    For example: This is a yes/no step.

    Recipient

    The person or people responsible for this step. You can choose any users with email addresses in Webdocs. Hold Shiftand click to select multiple adjacent users, and holdCtrl and click to select multiple non-adjacent users.

    Step Options

    What the recipients can do with a document:

    • Notify recipient when a document enters this stepreceive an email notification when a new document arrives in their routing inbox.

    • Allow route completion send the document to the end of the route.
    • Allow completion of all  – send the document to the end of all the routes it is on.
    • Allow transfertransfer the document to a different route.

    Expiration

    How long a document waits in the recipient's routing inbox before an automatic action happens:

    For... Choose...
    Time Limit When to set the expiration date for a document in a routing inbox. How long a document waits in a routing inbox.
    Action

    Webdocs does not currently use this setting.

  3. Click Save Step  .

    Edit Route Step closes, and the properties of the route step are set up.

  4. To see how your changes have affected the route, click Load Route.

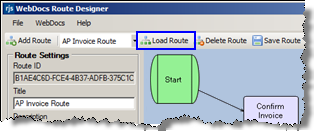
    The changes you made to the route display.

  5. After you are done setting up the properties for each step, click Save Route.

    The route is saved, and you can now assign documents to this approval route.