Adding Steps to a Route

This topic shows you how to add steps to the route you created. Each step represents an approval decision for a document on a route. You add steps by drawing in the blue designer area.

To...

Do the following...

And it looks like this...

Add a step.

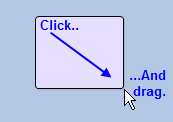
Click where you want the top-left of the step to be and drag to the bottom-right.

Move a step.

  1. Click the step to select it.

  2. Move the cursor to the center of step until it turns into directional arrows.

  3. Click and drag the step to where you want to move it.

Resize a step.

  1. Click the step to select it.

  2. Put your cursor over the sizing handles until the cursor turns into an arrow.

  3. Click and drag the step to make it bigger or smaller.


Connect two steps.

  1. Click the first step to create an arrow.

  2. Drag the arrow to the next step.

  3. Let go and the steps are connected.

Delete a step.

  1. Click the step to select it.

  2. Press Delete.

    A confirmation dialog box displays.

  3. Click Yes to confirm.

To set up what each step does, continue to Setting Up the Properties of Each Step.