Creating a Document Type
This topic shows you how to create a Document Type. Before you create a Document Type, make sure you are familiar with how Document Types are used in Webdocs. See the Webdocs Workbook. If you don't have a copy of the Webdocs Workbook, contact your Fortra project team or technical support.
In Webdocs, you use Document Types as a way to organize the different kinds of documents. You can think of Document Types as labels for groups of similar kinds of documents. Document Types are one of the labels that users can search to find a document.
If you have the "Document Type and Title by Functional Area" worksheet from the Webdocs Workbook, use it to set up your Document Types.
For more advanced ways to manage Document Types, see Managing Document Types.
To create a Document Type:
-
On the side menu of the Settings tab, click Create New Document Type
 .
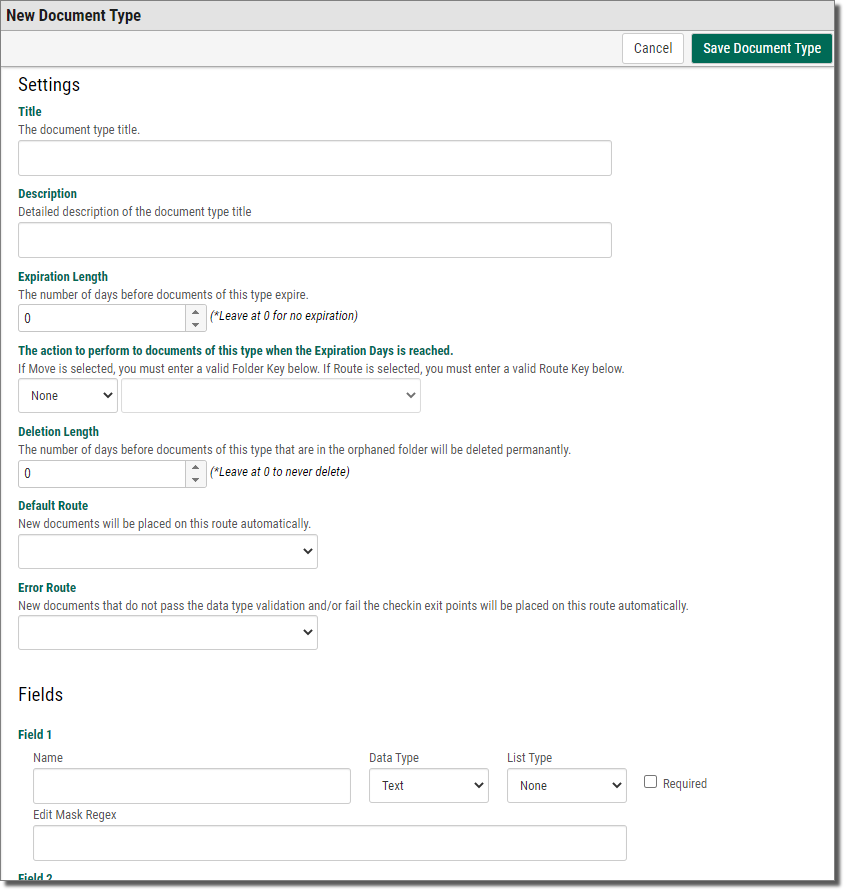
.The New Document Type page displays.
-
Set up the Document Type based on the following:
For... Choose... Enter a name for the Document Type.
NOTE:This isn't the title of the document. You add titles as you add specific documents.
Description
Enter a description of the Document Type.
(Optional) The number of days before documents of this Document Type expire.
Certain document types only need to be retained for 30 days, 60 days, 7 years, etc. for tax or audit purposes. This allows you to flag them in the database to either purge or archive them.
Action to Perform
Select one of the following actions that Webdocs will automatically take for each document of this document type when the expiration length is reached for the specific document:
None: This is the default action. Nothing will happen when the document expires.
Move: The document is moved to the specified folder when the document expires. This is a good option for archiving documents.
Orphan: The document is placed in the Orphan folder, removing it from its original folder location. Using this with Deletion Length is a good option for deleting documents that are very old.
Route: The document is placed on the selected route. This is a good option if documents need to be reviewed after a certain time period.
Deletion Length
Use to automatically remove documents from Webdocs' Orphaned folder when they have been deleted for X number of days. This will only delete items in the Orphaned folder and only if they have not been accessed for X days. Accessing a document will reset the counter. A value of zero means do not delete them ever.
Default Route
Automatically places all new documents checked into Webdocs with this document type on the specified route.
Error Route
Automatically places all new documents checked into Webdocs, that did not pass validation in an Exit Point, Rest Event, or Document Type Data Type rule, onto the selected route for review. This is a good option if you are using automated check-in, so that documents are not left on the other systems.
Define up to 30 fields with the following:
Name: Name of the search key with that number. For example: Invoice Number, Vendor Name, orVendor Number.
Data Type: Document Type Fields can have built in validation for a specific type of data. This feature utilizes Regular Expressions (Regex) to validate the incoming data and can deny the checkin of new documents if the data passed does not match the defined regex. Users receive messages when checking in a new document about the specific field and data type that did not pass validation.
- Text is the default, which allows all keyboard characters to be entered. You can write custom Regex to validate the Text type differently. Regex must be in the format of Microsoft's Regular Expressions which can be different from other languages. Please contact services for assistance.
- Integer allows whole numbers 0-9 only.
- Float allows decimal values like currency.~~Boolean allows only true/false values.
- DateTime allows a specific date time format in MM/DD/YYYY HH:MM:SS
- Date allows a specific date format in MM/DD/YYYY
- Time allows a specific time format in HH:MM:SS
- Link validated on data entry as a URL. When loading the document details screen, the field label will be underlined and clickable. Clicking will open the link in a new tab.
- KeyLink dynamically created URL based on one of many available fields. When loading the document details screen, the field label will be underlined and clickable. Clicking will open the link in a new tab. See Key Link Field Types for the full list
List Type: Allows definition of a drop down list for the field that will appear on the document edit UI. Select one of the following:
- None is the default is none, which means no list is shown.
- Optional means the user may choose from the given list or they may enter their own value.
-
Required means they can only chose from the list.
If you choose Optional or Required, you must press the Save Document Type at the top of the screen, then you can use the Edit Field Values option to create a field list.
Required: Check to require a user fill this field during check-in.
-
At the bottom of the page, click Save Document Type
 .
.A message displays, telling you that the Document Type is created.
TIP:Meet with your Webdocs users to explain what kinds of documents should be assigned to which Document Types. Also explain any potentially confusing search keys.
By making sure all users assign Document Types and search keys in the same way, you can reduce the time spent searching for documents and make working with documents easier.
- a
-
b
 xxxxx
xxxxx
bbbbbb
cccc
- c