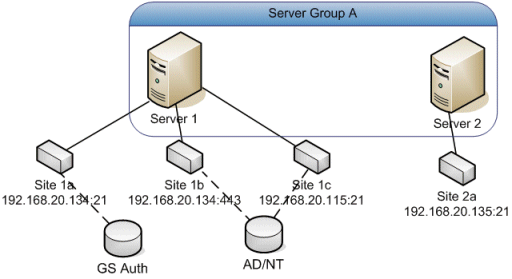
A Site is similar to a virtual FTP server bound to one or more IP addresses. In EFT Server hierarchy, a Server consists of one or more physical hardware devices (servers) running EFT Server executable as a system service. Server Groups are at the top of EFT Server's setting hierarchy and allow you to group multiple Servers from a management or administrative perspective. Each Server service, running as a single service on a single hardware device, can support multiple Sites.
You cannot run multiple Sites on the same IP address and port. Each Site requires an IP address and port combination that is not already claimed by other process or Site. To avoid conflicts, when the same protocol is used, each Site requires a distinct IP address (and same port), or the same IP address, but different ports. For example, use port 8080 for HTTP instead of 80, or 2121 for FTP instead of 21. You cannot have two Sites trying to use port 21 on the same IP address. The two Sites will conflict; the Site that starts first claims the contested port. The hardware in EFT Server's computer does not limit the number of Sites you can set up, at least regarding how many NICs (Network Interface Cards) you have. In Windows, you can assign any number of IP addresses to a single NIC.
In the above example, your internal users could connect to site 1A using the Site's internal IP address (192.168.20.134:21) while external users can access site 1C using the host address you designate, such as partners.globalscape.com, which resolves to a different IP address on the same port).
Sites can each have a unique authentication provider type, the same authentication provider type, or even share the same authentication provider database. For example, Site 1A could use GlobalSCAPE Authentication, Site 1B could use Active Directory (AD), and Site 1C could share the AD database.
|
|
The EFT Server service runs under a user account, which must have full administrative rights to the folder in which you installed EFT Server. With administrative rights, the EFT Server service can save all your settings. If the EFT Server service does not have administrative rights, you lose settings and user accounts whenever you restart the EFT Server service, and you need to reset permissions on the computer where the EFT Server service is running. |
You will need the following information to create and configure a Site:
Site name, listening IP address, and administrator port
Root folder path
DMZ Gateway IP address and port, if used
SSL/SFTP keys/certificate/ciphers/version information
To create a Site
The Site Setup wizard appears automatically after you complete the Server Setup wizard; otherwise, do one of the following:
In the administration interface, click Configuration > Create New Site.
Right-click anywhere in EFT Server's tree, then click Create New Site.
You are asked to choose the default security level for the Site. If PCI DSS compliance is not a requirement, you can use the default security level and manually configure advanced security options individually, as needed. Do one of the following:
To create a Site that complies with PCI DSS, refer to Creating a PCI DSS Site.
To create a standard Site, click Default security settings.
Click Next. The Site Label and Listening IP page appears.
In the Site label box, type a distinguishing name for the Site. MySite appears by default, but you can change this to anything you want.
The Site name cannot have a period at the end of the name or use any characters that are not allowed in Windows file naming. When you create a Site, EFT Server creates a file named site_name.aud in the Application Data directory (e.g., C:\Documents and Settings\All Users\Application Data\GlobalSCAPE\EFT Server Enterprise\MySite.aud; On Windows 2008, Application Data files for all users are in a hidden folder named %systemroot%\ProgramData instead of under Documents and Settings\All Users\Application Data). The Site label is also used in the Virtual File System (e.g., C:\Inetpub\EFTRoot\MySite\Usr) and in logs and reports.
Next to the Listening IPs box, click Configure. The Listening IP Settings dialog box appears.

The dialog box displays the IP addresses that are available on the computer, in addition to All Incoming (IPv4) and All Incoming (IPv6).
You cannot type in an address.
IPv6 not enabled by default for security reasons; IPv4 is enabled by default.
The "All" options are exclusive. That is, you can't select All Incoming (IPv4) and then one or more specific IP addresses. However, you can select multiple individual addresses if none of the All options are selected.
"Link local" appears next to certain IPv6 addresses. Routers do not forward packets with link-local addresses. In IPv6, link-local addresses are always assigned, automatically or by configuration, and are required for the internal functioning of various protocol components. IPv6 requires operating systems to assign link-local addresses to network interfaces even when routable addresses are also assigned. A link-local unicast address has the prefix fe80::/10 in standard IPv6 CIDR notation.
Select one or more check boxes for the IP address(es) on which the Site is to listen for connections, then click OK. The selected address(es) appear in the Listening IPs box.
You can copy the addresses in the Listening IPs box: Right-click in the box, click Select All, then right-click again and click Copy or use CTRL+V. (Unicode-related items on the right-click menu are a Windows feature and do not apply to EFT Server.)
Click Next. The Site Root Folder page appears.
In the Site root box, click Browse to specify the root folder or keep the default displayed in the box. If you type a folder name that does not exist, it will be created.
In the Additional folder options area, select the check boxes as needed:
Select the Automatically create UNIX-style subfolders check box to create Usr, Pub, Bin, and Incoming folders with appropriate permissions under the Site's root folder. This is only necessary if you are trying to mimic a typical default *nix EFT Server setup.
Select the Automatically create and assign home folders to newly created users to automatically create a user folder under \Site Root\Usr\ when a new user is added, named with their username. For example, username jbite might have the folder C:\InetPub\EFTRoot\MySite\Usr\jbite.
|
|
On an AD-authenticated Site, if Automatically create and assign home folders to newly created users is enabled, EFT Server creates a virtual folder under the Site's physical root that points to the user's home folders assigned in AD. If Automatically create and assign home folders to newly created users is disabled, the functions for creating virtual or physical folders for AD users are disabled. |
Click Next. The User Authentication Provider page appears.
(Not available for AD-authenticated Sites; RADIUS/RSA available in EFT Server Enterprise only.) If EFT Server is connecting to a server using RADIUS or RSA SecurID, select Enable RADIUS support or Enable RSA SecurID support, then click Configure. The applicable Settings dialog box appears:

In the RADIUS Server box, provide the name of the RADIUS Server (host name or IP address).
In the RADIUS Server Port box, provide the port the RADIUS Server is bound to. The default port is 1812.
In the NAS Identifier box, provide EFT Server’s NAS identifier for the RADIUS Server.
In the Shared secret box, provide the shared secret used to encrypt and sign packets between EFT Server and the RADIUS Server.
In the Connection Retries box, specify the number of times a RADIUS packet will be submitted to the server before giving up. The packet is resubmitted if there is no response from the server. (RADIUS runs over UDP, so packets may be dropped or ignored by the server). The default is 3 retries.
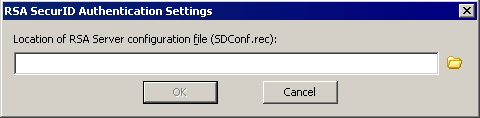
Click the folder icon to specify the location of the RSA Server configuration file (SDConf.rec), then click OK.
In the Authentication provider list, specify the type of user authentication this Site is to use. (Click a link below to skip to that section.)
GlobalSCAPE EFT Server Authentication - Does not rely on outside sources for user information. All information in the authentication database is protected from the operating system, contained within the .aud file located in EFT Server Application Data or ProgramData folder and encrypted, and can only be modified through the administration interface. (e.g., C:\Documents and Settings\All Users\Application Data\GlobalSCAPE\EFT Server Enterprise; On Windows 2008, Application Data files for all users are in a hidden folder named %systemroot%\ProgramData instead of under Documents and Settings\All Users\Application Data.)
Windows Active Directory (AD) Authentication - Connects to an AD server for user information.
LDAP Authentication - Connects to an LDAP server for user information.
ODBC Authentication - Connects to an ODBC database for user information.
For GlobalSCAPE EFT Server Authentication:
Keep the default of GlobalSCAPE EFT Server Authentication. Click Next. The EFT Server Authentication page appears.
The default path to store the user database appears in the box. If you want to store the user database in a different location, type the path in the box or click the folder icon to find and select or create a folder.
Skip to configuring Perimeter Network Security.
For Windows Active Directory Authentication
EFT Server is installed by default under the "local system" account, which cannot log in to AD. EFT Server must be running under an account that has permission to access the domain controller (i.e., create a domain account for EFT Server). Each Site can connect to only one domain. To connect to multiple domains, you must create multiple AD Sites.
In the Authentication type list, click Windows Active Directory Authentication.
Click Next. A prompt appears to remind you that you need to specify a different "Log on as" user for EFT Server.
Click OK. The AD Authentication page appears.
In the Type area, click Active Directory or NTLM/Local System Accounts to match the authentication method used on EFT Server's domain.
Active Directory - EFT Server queries the domain controller for authentication.
NTLM Authentication/Local System Accounts - EFT Server queries the local system to get the list of users and groups. Authentication is done with the LogonUser() function. (The operating system determines which method to use for authentication, such as Kerberos, NTLM2, etc.)
In the Domain area, do one of the following:
Click Default if you want to use the authentication database on the computer's current domain.
Click Specify, then in the box, provide the domain name that contains the authentication database.
In the Group area, do one of the following:
To allow access to every user in the domain's database, click Everyone.
To allow access to only a specific AD Group, click Specify, then in the box, type the AD group name for users that will have access to EFT Server.
|
|
For information about support for foreign groups, refer to Support for Foreign Groups. |
To verify your settings, click Test.
To close the Test dialog box, press ESC.
In the Use this user attribute as the logon name box, click the list to specify the attribute to use (only available when AD authentication is selected):
NT 4 Account Name - Username
Display Name - (DN) When a new user is created in Active Directory, the Full name field is always generated in FirstName LastName format. This field sets the Display Name field on creation, and you end up with a FirstName LastName formatted global address list.
User Principal Name - (UPN) For example, your_user_name@mycompany.com
Common Name - (CN) fully qualified domain name, computer name (netbios), localhost
Regardless of the logon name chosen, EFT Server will accept the provided logon name type, whether UPN, NT4 account name, common name, or display name, and if a match exists, the user will be authenticated and the chosen logon name type will be displayed in the administration interface.
|
Logon name type |
Allowed login form |
|
NT4 Account Name (NT4) |
NT4/UPN |
|
Display Name (DN) |
DN/NT4/UPN |
|
User Principal Name (UPN) |
UPN/NT4 |
|
Common Name (CN) |
CN/NT4/UPN |
In the User list refresh interval box, click the list to select how often you want EFT Server to check the authentication database for new users (server specified, never, or from 5 minutes to 1 day).
Under When creating home folders for newly created users, click Create a virtual folder or Create a physical folder. If you click Create a virtual folder, the virtual folder will point to the user's home folder as defined in his/her AD profile. (Disabled If Automatically create and assign home folders to newly created users is disabled on the Site Root Folder page of the wizard, step 6.)
If NT4 Account Name was selected as logon attribute and if Create a physical folder under the site root folder was selected, you can choose to not include the domain in the folder name by selecting the Don't include domain attribute in folder name, e.g., /jsmith, rather than /domain.jsmith check box.
Skip to configuring Perimeter Network Security.
In the Authentication type list, click LDAP Authentication, then click Next. The LDAP Authentication page appears.
In the Server box, type the Server name or IP address.
In the Port box, keep the default port 389 or specify a different port used by your LDAP server.
In the Base DN box, type the base domain name for the LDAP user database, in the format option=value (e.g.: dc=forest,dc=tree,dc=branch), or click List DNs to complete the box automatically or select from a list.
In the User Filter box, type the search filter information. Refer to Advanced LDAP Filtering for a detailed explanation of LDAP filtering.
In the Login Attribute box, type a comma-separated list of attributes to retrieve. Add userprincipalname to the LDAP query so that the userprincipalname is used for the account name in queries. For example, type:
userprincipalname,mail,e-mail,name,cn
In the Authentication mode area, click one of the following binding methods to define how the client is authenticated:
Anonymous
Simple requires a username and password. Note that the username must follow the syntax for the LDAP server that includes the Common Name and the Domain Components of your LDAP server’s distinguished name. For example, the username might be the following:
cn=Manager,dc=forest,dc=tree,dc=branch
|
|
For details of creating complex LDAP filters, refer to Advanced LDAP Filtering. |
If you are using SSL, select the Bind Using SSL check box, then in the User list refresh interval list, click the list to select how often you want EFT Server to check the database for new users.
To enable LDAP SSL, you need to have a certificate that includes Server Authentication on the LDAP server you are connecting to. If you install Certificate Services on the domain that you install EFT Server, you can request the certificate on the LDAP server. For more information, refer to the Microsoft Support article "How to enable LDAP over SSL with a third-party certification authority."
|
|
The LDAP bind password is encrypted in the FTP.cfg file. |
Click Advanced. The LDAP Authentication Advanced Options dialog box appears.
Specify advanced options based on your requirements:
Set timeout - Specify the connection/query timeout (in seconds). This option coupled with paging can help you avoid timeouts when querying against large directories.
Set search scope - This specifies the depth of the level to search for under BaseDN.
BASE - Only the requested object specified in BaseDN is searched.
OneLevel - All of the objects just below this object are searched.
Subtree - Searches for all the objects within the specified BaseDN object recursively.
Turn on referral chasing - If you have referral chasing on, the query returns information for objects that exist in the LDAP structure, but do not actually exist on EFT Server to which you are connected. The query displays bookmarks to entries that exist elsewhere in the network that EFT Server knows about.
Set LDAP Version - LDAP 2 is widely supported and adds anonymous binding and some filtering. LDAP 3 extends the features of LDAP 2 by adding paging (server side) and more complex filtering.
Use LDAP server-side page control - Asks EFT Server to limit result sets (or pages) to 1000 at a time or the value specified under Override search page size, if checked. If Use server page control is not selected, client-side paging is used to mitigate timeouts when retrieving large directory listings.
|
|
If you are connecting to a SUN Directory LDAP server, turn off page control. |
Override search page size - Overrides the default page size (1000) for client or server-side page limits. Making the value too large can cause timeouts. Setting the page size too small reduces the overall efficiency.
Select attributes - Returns only the specified attributes for the user objects found as part of the search query. Specifying only necessary attributes will greatly increase the efficiency of your query (since the filtering occurs on the LDAP server side). Add userprincipalname to the LDAP query so that the userprincipalname is used for the account name in queries. For example, type:
userprincipalname,mail,e-mail,name,cn
Click OK to close the LDAP Authentication Advanced Options dialog box.
To test your settings, click Test. The Authentication Manager Test Results appear.
For details of the LDAP test, refer to Testing LDAP Authentication Settings.
Click the X in the upper right corner to close the dialog box.
Specify the path at which EFT Server will store additional user settings, if different from the default shown in the wizard.
In the User list refresh interval box, specify the frequency at which EFT Server's user list should be refreshed. By default, the Server is configured to not refresh automatically.
Skip to configuring Perimeter Network Security.
In the Specify the data source box, type a connection string for the ODBC database. Refer to Using a DSN-Less Connection with ODBC Authentication for details of creating the connection string, if necessary.
Select the Encrypt user passwords check box to encrypt passwords stored in the database. When this check box is selected, when you create user accounts within EFT Server, the ODBC database is populated with the username and a SHA-256 hash of the account password. Alternatively, you can set a value in the registry to use MD5 encrypted passwords instead.
In the User list refresh interval list, click the list to specify how often you want EFT Server to check the database for new users.
|
|
You change the refresh interval later in the Authentication Options dialog box. |
Specify whether to connect the Site to DMZ Gateway.
If you choose to connect to DMZ Gateway, specify its IP address and port, then click Test Connection. If the DMZ Gateway is properly configured, the test is successful. If the test is not successful, click I'm not using the DMZ Gateway - or I'll configure it later.
If you have not yet installed or configured DMZ Gateway Server, click I'm not using the DMZ Gateway - or I'll configure it later.
Click Next. The Connection Protocols page appears.
Select one or more check boxes for the protocol(s) that this Site will use to connect to EFT Server and specify the port number for each protocol. The default ports appear in the boxes.
|
|
By default, the FTP server in Microsoft IIS binds to port 21 on all IP addresses. If you want to run both the IIS FTP server and EFT Server, you need to disable socket pooling for the IIS FTP server. |
If you selected FTPS, HTTP, or AS2, define the allowed SSL versions and ciphers. Click SSL options, or skip this step and leave the defaults.
In the Allowed SSL versions list, keep the default of TLS 1.0 and SSL 3.0, or click Auto Negotiable.
In the Allowed ciphers list, select the ciphers in the list or click Manually specify ciphers and provide the ciphers in the Command box. (Manually defining ciphers should only be done by advanced users.)
|
|
Refer to Using Ciphers for SSL Connections with EFT Server for a detailed explanation of SSL versions and ciphers. If EFT Server is in FIPS mode, only FIPS-approved ciphers are available. |
If you selected FTPS, HTTP, or AS2, specify the SSL certificate to use for this Site. Click SSL certs. The SSL Certificate Options page appears.
To create a certificate, click Create certificate and follow the prompts in the wizard. (Refer to Creating Certificates for details, if necessary.)
To use an existing certificate:
In the Certificate box, type the path to the .crt file or click the folder icon to find and select it.
In the Private key box, type the path to the .key file or click the folder icon to find and select it.
In the Certificate passphrase and Confirm passphrase boxes, type and confirm the passphrase for the certificate pair.
|
|
If you do not enable SSL, you will not be able to connect to EFT Server from a remote administration interface. Refer to SSL Certificate-Based Login, Creating Certificates and Importing a Certificate into the Trusted Certificate Database for information regarding certificates. If you are using Secure Ad Hoc Transfer, you need to configure remote access to EFT Server. |
Click Next to return to the Protocols page.
If you chose SFTP, click SFTP options, and specify the algorithms this Site will use for SFTP. If FIPS mode is enabled on EFT Server for SFTP, only the FIPS-approved algorithms are available (i.e., fewer options will appear in the lists of algorithms).
Click Next to return to the Protocols page, then click SFTP keys to configure an SFTP key pair. The SFTP Keys page appears.
Click Next to return to the Protocols page. If you chose AS2 over HTTP/S, click Configure. The AS2 Setup Wizard appears.
Specify Your AS2 identifier. There is no standard for the AS2 Identifier. You can use your name, your company's name, or some other unique name. EFT Server validates the AS2 identifier to determine whether it is unique (not used by another partner on this EFT Server). If you type an ID that is not unique, the field resets to blank.
Click Next.
Specify the AS2 certificate path for signing/encryption, populated by default with the SSL certificate paths (if present) for EFT Server SSL communications. Click the folder icons to specify a certificate pair or click the blue create link to open the SSL certificate wizard to create a new certificate pair. (You can use the same SSL certificate that you are using for the Site.)
Click Next, then click Finish.
Click Next. The Site Setup Completed page appears.
If you specified GlobalSCAPE authentication, you are offered the option of running the user creation wizard or quitting the Site Setup wizard and creating users later. Click an option, then click Finish.
If you chose Run New User Creation wizard, the User Creation wizard Welcome page appears. Continue to Creating User Accounts for the procedure.
You can run the Site Setup wizard again at any time to create additional Sites.
You can view and modify Site configuration in the administration interface