For more information, review the topics in the table of contents to the left. If the table of contents is hidden, click <--Show Table of Contents.
For more information, review the topics in the table of contents to the left. If the table of contents is hidden, click <--Show Table of Contents.
You can configure Secure Ad Hoc Transfer to block (Blacklist) or allow (Whitelist) only specific domains. That is, if you do not want users to send files to or from certain e-mail accounts, you would add that domain to the blacklist. The value applies to e-mail address in the From, To, CC, and BCC fields.
You must first enable e-mail filtering (set EnableEmailFiltering to True).
WhitelistDestinationDomain by default is set to allow all domains (*). When BlacklistDestinationDomain is set to block all domains (*), you must specify which are allowed in WhitelistDestinationDomain.
BlacklistDestinationDomain by default is set to not block any domains (blank). When WhitelistDestinationDomain is set to allow all domains (*), you can specify which domains to block in BlacklistDestinationDomain.
Note that if you set BlacklistDestinationDomain to (*), you must specify the domains to allow; otherwise, you will not be able to send mail to anyone.
For example:
If you leave WhitelistDestinationDomain at the default of *, then set BlacklistDestinationDomain to mycompany.org, You can send files to/from any domain except mycompany.org.
If you set BlacklistDestinationDomain to *, and set WhitelistDestinationDomain to mycompany.org, you can only send files to/from mycompany.org. All other domains are blocked.
If EnableEmailFiltering to set to False, it will ignore those settings and all domains are allowed.
To configure the blacklist and whitelist
Open the ASP.NET Configuration Settings dialog box. (Refer to Editing the Configuration File (web.config) for the procedure.)
Scroll to EnableEmailFiltering, click it, then click Edit.
In the Edit/Add Application Settings dialog box, type True. Setting this value to True enables white/blacklist filtering options for To/Cc/Bcc e-mail addresses.
Scroll to BlacklistDestinationDomain, click it, then click Edit. By default, no domains are blocked.
In the Edit/Add Application Settings dialog box, type the domain or string to block from being used in the in the SendMail form, then click OK. Separate multiple domains with commas.
Scroll to WhitelistDestinationDomain, click it, then click Edit. By default all domains (*) are allowed.
In the Edit/Add Application Settings dialog box, type the domain or string to allow in the SendMail form, then click OK. Separate multiple domains with commas.
Click OK to save the changes.
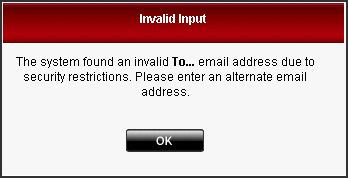
When the From, To, CC, or BCC field contains an e-mail address whose domain is blacklisted, a message similar to the following appears:

Customizing the Secure Ad Hoc Transfer Web Interface
Customizing the Notification E-Mail
Configuring Temporary User Account Expiration