Installing EFT Enterprise, Administration Interface, and Modules
The EFT installer is used to install EFT and its modules, except for DMZ Gateway.
Important Pre-Installation Information:
-
Before installing the software, refer to System Requirements, and read the entire installation procedure below.
-
Before upgrading from a previous version of EFT, refer to Upgrading the Software; export and convert your SFTP keys. EFT v7.4.11 only creates RSA keys in OpenSSH new format. (You can't generate DSS keys and save keys in SSH.com format.)
-
After you have installed the system on a test computer and are now ready to move it to a production environment, refer to Backing Up or Restoring Server Configuration (Enterprise) or Copying Server Configuration to Several Computers if you want to keep the test environment's Server, Site, and user configuration settings. Otherwise, install as usual on the production system.
-
If you are installing in a cluster configuration, refer to Installing or Upgrading the Server in a Cluster.
-
If you are connecting to an existing database, ensure the database is installed and configured before starting the EFT installer. The installer will attempt to connect to the database. Or you can skip ARM installation and rerun the installer later in Modify mode. If you are using an Oracle database, ensure the ODAC client suitable for your database version is installed. For details of installing SQL Server, refer to the SQL Server Install pages on technet.microsoft.com.
-
The installer does not support Unicode characters. Refer to Unicode Exceptions for details.
-
The EFT installer includes the ARM database installation/upgrade. If you want to install/upgrade the database later, refer to Installing and Configuring the Auditing and Reporting Module, Upgrading the EFT Database, Upgrading Large Databases, and EFT Database Utility.
-
Before upgrading EFT Enterprise, to be able to see the AWE information in Insight, you must upgrade to Insight v1.0.5 so that the AWE tables are created in Insight.
The EFT has four different installers; each of them installs as a 32-bit application, even on a 64-bit OS. Silent installation is also available.
-
EFT-Express.exe - EFT Express with a SQL Express installer bundled
-
EFT-Express-nodb.exe - EFT Express without bundled database installer
-
EFT-Enterprise.exe—EFT Enterprise with a SQL Express installer bundled
-
EFT-Enterprise-nodb.exe—EFT Enterprise without bundled database installer
The installer verifies that the following items before continuing:
-
OS compatibility
-
Is the user an admin?
-
DMZ Gateway is not installed on this server?
-
.NET 4.0 Full installed?
-
MSI 4.5 installed?
-
MSMQ installed? (HA installations only)
To install EFT, administration interface, and all modules except for DMZ Gateway
The screenshots below are from EFT Enterprise; however, they are the same for EFT Express.
-
Close all unnecessary applications so that the installer can update system files without rebooting the computer.
-
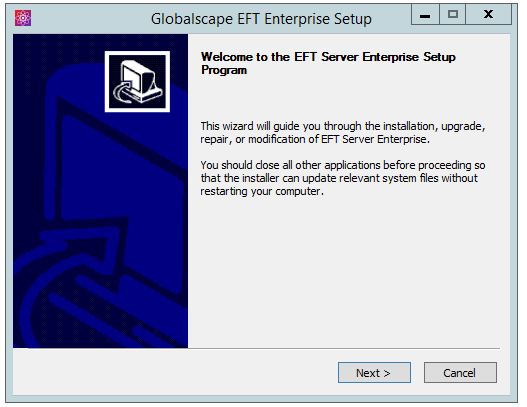
Start the installer, and then click Next. The Choose an installer page appears.
-
Click the list and then, depending on which EFT you downloaded, click EFT Enterprise.
-
Click Next. The installer will verify the prerequisites.
-
If the prerequisites are not installed, you are asked to cancel so that you can install the prerequisites. For example, if you are missing the correct version of .NET Framework and have Internet access, you are redirected to the .NET download page after you click Cancel.
-
-
Click Next. After installation components are loaded, the Welcome page appears.
-
Read the Welcome page, and then click Next. The License Agreement page appears.
-
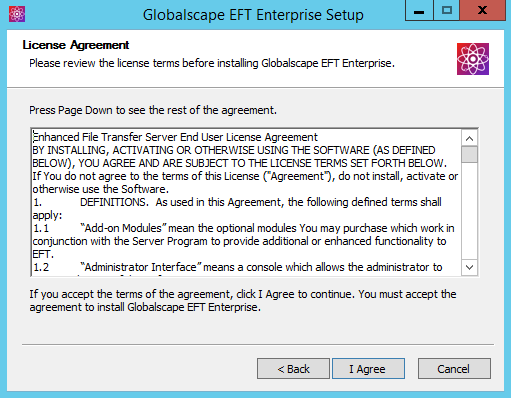
Read the license agreement, and then click I agree to accept it. The license agreement is also saved in the EFT installation folder as "license.txt" if you want to read or print it later. Clicking Cancel aborts the installation.
-
If you are upgrading or reinstalling, the version detected page appears. Refer to Upgrading the Software for the procedure.
The Choose Components page appears.
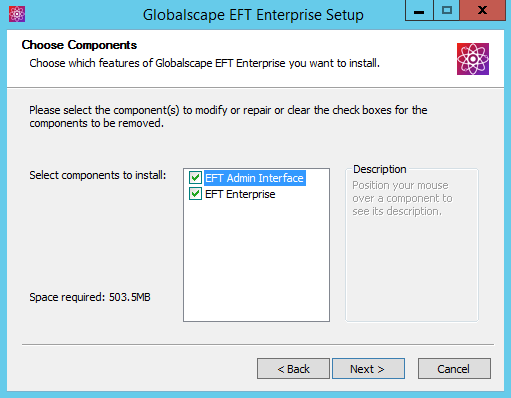
When you install EFT, the EFT Admin Interface check box must also be selected. After you have installed EFT and the administration interface on one computer, you can install the administration interface on other computers for remote administration. (To install the administration interface on a remote computer, refer to Installing the Administration Interface Remotely.)
-
-
Click Next. The Installation type page appears.
-
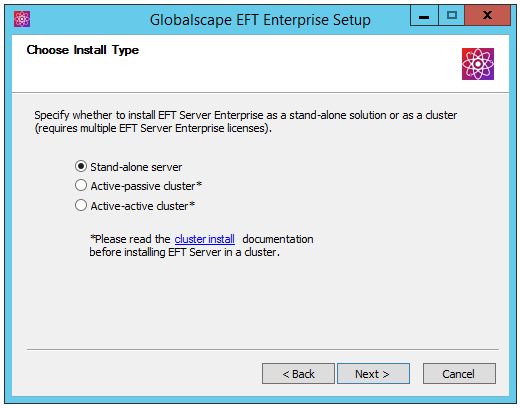
Specify the installation type, and then click Next.
-
Single server is the default installation type.
-
To install EFT as part of a failover cluster, review the cluster documentation, and then click Part of afailovercluster. A message appears cautioning that it is important to read and understand the cluster documentation if you are installing EFT in a cluster. Refer to Installing or Upgrading the Server in a Cluster for the procedure for installing EFT in a cluster setup.
-
To install EFT as part of a high availability cluster, refer to Installing or Upgrading the Server in a Cluster.
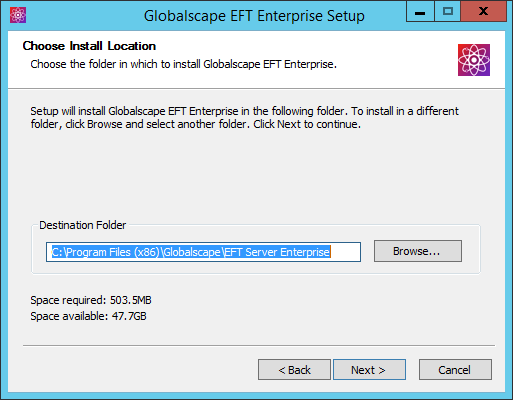
The Choose Install Location page appears.
-
-
The default installation location appears in the Destination Folder box. Leave the default or click Browse to specify a different folder, and then click Next. The Configuration Data Location page appears. (The installer does not support Unicode characters in the path. Refer to Unicode Exceptions for details.)

-
Specify where you want to save EFT's configuration settings. For example, if you are installing in a cluster, you should specify a shared resource drive to synchronize settings across nodes. The EFT service must have permission to access the specified path. The default location is %systemroot%\ProgramData. The installer does not support Unicode characters in the path. (Refer to Unicode Exceptions for details.)
-
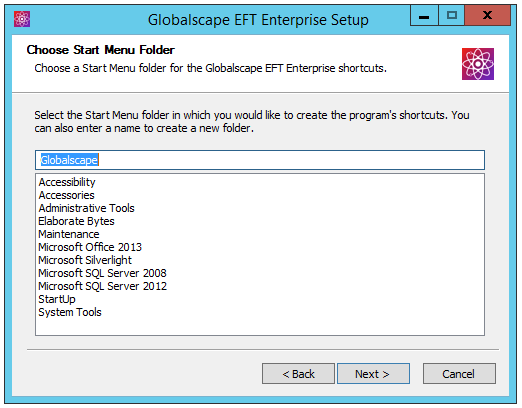
Click Next. The Choose Start Menu Folder page appears.
-
Keep the default shortcuts, specify an existing folder, or type a name for a new folder.
-
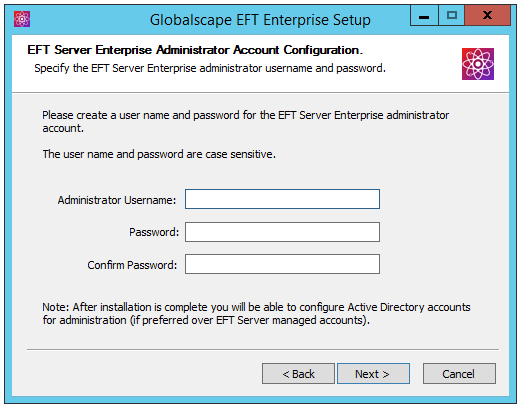
Click Next. The Administrator Account Configuration page appears.
-
Create a user name and password for the administrator account for connecting to EFT from the administration interface. Both the username and password are case sensitive. The installer does not support Unicode characters in the username or password.
-
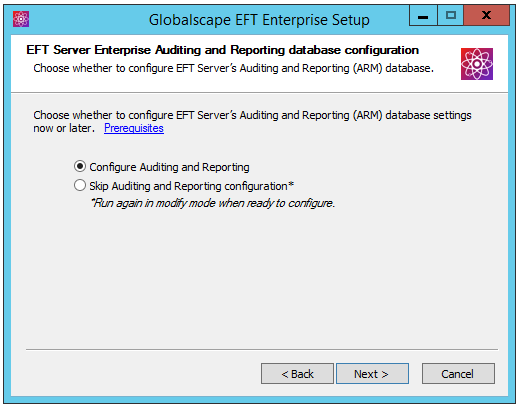
Click Next. The ARM selection page appears.
-
If you want to configure auditing and reporting, click Next.
-
If you do not want to configure auditing and reporting, click Skip auditing and reporting configuration, and then click Next to skip the database configuration pages. You can still configure the database later, if you want. (Skip to step 18.)
-
If you want to manually create the database later, click Skip auditing and reporting configuration, and then refer to Manually Creating the ARM Database in SQL Server or Manually Creating the ARM Database in Oracle when you're ready to create the database. (Skip to step 18.)
-
-
Specify the type of database, SQL Server or Oracle, that EFT is to use. You will need the connection information available to point EFT to the database. If you already have a database to use, then you do not need to install SQL Server Express.

-
Install SQL Server Express
- SQL Server Express is provided for use in a trial. It is not intended for production use. During installation, a default system administrator account (the "sa" account) will be created within SQL Server Express. The EFT administrator account password will be used as the password for this "sa" account. Click OK to continue SQL Server Express installation and follow prompts to complete SQL Server Express installation.
-
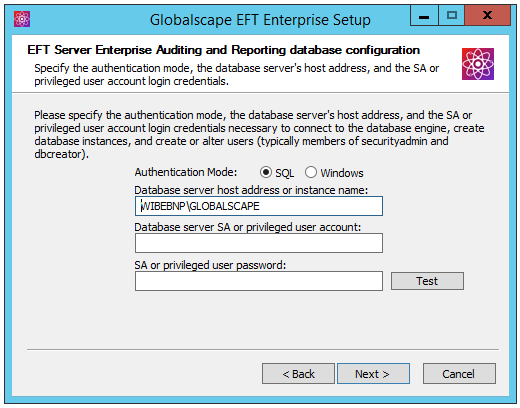
SQL Server:
-
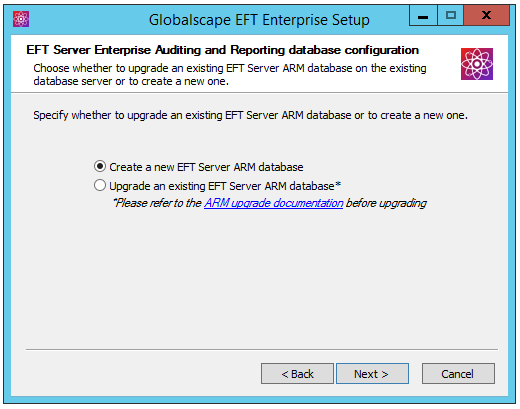
Click Create a new EFT ARM database. The configuration page appears.
-
Specify Windows or SQL Authentication. (Windows mode allows you to connect through a Microsoft Windows NT or Windows 2000 user account. SQL allows you to connect using either Windows Authentication or SQL Server Authentication.)
-
Specify the host address or instance name.
-
Specify the database server SA or privileged user account name (e.g., sa).
-
Specify the database server SA or privileged user account password
-
(Optional) Click Next or Test to test the connection to the database. If the test fails, click Yes to verify database connection details or No to continue without configuring the database.
-
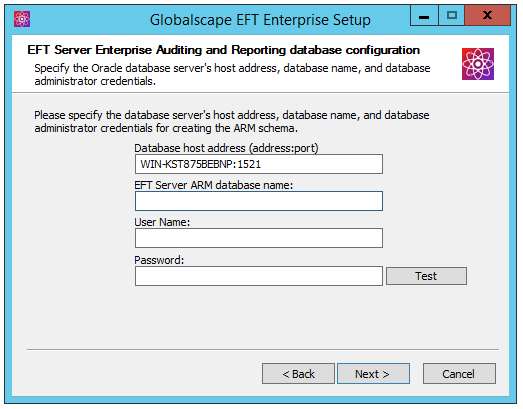
Oracle:
-
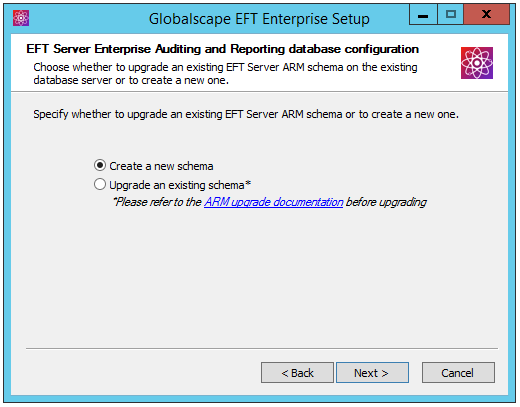
Click Create a new schema. The configuration page appears.
-
Specify the database host address and the EFT-specific schema name and database administrator credentials, and then click Test or Next to test the connection to the database. (If you have installed Oracle Database Express Edition (XE) for testing/demo purposes, the instance name is XE and the User Name is SYSTEM.)
-
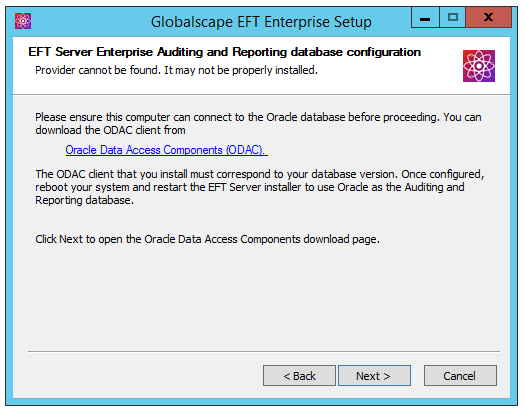
If the test fails, click Back to verify the configuration or click Next and then Next again to open the Oracle Technology Network download page and download "Oracle Data Access Components for Windows" driver, if necessary.
-
-
-
After the test is successful, click Next. The ARM schema owner credentials page appears.
-
Specify/create the ARM schema owner credentials, then click Next.
-
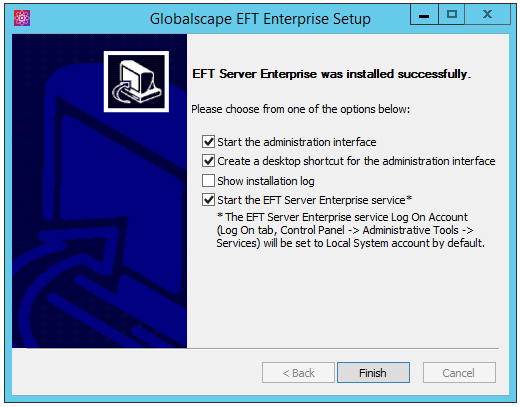
Click Next. A page appears allowing you to start EFT, create a shortcut to the administration interface on the desktop, open the administration interface, and/or view the EFT version history.
-
Start the administration interface - If you do not want to open the interface, clear the check box. You can also open the interface from the Start menu.
-
Create a desktop shortcut - An administration interface shortcut is created on the desktop by default. If you do not want to create a shortcut, clear the check box.
-
Show version history - If you want to read the release notes, select the Show Version History check box. If you want to read it later, the file, notes.txt, is stored in the EFT installation directory.
-
Show installation log - If you want to review the installation log now, select the check box. If you want to review it later, it is stored in a temporary folder, C:\Program Files\GlobalSCAPE\EFT Enterprise (or EFT Server)\Installer.log.
-
Start the EFT Server Enterprise Service - Clear the check box if you do not want to start the Service yet. Select the check box if you want to start the service when you click Finish. The service is configured to start automatically when the computer starts. If you do not want the service to start automatically, you will have to configure it in Windows to start manually. The EFT service Log On Account is set to "Local System account."
-
-
Click Finish. If the administration interface check box was selected and the EFT service was started, the Login Wizard appears.
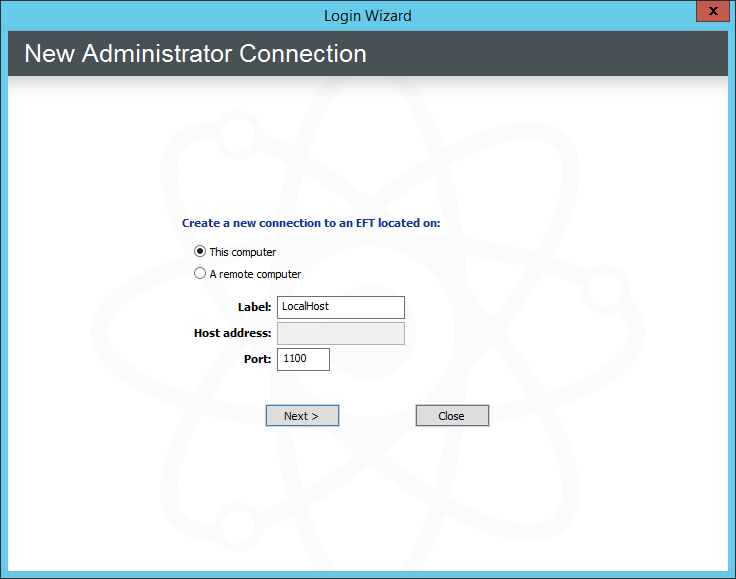
-
With This computer selected, click Next. (You must create a local connection first. Then later you can create remote connections, if you want.) The EFT Server Administrator Login page appears.
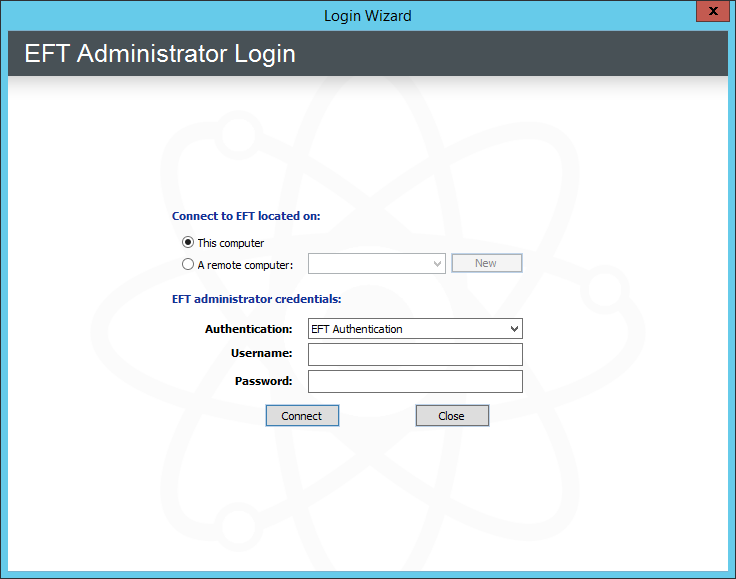
-
Click in the Authentication box and specify the type of authentication to use for this login. Future connections will default to the authentication type that you specify during this initial login, but you can choose a different type. Authentication types include:
-
EFT Authentication - Choose this option to log in with an EFT-specified administrator account, such as the one you created during installation.
-
Integrated Windows Authentication - Choose this option to log in with an Active Directory or local Windows account.
-
Windows NET logon - Choose this option to log in with a local Windows account.
-
-
In the Username and Password boxes, provide the login credentials that you created during installation, and then click Connect. The Welcome page appears. Since you have not yet activated the software, the "Free Trial" reminders appear. After you activate, you will not see the reminder prompt.
The administrator account password cannot be blank, can be up to 99 characters, and cannot be any of the following keywords: password, admin, administrator, sa, or sysadmin. The administrator account password must also comply with the computer's Windows account password policy (local or domain policy) "Minimum password length" and "Password must meet complexity" items. To view the policy, click Start > Run, then type secpol.msc. The Local Security Policy snap-in appears. Under Security Settings, expand Account Policies, and then click Password Policy. Right click the policy, and then click Properties to view the details and to enable, edit, or disable the policy.
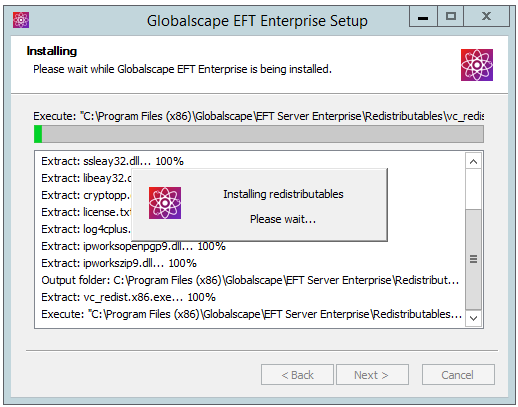
The installer installs the options that you've selected, then the Installation Complete page appears.
Next Steps:
-
If you are evaluating the software or just do not want to activate yet, click Start Trial, then follow the prompts to Configure EFT.
-
If you want to restore EFT configuration from a backup, refer to Backing Up or Restoring Server Configuration.
-
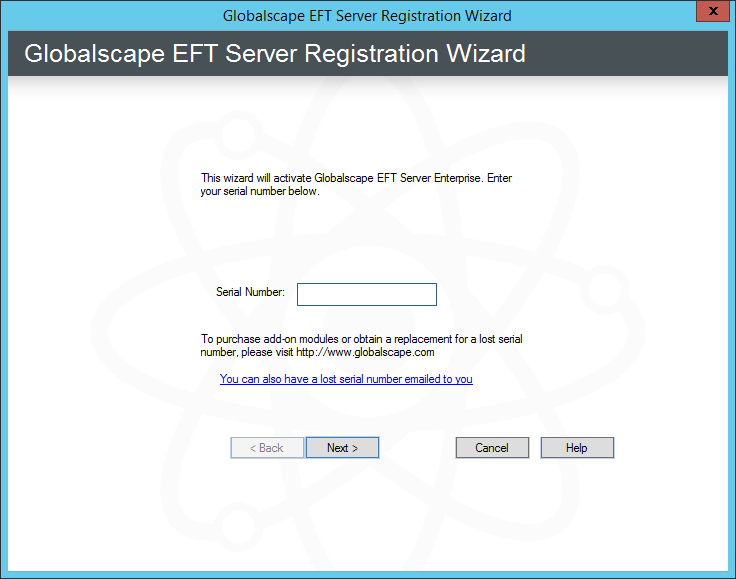
If you have purchased a license, click Activate Now, then follow the procedures for activating the software.
-
Set Windows System Services (You do not have to activate the software before you do this. All features and modules are available during the 30-day trial.)
The EFT service runs under a user account, which must have full administrative rights to the folder in which you install EFT. With administrative rights, the EFT service can save all of your settings. If the service does not have administrative rights, you will lose settings and user accounts whenever you restart the EFT service and you will need to reset permissions on the computer on which the EFT service is running.
If you are using Microsoft IIS on the same computer as EFT, refer to Running EFT and Microsoft IIS on the Same Computer.
Related Topics