Enable and Configure EFT Workspaces
The Workspaces feature of EFT allows end users to share their folders with other users. The user account that is sharing the folder maintains control of permissions to the shared folder, and can revoke sharing privileges at any time.
Workspaces provides the ability to easily share and collaborate on information that is securely managed by EFT, including existing authentication, access control, auditing, governance, and Event Rule workflow capabilities available in EFT.
Refer to Licensing Workspaces for important information regarding Guest Accounts.
To enable Workspaces
-
In the administration interface, connect to EFT and click the Server tab.
-
On the Server tab, click the Site you want to configure.
-
In the right pane, click the Workspaces tab.
-
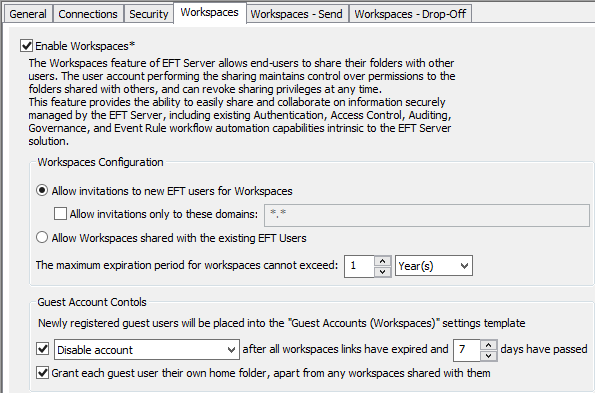
Select the Enable Workspaces check box. The Guest Accounts Settings Template appears under User Settings Templates.
-
Under Workspaces Configuration, specify whether to allow EFT users to send invitations to users not in the EFT user authentication database.
-
Allow invitations to new EFT users for Workspaces
-
-
(Optional) Specify the domains to which Workspaces users can send invitations, comma/semicolon delimited. Wildcards are supported (e.g., *.domain.com or domain.com). The setting is not selected by default; that is, all domains *.* are allowed. (Allow invitations to new EFT users for Workspaces must be selected.) NOTE: Be sure wildcards are formatted correctly. That is, if you have specified *.domain.com, then the domain www.domain.com is allowed.
-
-
Allow Workspaces shared with existing EFT users only
-
On an LDAP-authenticated Site, when a sender types a recipient email to share a Workspace, if that email does not belong to a local (cached) account in EFT, EFT will extend its search to the LDAP authentication database.
-
-
Specify the maximum expiration period for a Workspace. Senders can set the expiration to happen sooner than what is defined on the server, but you cannot specify a longer period.
-
-
Specify whether to Disable account, Remove account and home folder, or Remove account only after all Workspaces links have expired and n days have passed. When set to 0 days, the account(s) will be cleaned up at midnight. If the Guest Account is disabled, the user will not be able to log in unless the EFT administrator enables or removes the account (and then the guest user would have to recreate their account).
-
To grant guest users their own home folder, select the Grant each guest user their own folder check box. Selecting the check box prevents guests from viewing other files in the Workspace's home folder. If the check box is not selected, the user has:
-
Read-only access to home folder.
-
List view of Workspaces with permissions as allowed by Workspace owner, regardless of any protocols used to access the account.
-
This is required when allowing guest users to reply and attach files to the reply
-
-
Click Apply to save the settings.
To enable Workspaces for specific users
-
In the administration interface, connect to EFT and click the Server tab.
-
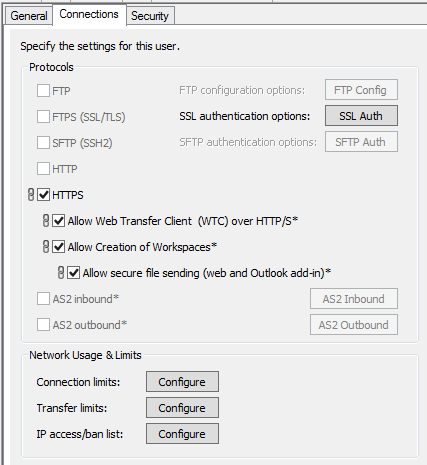
On the Server tab, click the Settings Template or user account.
-
In the right pane, click the Connections tab.
-
In the Protocols area, select the Allow Creation of Workspaces check box. If this check box is not available, you have not activated the Workspaces licenses or the trial has expired; or you have not enabled Workspaces for the Site.
-
To also allow the use of the Outlook add-in, ensure that the Allow secure file sending check box is selected.
-
Click Apply.
HTTPS must also be enabled.
Related Topics