Creating a New Virtual Folder
Virtual folders reference physical folders on a computer's hard drive, LAN, or in the cloud. Similar to a Windows shortcut, a virtual folder is only an alias for the real folder. When you create a virtual folder, you do not have to give it the same name as the folder it references. You cannot change the name of a virtual folder, but you can delete the virtual folder and then re-create it with a new name.
To create a new Virtual folder
-
In the administration interface, connect to EFT and click the VFS tab.
-
In the left pane, click the folder in which you want to add a virtual subfolder, then do one of the following:
-
Right-click the folder, and then click New Virtual Folder.
-
On the toolbar, click the New Virtual Folder icon
 .
. -
On the main menu, click Configuration >New Virtual Folder.
-
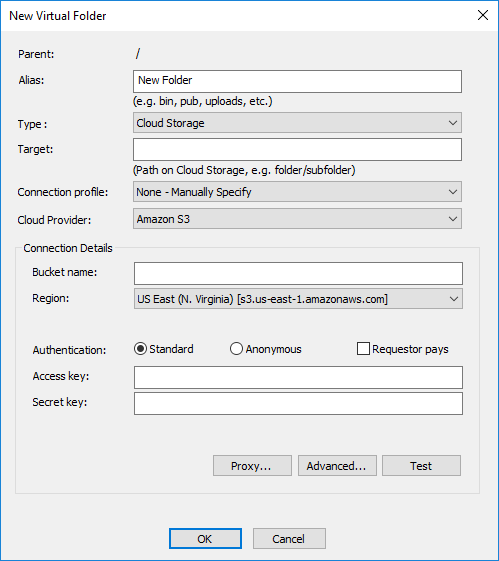
In the Alias box, type a name for the folder. For example, type Shared.
-
In the Type box, specify whether the folder is Local/LAN or Cloud Storage.
-
In the Target box, specify the target folder by typing the path or click the folder icon
 and browse to the target folder. For
example, browse to C:\Documents
and Settings\All Users\Documents\. For cloud storage, provide the URL and/or folder ID. Please refer to Defining a Connection Profile for details.
and browse to the target folder. For
example, browse to C:\Documents
and Settings\All Users\Documents\. For cloud storage, provide the URL and/or folder ID. Please refer to Defining a Connection Profile for details. -
In the Connection profile box, click the down arrow to select a Connection Profile, if there is one defined.
-
In the Cloud Provider box, click the down arrow to specify Amazon S3, Amazon S3-compatible, Azure blob storage, or Azure Data Lake Storage gen 2. then configure the Connection Details accordingly.
-
For Proxy and Advanced configuration, refer to Defining a Proxy and Specifying Advanced Transfer Options.
-
Click OK. The new virtual folder appears in the tree with the name that you typed in the Alias box, plus "Virtual" and the full path. For example:
-
Alias = name of folder
-
Type= S3\Azure\CP (Connection Profile)
-
Info = short details of Storage or Connection Profile name
-
Target - relative path on Storage.
The New Virtual Folder dialog box appears.
Shared - Virtual (C:\Documents and Settings\All Users\Documents\).
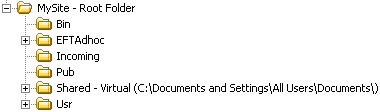
For cloud storage, the VFS name appears as "Alias - Virtual(Type://Info/Target)", where:
Related Topics