Protocol: Synchronize Action
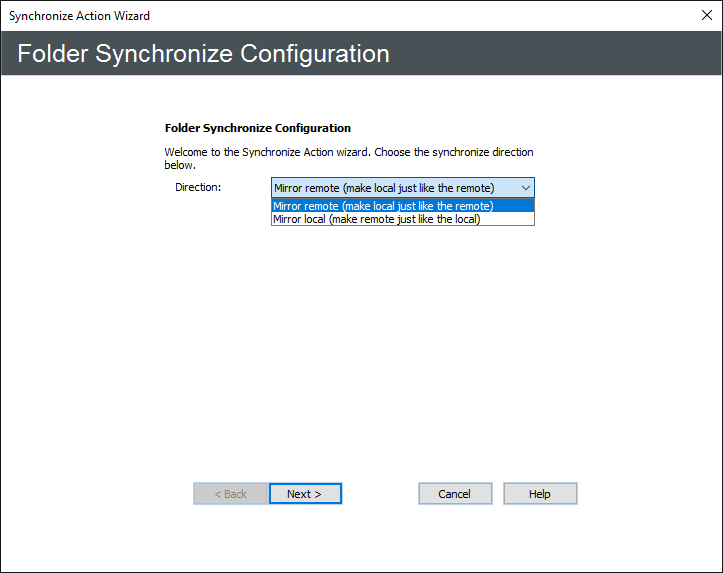
(Requires FTC module) The Protocol: Synchronize Action allows you to make a local folder list match a remote folder, or a remote folder match a local folder. The Synchronize Action is available for any Event Rule for which copy, move, or download actions are used. The wizard allows you to synchronize or mirror the folders:
With respect to EFT rules:
-
“Mirror local – duplicate EFT’s contents to the remote server”
-
“Mirror remote – duplicate the remote server’s contents to EFT”
With respect to RAM Agent rules
-
“Mirror local – duplicate Agent’s contents to the remote server”
-
“Mirror remote – duplicate the remote server’s contents to the Agent”
To define the Synchronize Action
-
Follow the procedure in Creating Event Rules or select the Rule to which you want to add the Action.
-
In the Actions list, click Protocol: Synchronize. The Rule parameters are added to the Rule in the Rule Builder.
-
Click one of the undefined parameters where the parameters are listed in the Rule Builder. The Synchronize Action wizard appears.
-
In the Direction list, specify whether to Mirror remote or Mirror local, then click Next. The Configuration page appears.
-
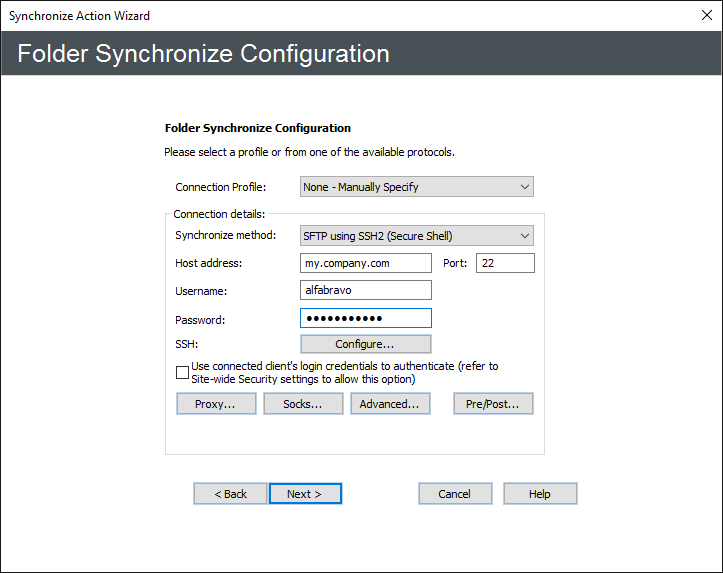
In the Connection Profile box, specify a connection profile for this Event. If none is specified, you will need to configure the Connection details as described below.
-
Click the Synchronize method list to specify a method for the connection: FTP (standard File Transfer Protocol), FTP SSL/TLS (AUTH TLS), FTP with SSL (Explicit encryption), FTP with SSL (Implicit encryption), SFTP using SSH2 (Secure Shell).
-
In the Host address box, type the IP or host address of the EFT to which you want to connect.
-
The Port number for the selected protocol changes automatically based on the offload method. Provide a different port number, if necessary.
-
In the Username and Password boxes, type the username and password used to authenticate.
-
Select the Use connected client's login credentials to authenticate check box if you want to use the local system account to authenticate. The availability of this check box is controlled by the Persist username and password credentials for use in Event Rule context variables check box on the Site's Security tab.
-
If you chose SFTP, provide the client SFTP certificate information.
-
If you chose a protocol that uses SSL (FTPS or HTTPS), provide the client and remote server's SSL certificate information.
-
If you are connecting to a remote host through a SOCKS server, click SOCKS and provide the SOCKS connection information.
-
If you are connecting to a remote host through a proxy, click Proxy. Provide the proxy connection information.
-
To specify transfer options and time stamps, in the Offload wizard, click Advanced. Specify the advanced transfer options, such as connection retry attempts and delay between retries.
-
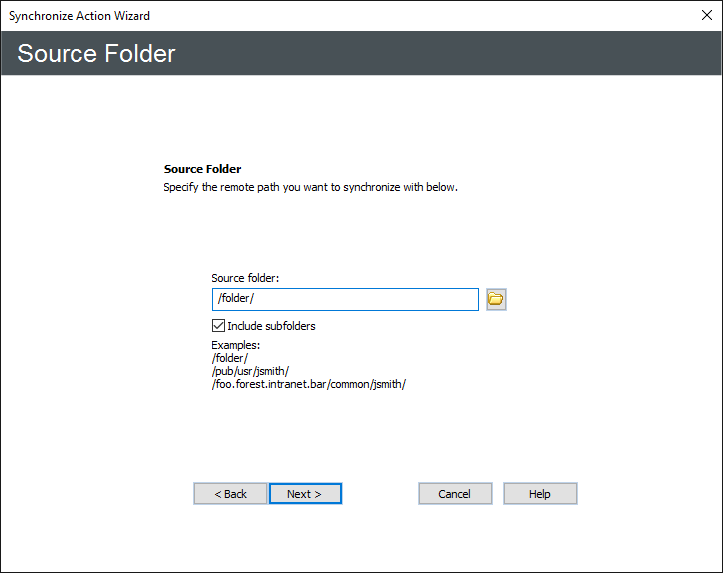
Click Next. The Source Folder page appears.
-
In the Source path box, provide the path to the file(s) that you want to synchronize. For example, type:
-
Select the Include subfolders check box if you also want to synchronize the subfolders of the source folder.
-
Click Next. The Destination Path page appears.
-
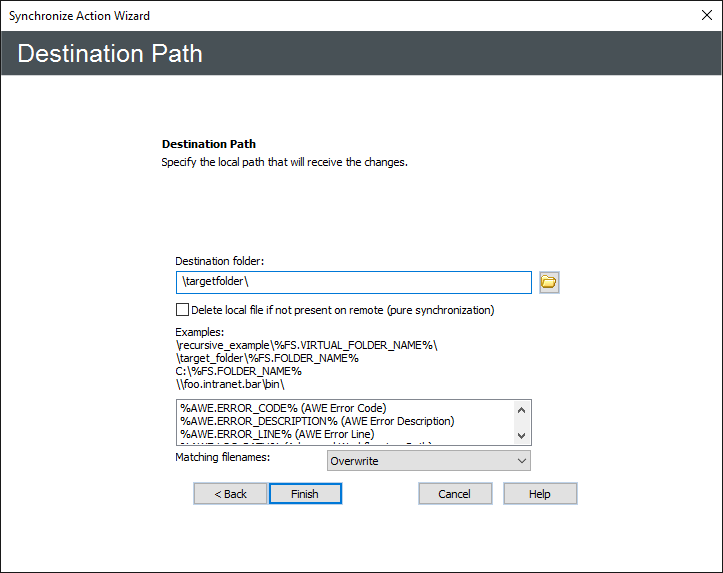
In the Destination folder box, click the folder icon
 and
specify the location in which to save the downloaded file. You can
insert variables by double-clicking them in the box below the Destination folder box. If you type
a path to a remote folder that does not exist, the Event Rule will
fail.
and
specify the location in which to save the downloaded file. You can
insert variables by double-clicking them in the box below the Destination folder box. If you type
a path to a remote folder that does not exist, the Event Rule will
fail. -
To make local folder match the remote folder, select the Delete local file if not present on remote.
-
In the Matching filenames box, specify whether to Overwrite, Skip, Skip if size is the same, Skip if size and time are the same, Smart Overwrite, or Numerate files that exist with the same name. (Refer to Smart Overwrite for more information about Smart Overwrite.) This setting only applies to the initial transfer, not when the transfer is interrupted and then resumed. When resuming, EFT will follow the Smart Overwrite settings (that is, performs a CRC match for the files; if the files are identical, the destination file is not overwritten).
-
Overwrite—Overwrite any existing file with the same name.
-
Skip—Skip the transfer if a file with the same name exists in the destination directory.
-
Skip if size is the same—Skip the transfer if a file with the same name and size exists in the destination directory.
-
Skip if size and time are the same—Skip the transfer if a file with the same name, size and timestamp exists in the destination directory. *When using this overwrite method, the preserve remote/local time stamps option must be enabled or the files may always be overwritten. These settings can be found under the Advanced Options of the connection profile.
-
Smart Overwrite—EFT performs a CRC match for the files. If the files are identical, the destination file is not overwritten. Refer to Smart Overwrite for more information about this feature. (Supported only on FTP transfers.)
-
Numerate—If a file in the destination folder has the same name as the file you are transferring, EFT renames the transferred file to "Copy of file.txt." If the same transfer occurs again, EFT renames the transferred file to "Copy (2) of file.txt" and so on.
-
Click Finish, then click Apply to save the changes on EFT and/or add other Actions and Conditions to the Rule.

/pub/usr/jsmith/file.txt or \\mydomain\common\jsmith\file.txt
Synchronization action fails to delete file with Numerate set.