Log in to the Mail Express Administration portal.
Before installing, review the Outlook Add-In's system requirements and ensure Outlook is updated with the latest service packs.
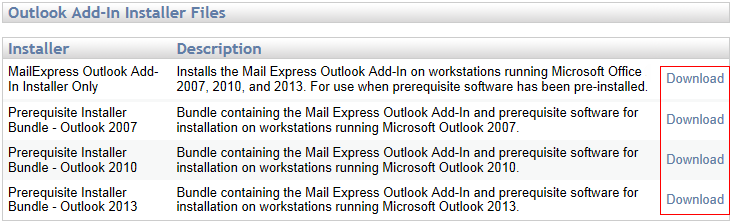
In the navigation pane, under System Information, click Add-In Installer. The Outlook Add-In Installer page appears from which you can download the applicable installer files or generate and download an installation script. (Or, you can copy the installation files from the Mail Express Server installation directory (by default, C:\Program Files\Globalscape\Mail Express).)
Download the applicable installation file(s) from the Outlook Add-In Installer page (using the Download links in the top section of the page).

-
Mail Express Outlook Add-In Installer Only—(If the prerequisites are not yet installed, use one of the "Prerequisite Installer" bundles below instead of this installer.) Installs the Mail Express Outlook Add-In on workstations running Microsoft Office 2007, 2010, 2013, and 2016 when the prerequisite software has been pre-installed. This installer will simply install the Add-In; it will not install the prerequisite items that it requires. This installer supports silent installation mode and does not require administrative privileges to install.
-
Prerequisite Installer Bundle - Outlook 2007—(If the prerequisites are already installed, you do not need this bundle. Instead, use "Mail Express Outlook Add-In Installer Only" above.) Zipped bundle containing the Mail Express Outlook Add-In and prerequisite software for installation on workstations running Microsoft Outlook 2007. This bundle can be used to install the prerequisite items that the Add-In requires plus the Add-In. Typically, you will run the bootstrapper installer in this bundle, which will install the Add-In prerequisites, and then afterwards it will run the Add-In Installer to install the Add-In.
-
Prerequisite Installer Bundle - Outlook 2010—(If the prerequisites are already installed, you do not need this bundle. Instead, use the "Mail Express Outlook Add-In Installer Only" above.) Zipped bundle containing the Mail Express Outlook Add-In and prerequisite software for installation on workstations running Microsoft Outlook 2010. This bundle can be used to install the prerequisite items that the Add-In requires plus the Add-In. Typically, you will run the bootstrapper installer in this bundle, which will install the Add-In prerequisites, and then afterwards it will run the Add-In Installer to install the Add-In.
-
Prerequisite Installer Bundle - Outlook 2013—(If the prerequisites are already installed, you do not need this bundle. Instead, use the "Mail Express Outlook Add-In Installer Only" above.) Zipped bundle containing the Mail Express Outlook Add-In and prerequisite software for installation on workstations running Microsoft Outlook 2013. This bundle can be used to install the prerequisite items that the Add-In requires plus the Add-In. Typically, you will run the bootstrapper installer in this bundle, which will install the Add-In prerequisites, and then afterwards it will run the Add-In Installer to install the Add-In. Note that this bootstrapper does not currently install the Microsoft Outlook 2013 PIA because Microsoft has not yet published its redistributable installer. By default the PIA will be installed when Microsoft Outlook is installed if .NET was installed beforehand. If needed the PIA can be installed via the Microsoft Office installer. Refer to the following KB article for more information: http://kb.globalscape.com/KnowledgebaseArticle11129.aspx.
-
Prerequisite Installer Bundle - Outlook 2016—(If the prerequisites are already installed, you do not need this bundle. Instead, use the "Mail Express Outlook Add-In Installer Only" above.) Zipped bundle containing the Mail Express Outlook Add-In and prerequisite software for installation on workstations running Microsoft Outlook 2013. This bundle can be used to install the prerequisite items that the Add-In requires plus the Add-In. Typically, you will run the bootstrapper installer in this bundle, which will install the Add-In prerequisites, and then afterwards it will run the Add-In Installer to install the Add-In.
-
-
Outlook 2016 will not connect to Exchange 2007, only 2010 and later. Mail Express has not been tested on Exchange 2016. Refer to https://kb.intermedia.net/article/20784 for more information about Outlook 2016.
-
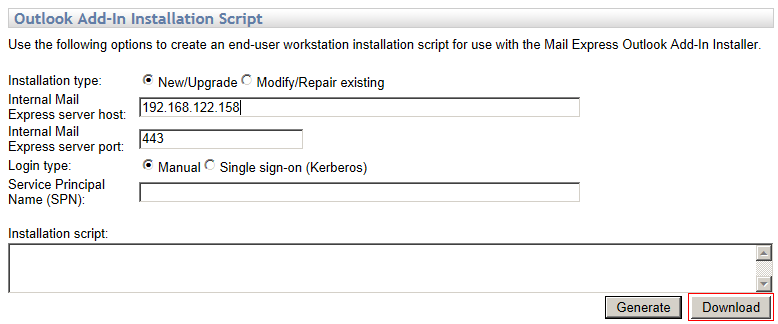
In the Outlook Add-In Installation Script area:
-
For the Installation type options, specify whether the script is for a New/Upgrade or to Modify/Repair existing installation:
-
Use the New/Upgrade option when installing the Add-In for the first time or when installing a new version of the Add-In for the first time (i.e. an upgrade).
-
Use the Modify/Repair existing option when reinstalling the same version of the Add-In that is already on the computer either to repair it or to provide different values for the installation parameters.

If you choose the wrong option, the Add-In may not install at all.
-
-
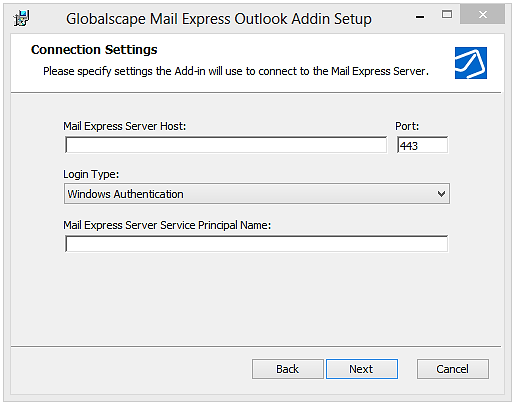
In the Internal Mail Express server host box, specify the Mail Express Server hostname as recognized by internal workstations. (This may be different from the setting on the General Configuration page, which may be the host name of the fronting web server.)
-
In the Internal Mail Express server port box, specify the port through which the Mail Express Server connects, if different than the default. (It will default to 443.)
-
For the Internal Mail Express server host and the Internal Mail Express server port, you should add a listening IP on the General Configuration page in the IP Port Bindings area, and set it for port 443.
-
-
For the Login type options, specify Manual or Single sign-on.
-
If you click Single sign-on, in the Service Principal Name (SPN) box, specify the service context. (e.g., <service type >/< mail express instance server host name >:< port number >/< service name >). For example, HTTP/meserver. The SPN is a name by which the Add-In can uniquely identify the Mail Express Server Service.
-
To create the SPNs, execute the following commands on the domain’s primary Active Directory server using the command console. In the commands below, substitute:
-
-
<MailExpressServerHostName> with the host name of the Mail Express Server
-
<MailExpressServerFullyQualifiedDomainName> with the fully qualified domain name of the Mail Express Server
-
<PreAuthUsername> with the username of the pre auth user account. You will need to create a domain account for the Mail Express Server for participating in Kerberos authentication. This account is used by the Mail Express Server when authenticating with the Kerberos Key Distribution Center (typically Active Directory) and allows a Service Principal Name (SPN) to be associated with the account using the setspn command.
setspn –A HTTP/<MailExpressServerHostName> <PreAuthUsername>
setspn –A HTTP/<MailExpressServerFullyQualifiedDomainName> <PreAuthUsername>
For example:
setspn –A HTTP/meserver mepreauthuser
setspn –A HTTP/meserver.globalscape.com mepreauthuser
These SPNs should work regardless of the account the Mail Express Server Service is running as.
To view the SPNs to verify that they were created successfully, run the following command, substituting <PreAuthUsername> with the username of the pre auth user account:
setspn –l <PreAuthUsername>
(Note: The switch is a lower-cased letter L, not the number one.)
For example:
setspn -l mepreauthuser
If the Outlook Add-In is installed silently, the SPN must be provided as an installation parameter. The installation parameter name is “SERVICEPRINCIPALNAME.”
-
Click Generate to create the installation script. The necessary script appears in the Installation script box.
-
Click Download to save the script.
-
-
Save the script and the installation files in the same directory, or ensure that the script can access the installer. The command line parameters in the script are imperative for the proper operation of the Outlook Add-In. Use one of the following methods to install the Add-In on users' desktops:
-
Execute the script at each user's desktop to silently install the Add-In.
-
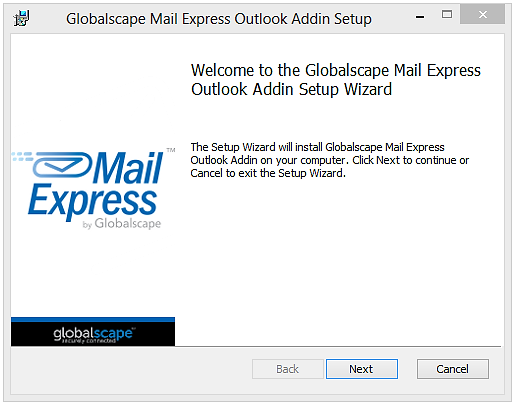
Install the Add-In manually on a user’s desktop by double-clicking on the Add-In MSI installer. Or, send an email instructing users to install the Add-In themselves and provide a walkthrough or screenshots to guide them through the installation wizard screens.
-
Deploy the Add-In across the enterprise using a deployment tool. For example, use a logon script to install the Add-In silently on workstations since the Add-In MSI does not require administrative privileges to install.