Internal User Management
The Internal User Management page provides status and configuration options for all internal senders that are defined in the Mail Express system. On this page, you can view, modify, add, and delete internal user accounts.
When you are connected to an Active Directory (AD) user database, the Internal senders page is automatically populated. Active Directory users are created as Internal users upon their first login to Mail Express. Only Internal accounts are valid for connecting to the Mail Express Server with the Outlook Add-In. Thus, administrators should avoid creating Administrator or External User accounts whose username conflicts with a user wishing to connect using the Add-In. That is, if users are going to connect to Mail Express through the Outlook Add-In with their AD account, do not manually create an account for them in Mail Express with the same username; however, you can create a separate Internal user account for them in Mail Express for manual authentication, as long as the username is different from their AD account.
If a user is deleted in the AD user database, the user is not deleted from the Mail Express internal user list. You must delete the account manually on the Internal User Management page. When you delete a user account, the account is marked as deleted in the database, but is no longer visible in the account table in the interface. Audit reports can still look up and reference deleted accounts until they have been purged from the system. Once a user account has been marked as deleted, it is not eligible for purging after the appropriate age has been reached.
|

|
-
You cannot create an internal account with the same username as an administrator account.
-
Usernames must be unique across all user accounts. Administrators must take care when manually creating Administrator or Internal User Accounts so that the username does not conflict with an Active Directory account. If an account is manually created with the same username as an Active Directory user, then that user will be unable to connect to the server with the Outlook Add-In using Windows (Kerberos) Authentication.
|
To manage user accounts
-
Launch the Mail Express Server administration interface. (e.g., click Start > Programs > Globalscape > Mail Express > Mail Express Admin or double-click the desktop shortcut).
-
Log in using the Mail Express Server administrator username and password that you specified during installation of the server.
-
In the navigation pane, click User Management > Internal Users. The Internal User Management page appears. The account details are displayed in sortable, scrollable columns.

The table displays the Internal users sorted by email address. A green check mark in a column indicates that the feature is enabled for the user; a red X indicates that the feature is not enabled for the user.
-
Do one of the following:
-
To sort by a column, click the column header (except the Email column).
-
To search for a user, in the Search criteria box, type the email address or display name that you want to search for, then click Search. Wildcards are supported. (? matches 1 character, * matches 0 or more characters, \ can be used to escape an actual ? or *.)
-
To edit an account, next to the account you want to edit, click the Edit icon  , then edit the account as necessary. The username, password, and email address for users that are created using AD cannot be edited in Mail Express.
-
To delete an account, next to the account that you want to delete, click the Delete icon  . When an account is deleted, it is marked as deleted in the database and is no longer visible in the Internal User Management page; however, audit reports can look for and reference deleted accounts.
-
To create an account:
-
-
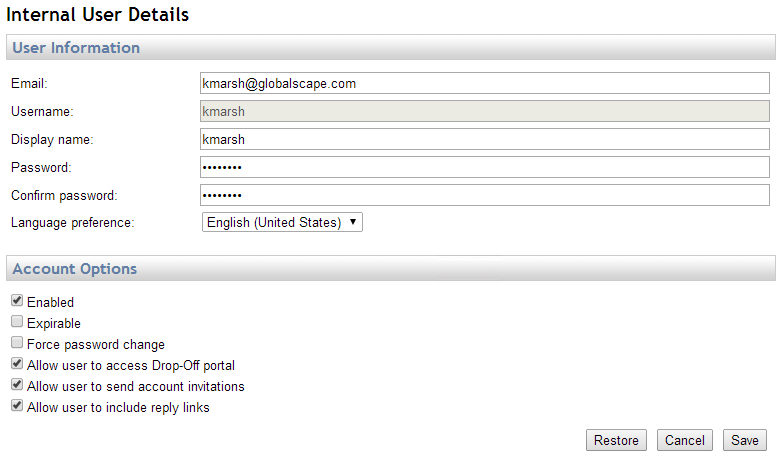
Click Add User. The Internal User Details page appears.

-
In the Email box, provide the email address associated with the account.
-
In the Username box, provide the username for the account.
|

|
If a manually created Internal user account has a username that matches a username in the defined set of Active Directory user accounts, Mail Express will only authenticate against the manually created user account. It will not attempt to authenticate against the Active Directory account.
|
-
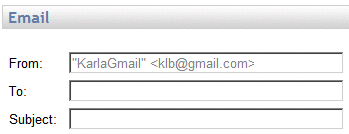
(Optional) In the Display name box, provide the name for the account user. The Display name appears in the From box with the sender's email address, as shown below:

-
In the Password and Confirm Password boxes, provide a password for the account. The password must be between 6 and 256 characters and adhere to at least 3 of the following requirements: contain at least 1 number, 1 upper case, 1 lower case, and 1 non-alphanumeric character.
-
In the Language preference box, specify the language preferred by the user.
-
In the Account Options area, the Enabled check box is selected by default. (To disable the account, clear the check box.)
-
Select the Expirable check box to make the account expire based on the Internal Users expiration settings on the General User Settings page.
-
To force the user to change the account password upon signing in, select the Force Password Change check box.
-
To allow this user to access the Drop-Off page, select the Allow user to access Drop-Off portal check box. (Refer also to the Register Internal Users as Verified setting on the Drop-Off Portal Settings page.)
-
To allow the user to send account invitations, select the Allow account invitations check box. You can also enable this globally on the Internal Settings page.
-
To allow the user to include Mail Express Reply links in messages, select the Allow Mail Express Reply links check box. You can also enable this globally on the Internal Settings page.
-
Click Save to create the account or click Cancel if you do not want to create the account. Click Restore to restore the settings in the boxes to their last saved state.
-
After you click Save, the changes appear on the Internal User Management page.
![]()
