Launch the Mail Express Server administration interface. (e.g., click Start > Programs > Globalscape > Mail Express > Mail Express Admin or double-click the desktop shortcut).
Log in using the Mail Express Server administrator username and password that you specified during installation of the server.
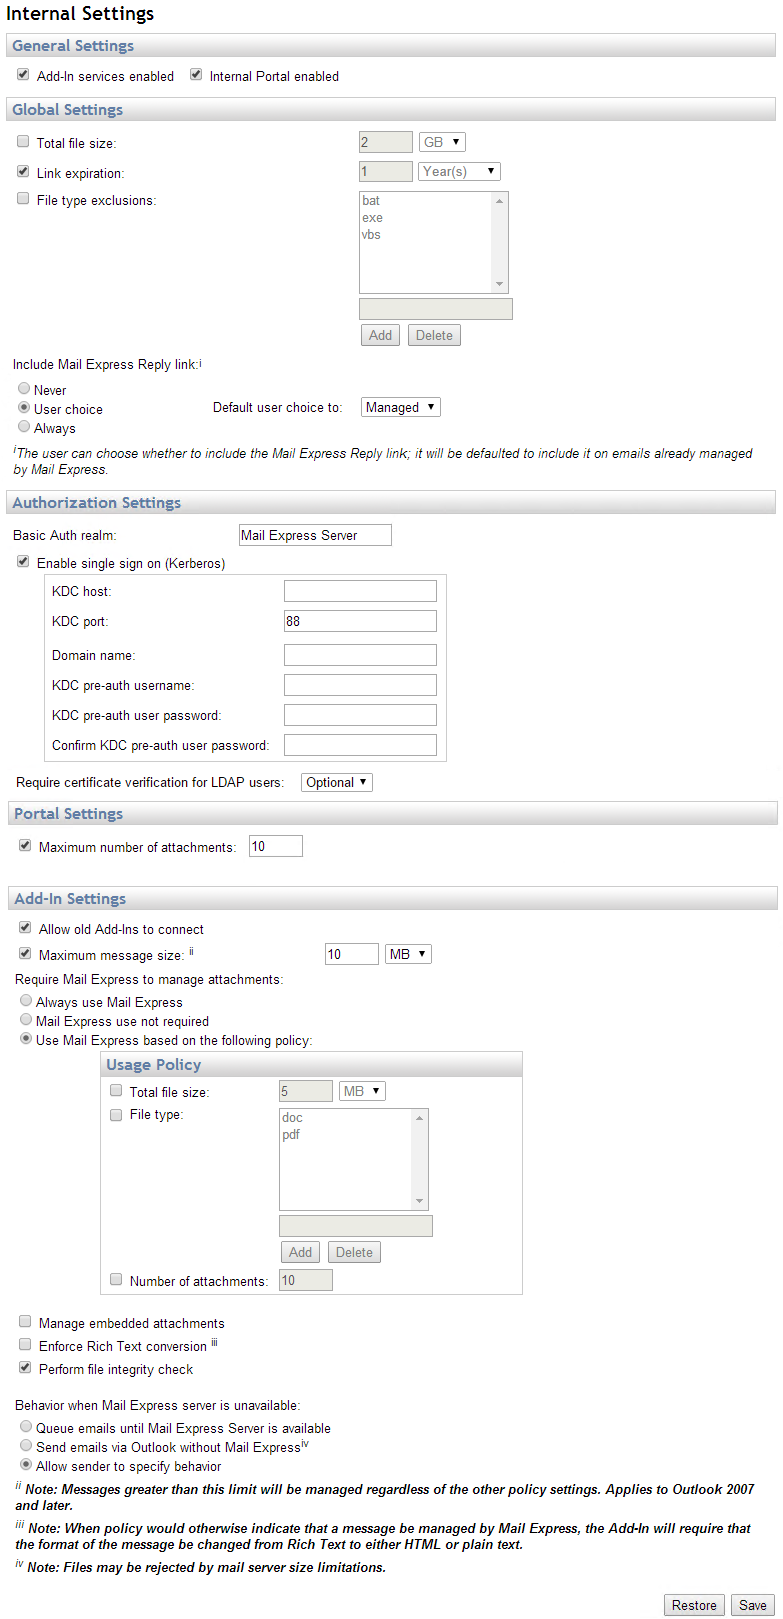
In the navigation pane, click Portal Settings > Internal Settings. The Internal Settings page appears.
Select the Add-In services enabled check box. If the Add-In services enabled check box is cleared, the Outlook Add-In will not be able to connect to the Mail Express Server. The Add-In services enabled check box also controls whether the Authorization Settings and Policy Settings are available.
Select the Internal Portal enabled check box to allow Internal users to connect to the Internal Portal.
To limit the size of files for uploads when using the Internal Portal or the Outlook Add-In, select the Total file size check box, then specify the file size.
To specify when links are to expire, select the Link Expiration check box, then specify the duration. If no link expiration is defined, packages will be available for download until purged, based on the file retention policy. When you modify the file expiration value, you are modifying this setting for all future transfers. Packages that are active within the system retain the expiration value in place at time that they were created. (Link expiration can be from 1 minute to 99 years.) Administrators should instruct their internal recipients to download a copy of Mail Express-managed attachments before the expiration date.
To exclude specific file types from being transferred, select the File type exclusions check box, then list up to 50 file extensions in the box. (Wildcards are not supported.) This is in addition to the File type setting below, which applies only to Outlook Add-In users.
-
To add file extensions to the list, type the file extension in the small box, then click Add.
-
To remove a file extension from the list, click the file extension in the list, then click Delete.
In the Include Mail Express Reply link area, specify whether the Mail Express reply link is Never included, Always included, or User choice. If User choice is specified, the sender can choose whether to include the Mail Express reply link and, if so, whether the default user choice of Never, Managed, or Always. Managed is specified by default, which means that the Mail Express reply link is included on all emails that are managed by Mail Express. When a reply link is included, text similar to the following line appears:

In the Basic Auth realm box, specify the Mail Express Server name. This name is used as the realm name when performing basic access authentication for web services.
To enable Kerberos, select the Enable Single Sign On (Kerberos) check box. (To use SSO, Active Directory must be enabled and configured.) If Kerberos authentication is enabled, the account with which the Outlook user is logged into the operating system is used for authentication. If you selected the Enable Single Sign On check box, more options appear. (Refer to Configuring Mail Express for Windows (Kerberos) Authentication for more information about using Kerberos.)
-
In the KDC Host box, provide the string (between 1-256 characters) that used as the Key Distribution Center (KDC) host when performing Kerberos authentication. A KDC for a domain is located on a domain controller. If a domain has a single domain controller, the KDC host will be the same as the Active Directory server host. For example, mailexpress.globalscape.com.
-
In the KDC Port box, provide the port that the KDC is listening on (default = 88; valid values are 1 to 65535).
-
In the Domain Name box, provide the string used as the domain name when mapping between Windows Domains and the Kerberos Realm. For example, globalscape.com
-
In the KDC Pre-auth Username box, provide the username of the account that will be used to authenticate with the KDC.
-
In the KDC Pre-auth User Password and Confirm KDC Pre-auth User Password boxes, provide the password of the account that will be used to authenticate with the KDC.
Under Portal Settings, to limit the number of attachments per email, select the Maximum number of attachments check box and then specify the number. The default is 10. Clear the check box if you do not want to limit the number of attachments.
Select the Maximum message size check box to limit how large file attachments can be, even if there is no Usage Policy set for File size. (Applies to Outlook 2007 and later.) For example, if you have specified Mail Express use not required, you can still limit file size based on this setting. When the Maximum message size check box is selected, you can attach files over the specified size without receiving an error message when you attach the file using the Outlook Attach File button instead of the Mail Express Attach File button. Refer to Best Practice Recommendations for Outlook 2007 and Later for more information about this setting. (Outlook may need to be closed, and then reopened for this setting to take effect.)
Under Require Mail Express to manage attachments, specify whether Mail Express use is required when using Outlook. You can also specify a usage policy.
-
Always Use Mail Express—Selected by default; use Mail Express to manage attachments for every email.
-
Mail Express use not Required—Outlook Add-In users can use Mail Express if they want to, but the administrator is not requiring its use.
-
Use Mail Express based on the following policy—Any attachment on a message that matches any one of the criteria specified causes all attachments on that message to be sent using Mail Express. When you select this option, the section expands to provide Usage Policy options. (Usage Policy options appear when you click Use Mail Express based on the following policy.)
-
-
Total File Size—Messages that match or exceed the defined file size (aggregate of all files attached to message) will cause Mail Express to be used; otherwise, it is not used. (This setting does not automatically increase in the Message Options dialog box in the Add-In, to avoid overwriting any user-specified, more restrictive settings.)
-
File Type—Attached files with extensions defined in this section trigger Mail Express use. That is, if a user attaches a file using the Outlook paper clip icon, and it is of the type that triggers Mail Express, then the file will be managed by Mail Express. If not, it will be managed by the mail server. Default file types are DOC and PDF. Provide only the extension, no periods or wildcards. To add a file type, select the check box, type the extension, then click Add. To remove a file type from the list, click it in the list, then click Delete.
-
Number of Attachments—Messages that match or exceed the number of attachments specified trigger Mail Express use. Defaults to 10 when enabled; valid values are between 1-1000.
-
|
|
File restriction trumps file inclusion. For example, if the Global Setting has a restriction of ‘bat’ files and the OAI inclusion setting has ‘bat’ files defined, you cannot send ‘bat’ files. The Outlook user is notified to either try sending the email without Mail Express or to remove the file from the attachments list. |
To specify that Mail Express should manage embedded attachments, such as a company logo in a signature block, select the Manage Embedded Attachments check box.
Mail Express does not process emails that are in rich-text format (RTF); however, Mail Express does provide an administrative setting "Enforce Rich Text Conversion" that requires users to change the format of RTF messages to plain-text or HTML if they try sending RTF emails that meet the policy criteria. This feature is useful in situations where an organization wants to ensure that users cannot bypass Mail Express by sending attachments via RTF messages. By default, the Enforce Rich Text Conversion feature is turned off. For instructions for changing the format of emails to HTML or Plain-Text in Outlook, refer to Sending Files with the Mail Express Outlook Add-In.
File integrity checking is enabled by default. With integrity checking enabled, if there is a mismatch between sent and received files, the Add-In will resend the attachment. (A mismatch is typically due to a network error.) If you do not want to use file integrity checking, clear the Perform file integrity check check box. If your server experiences heavy traffic, turning off file integrity checking can provide a slight boost in performance.
To specify what to do when the Mail Express server is not available, under Behavior when Mail Express is unavailable, click one of the following options:
-
Queue emails until Mail Express Server is available—Save the messages in a queue until the connection to Mail Express Server is restored, then send the emails.
-
Send emails via Outlook without Mail Express—Send the emails through Outlook without Mail Express managing the attachments.
-
Allow sender to specify behavior—Display a prompt when the connection to the Mail Express Server is lost and ask the user to specify whether to wait for connectivity to the Mail Express Server or send the email immediately without Mail Express managing the attachments.
Click Save to save your changes, or click Restore to reset the boxes to their previous setting. If you navigate away from the page without clicking Save, your changes are discarded.