Internal users can send invitations to external users to create a Drop-Off portal account. If the Mail Express administrator has enabled Active Directory, invites can be used to create internal users.
If the Send Invites link does not appear when you log in to the Internal Portal, the administrator has not enabled that feature either on your account or globally for all Internal Users.
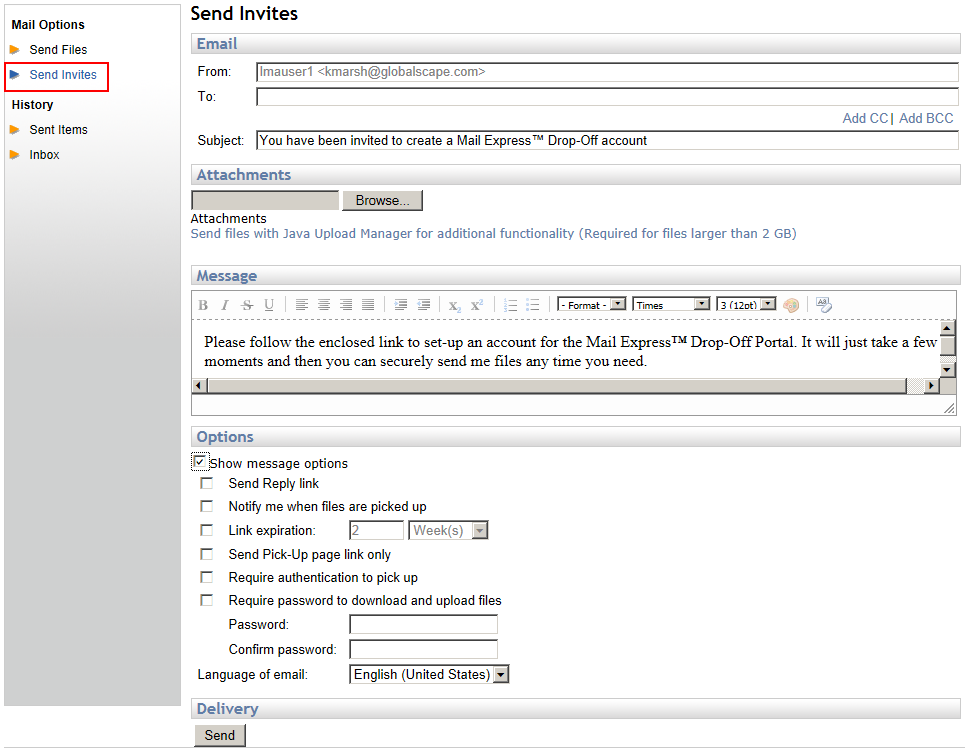
To send invitations with the Internal portal
Do one of the following:
Open a web browser and navigate to the web address of the Internal web portal (e.g., https://mymailexpress.org/internal).
Open a web browser and navigate to the web address of the default landing page (e.g., https://mymailespress.org). If a welcome page appears and displays icons with which to connect to the Drop-Off portal or Internal Portal, click Internal Portal.
Log in. The Send Files page appears.
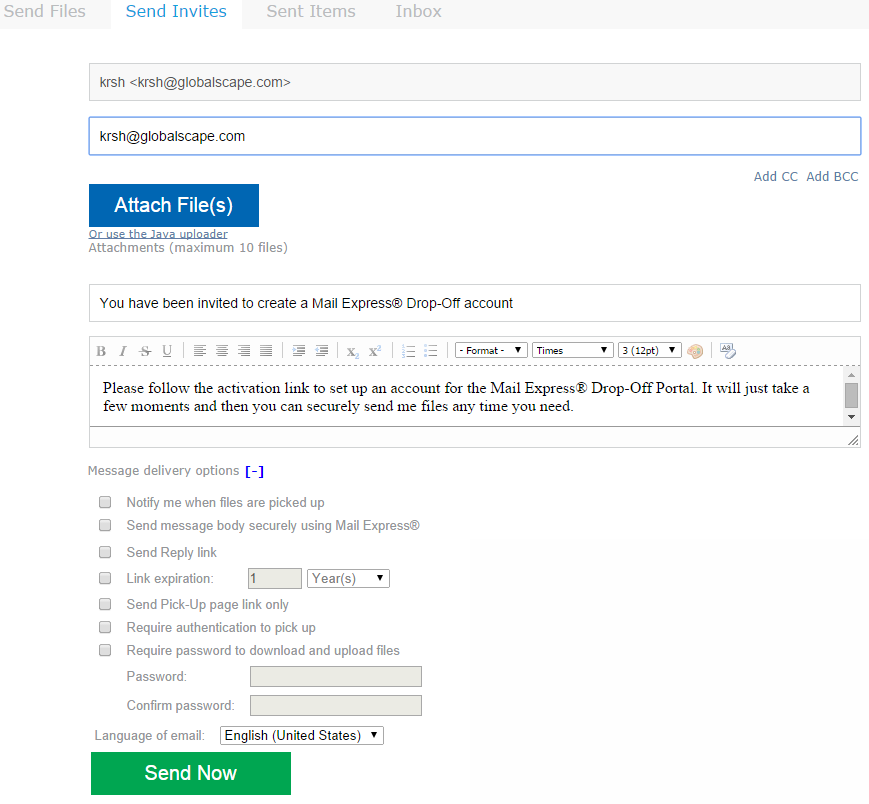
The From box displays the sender's (your) email address. In the To box, provide the recipient's email address. Multiple email addresses can be separated by commas or semicolons. Any other delimiters, such as semicolons will result in errors. Click Add CC and Add BCC to add courtesy copy or blind courtesy copy recipients.
In the Subject box, the text "You have been invited to create a Mail Express® Drop-Off account" appears. You can change this text, if necessary. You are allowed up to 256 characters.
The Message box contains text instructing the recipient to click the link in the email to set up an account. You can edit this text as necessary. (Refer to Sending Files Using the Internal Portal, if necessary.)
More options may be available depending on the administrator's settings. Click the plus sign next to Message delivery options if you want to specify the following message options specific to this email:
Notify me when files are picked up—Select this check box to receive an email when the recipient downloads the files that you sent.
Send message body securely using Mail Express—Select this check box to encrypt the email message body.
Send Reply link—When the Mail Express administrator has enabled this option, recipients can click a link in the email to reply to your email.
Link expiration—Select this check box if you want to specify an expiration that is more strict that what is defined on the server.
Send Pick-Up Page link only—Select this check box if you want to send only a link to the Pick-Up Page, not links to the attachments.
Require authentication to pick up—Select the check box to require the recipient to log in to their Mail Express account when they pick up the email. If they do not have an account on Mail Express, they are prompted to create one.
Require passwords to download and upload files—Select this check box and specify a password if you want the recipient to provide a password before being able to download or upload attachments. The sender must provide the password to recipients in a separate email, over the phone, IM, etc.
Language of email—Click the list box to specify the language of the email. The language pack for that language must be installed.
You can attach files to the invite, but it is not required. (Refer to Sending Files Using the Internal Portal, if necessary.)
Click Send.
If the To, Subject, or Message boxes are empty, the send will fail.
To receive a copy of the receipt in email, click email. The email is sent to the address specified in the From box of the email.
The recipient will receive the email with an embedded link to create an account.
When the recipient clicks the activate link (which expires 2 weeks after the email is sent), the create account page opens in their default browser. After they create the external user account (provide a display name and password, then click Create), one of the following occurs:
The Drop-Off portal appears in which the recipient can now send files back to the sender.
If the Mail Express administrator has selected the Require email verification to activate an account check box (on the General User Settings page), Mail Express sends an email to external users with an activation link. The external user must then click the link in the email to activate the account (thus verifying that it is a valid account). After the email address is authenticated, the Drop-Off portal appears in which the recipient can now send files back to the sender
|
|
The appearance of the text at the bottom of the email ("Please follow...") is dependent on the font settings used by the sender and the settings used by the receiving email reader (e.g., Microsoft Outlook settings and Microsoft Word's "Normal.dot" template). The Mail Express administrator can edit the top half of the message ("You have been invited...") using the Mail Express templates. |